Welcome to my Behringer X32 FX Series tutorials. Today we are going to be looking at the Leisure Compressor. Be sure to watch my YouTube video that I released on the Leisure Compressor as it goes along with this blog post!
The Dual Leisure Compressor and the Stereo Leisure Compressor are Behringer X32 Effects that are modeled after the Teletronix LA-2A Classic Leveling Amplifier. This is by far one of the most popular compressors on the market in both hardware form and plugin form. If you haven’t heard the history of the LA-2A compressor, it is a very interesting read, take a look at the history here. The LA-2A is an optical compressor using a ‘T4 Photocell’ and because of the interesting attack & release characteristics of that makes it a flawless compressor to use for vocals and bass guitar.
The ease of use with the LA-2A is what I really love about it. There is one knob for the compressor, and one knob for the makeup gain on the original. What is curious, is that Behringer has put two makeup gain knobs on this compressor. Nonetheless, with a basic understanding of what the Leisure Compressor controls do, you will be able to get a great sound out of this effect!
Dual Leisure Compressor & Stereo Leisure Compressor
The Leisure Compressor is offered in both a dual mono and a stereo effect. When the stereo Leisure Compressor is used, the 2nd layer disappears for control. When we use the dual Leisure Compressor, the 1st layer controls Channel A and the 2nd layer controls Channel B.
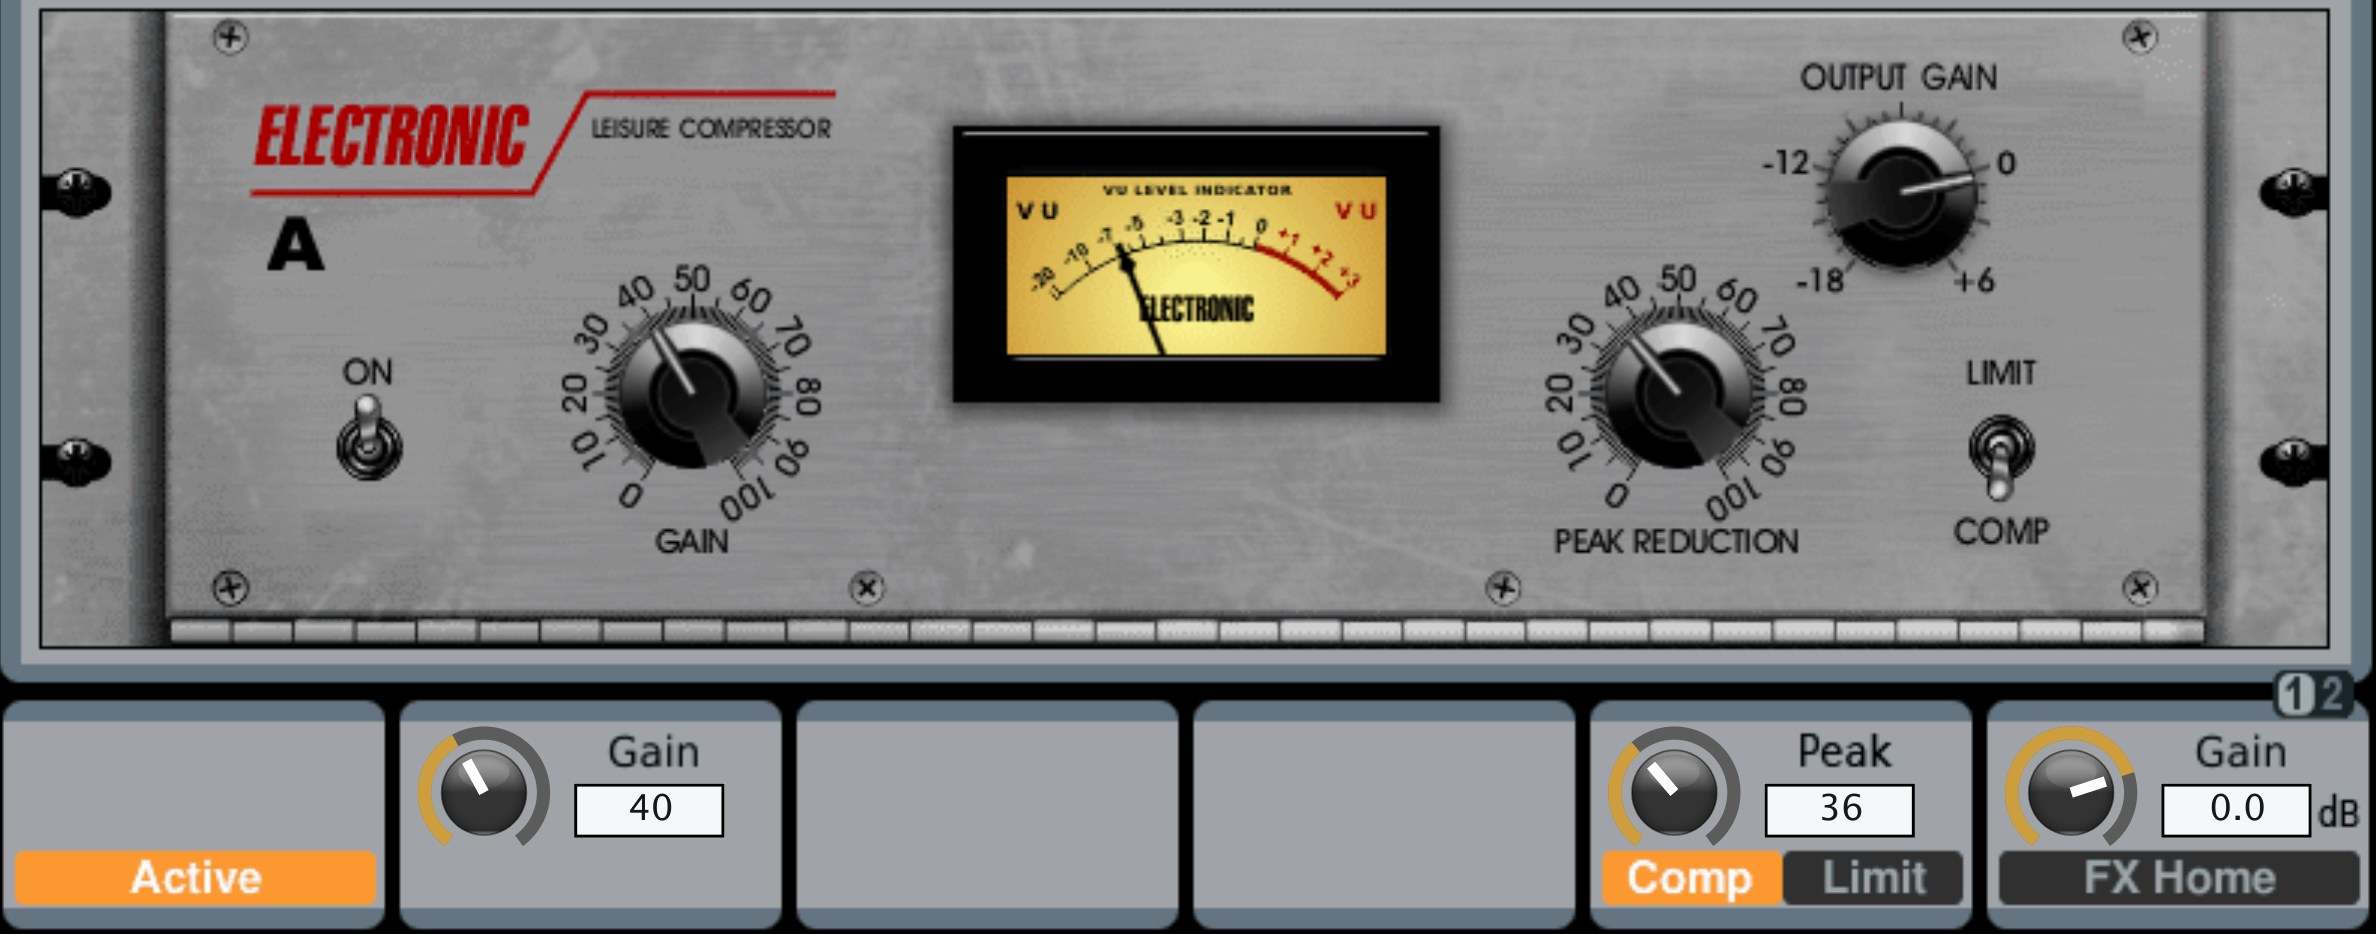
- Active: Allows us to activate or bypass the effect.
- Gain (Output Gain): This is the effect’s true makeup gain, control is from 0-100 in increments of 2. The number values do NOT equal the value in dB, they are more just control numbers.
- Peak (Peak Reduction): Peak Reduction gives us our compression threshold. Turning this to the left down to 0 will result in no compression, turning the peak knob to the right will result in compression increasing in amount as you go up.
- Comp/Limit: The original LA-2A states a 3:1 compression ratio when set to ‘Comp’ and ‘Limit’ results in a ratio of ∞:1. The LA-2A’s T4 Cell was both frequency dependent and program dependent, therefore the compression ratio is nonlinear so these figures are not absolute.
- Gain (Additional Output Gain): This is an additional makeup gain, -18dB to +6dB in 0.5dB increments.
Insert Delay:
- 0.67 ms delay
Leisure Compressor Gain (+another gain?)
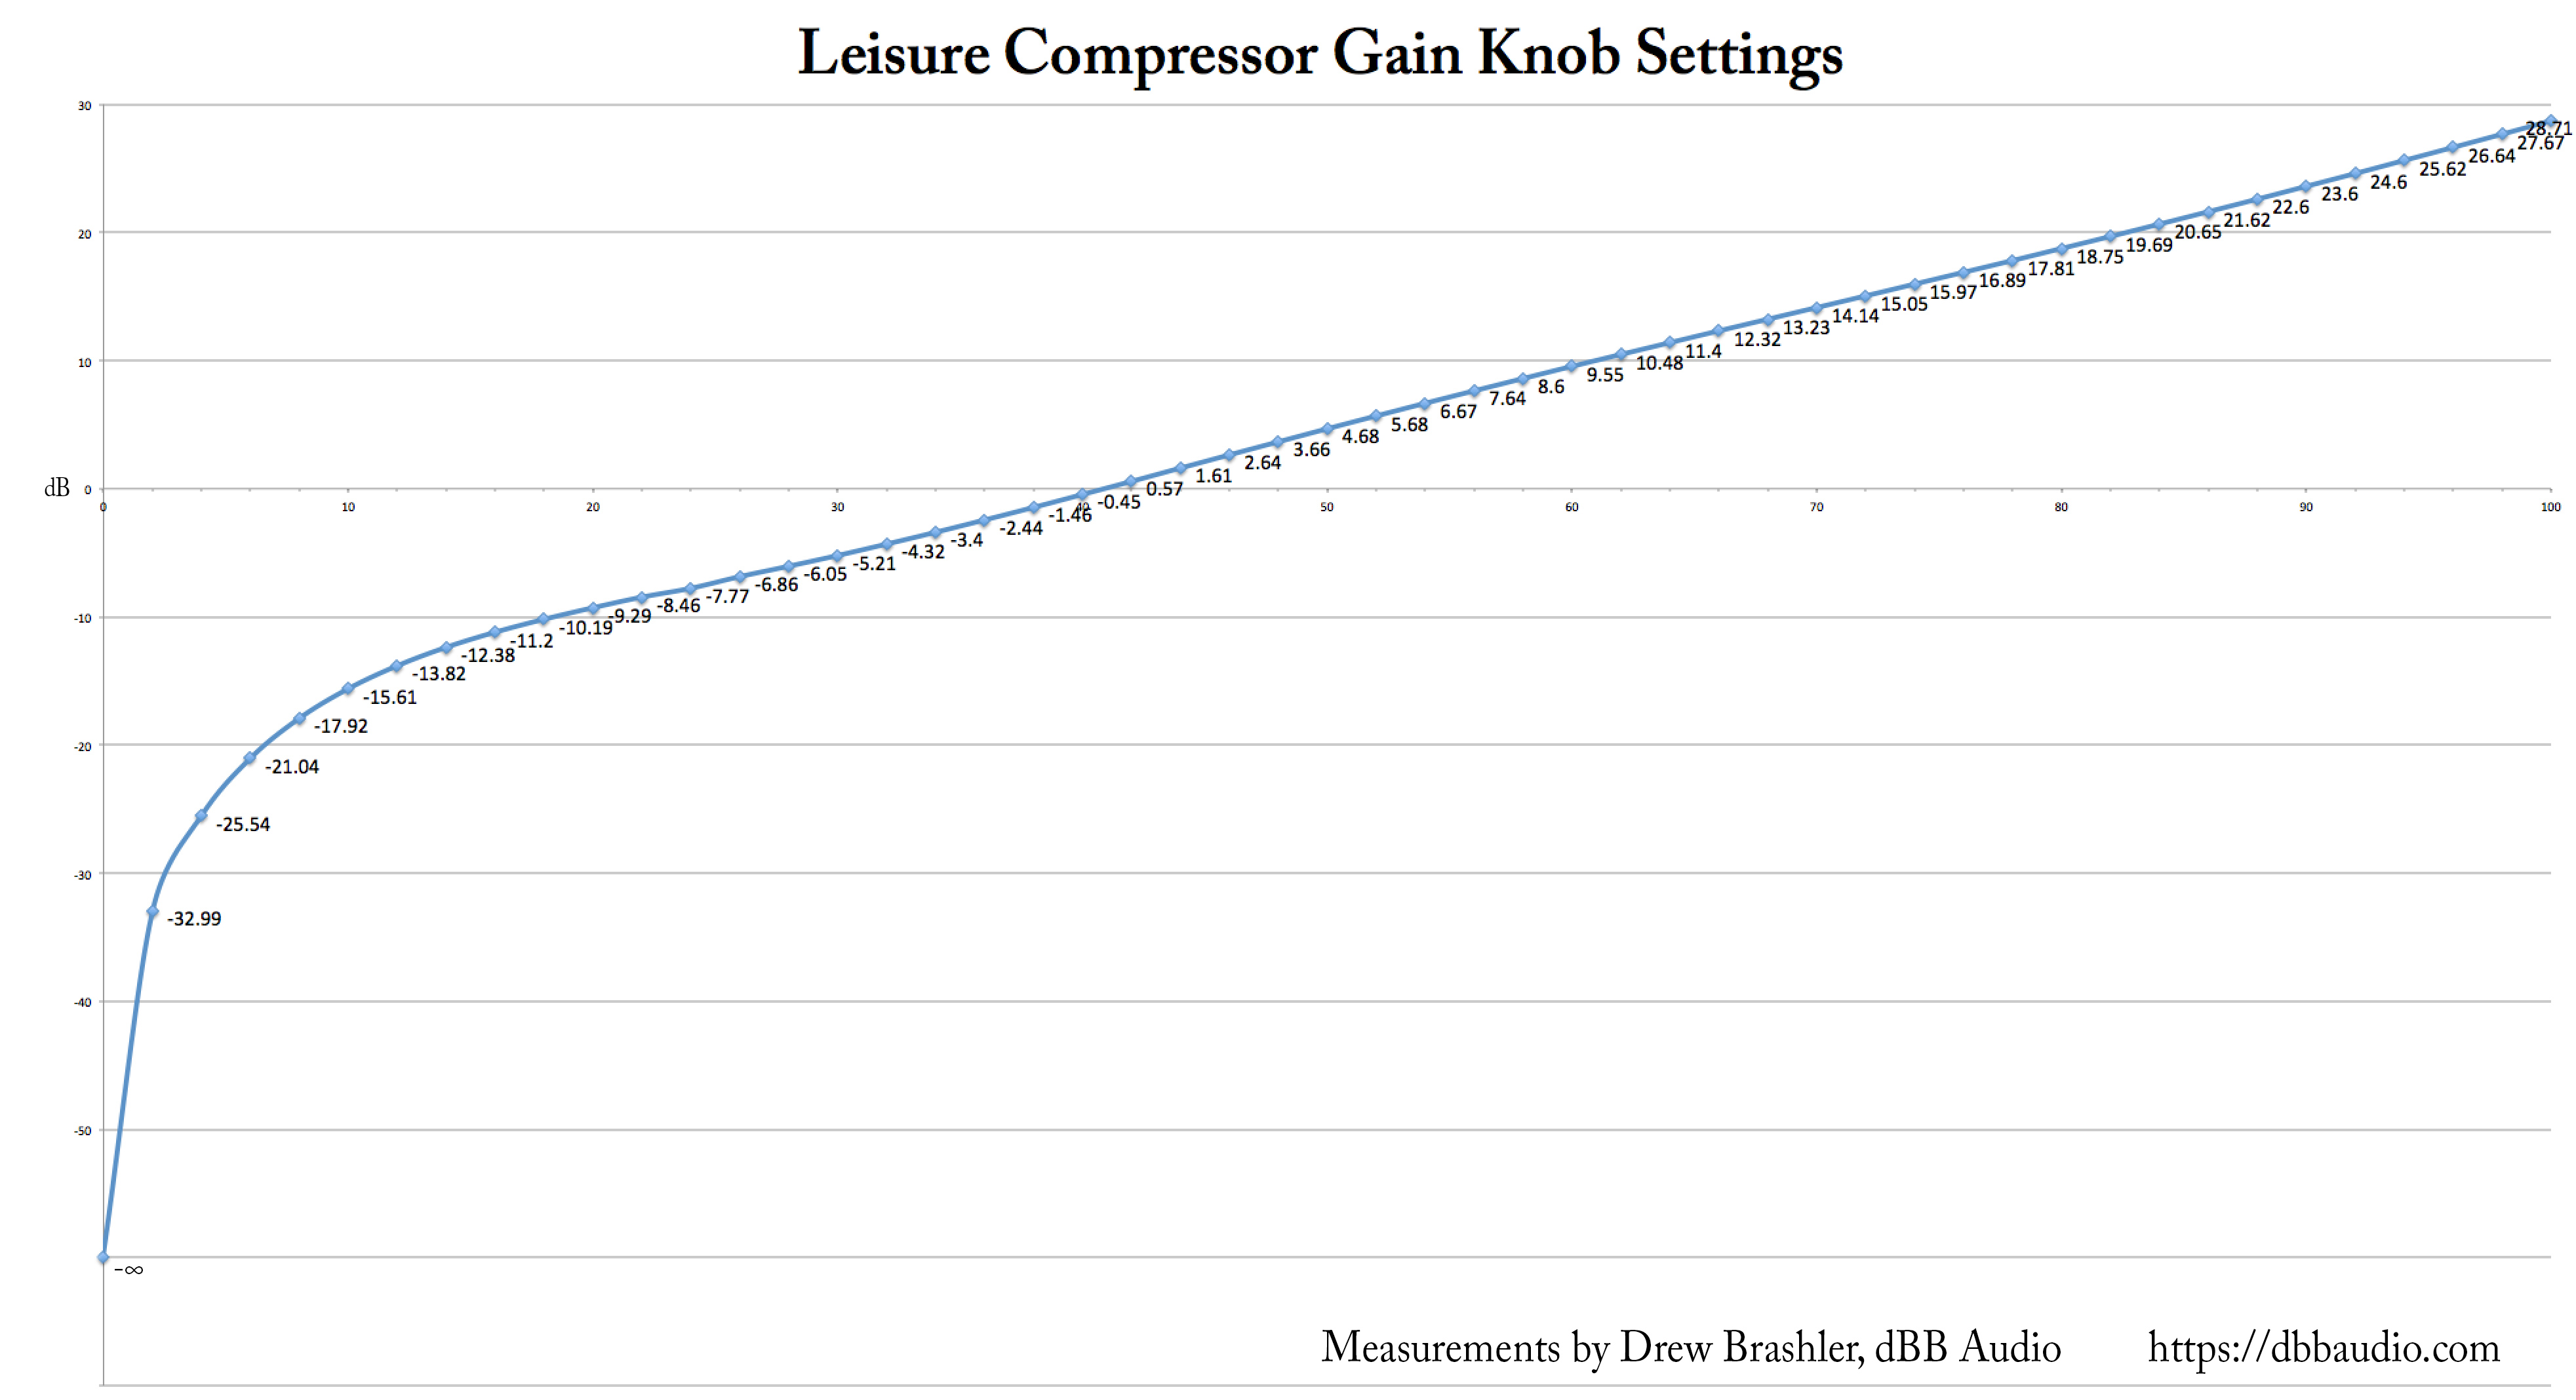
Firstly, both gains are POST compression and have no influence on the compression. Our first gain knob is the main gain setting on this effect. The control number values do NOT equal the value in dB. When it is set to 0, that results in NO audio passing through the effect. A Gain setting of 40 results in unity gain (-0.45dB loss) and when put to a gain setting of 100, it will result in a +28dB gain. I have made a below showing how this gain knob results in dB gain or reduction. The setting is logarithmic in nature from settings 0-20, then above 20 it takes on a more linear shape raising +1dB per every +2 Gain setting.
I have included the values of the chart above that you can take a closer look at here:
We will see that there is an additional gain knob on the right side of the effect. This gives us another makeup gain control of -18dB to +6dB in 0.5 increments. I have not been able to measure or distinguish any difference between using the first gain knob vs. the second gain knob. The only thing I am able to show is that the first gain knob has a variable gain from -∞ to +28dB, where the second gain knob has -18dB to +6dB in controlled 0.5dB steps. With the compressor able to give close to 25dB of compression, I would be going to the first gain knob if applying a lot of compression.
Leisure Compressor Peak Reduction
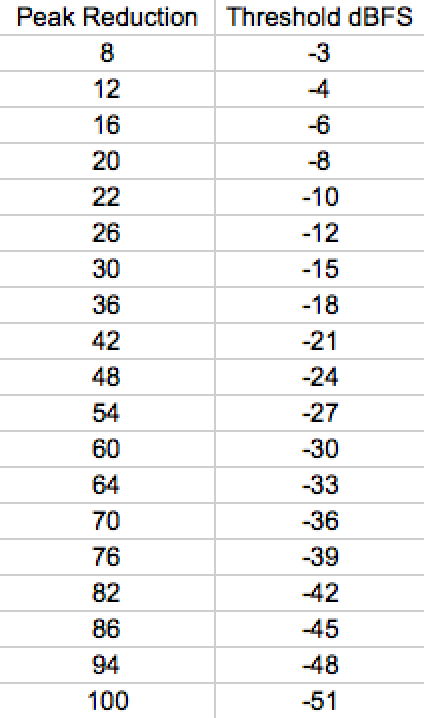
This is where the real magic happens with the effect. We can get up to 24dB of compression/limiting using the Leisure Compressor! The threshold of the compressor is set via the Peak Reduction knob. Turn to the left and the threshold raises, resulting in less compression. Turn to the right and the threshold lowers, resulting in more compression. With -18dBFS being what I consider unity level on the console, the Peak Reduction would need to be set to 36 to have the threshold start compressing a unity level input.
Just remember:
- More compression = Turn Right
- Less compression = Turn Left
Compression vs. Limiting
The LA-2A’s T4 Cell was both frequency dependent and program dependent, therefore the compression ratio is nonlinear so these figures are not absolute. However when it is set to ‘Comp’ the ratio should be around 3:1 and when it is set to ‘Limit’ the ratio should be around -∞:1.
Leisure Compressor Attack Time
The attack time is frequency dependent, but I have measured attack times ranging from 10ms to 30ms.
Leisure Compressor Release Time
The release times are program specific and frequency dependent, so I am going to quote the original Teletronix LA-2A manual: “a release time which requires about 60 milliseconds for 50% release, and then a gradual release over a period of 1 to 15 seconds to the point of complete release.” I have verified that this is very close to the results that I am getting from the Leisure Compressor however sometimes after hitting the compression a LOT I have timed 20 seconds for a full release.
Using the Leisure Compressor
My Starting Settings: Gain: 40, Peak: 36, ‘Comp’ setting, and last Gain knob to 0.0
Have I mentioned that I love this compressor? By far my favorite compressor to use on vocals. When initially using this, I would set the Gain knob to 40, the Peak knob to 36 and the last Gain knob to 0.0. Then start passing some audio through it and make sure it is active. Because we know the threshold levels of the Peak Reduction knob, I would look at what level your channel is at and adjust the Peak knob until you start getting some compression! The VU meter on the effect screen shows the amount of gain reduction that is happening. You will want to adjust either gain knob to match the amount of gain reduction that you are achieving. That’s it! That’s all! Super easy!
On vocals this compressor is beautiful, you can really squash vocals with this compressor and still have them sound fairly natural, so don’t be too shy with your compression! Because of the longer attack time and longer release time, this is great for bass guitar too.
The compression and limiting setting you can choose when you are listening to it. There is a large audible difference between the two, so listen and choose which you like more for that specific channel! You will typically achieve 1-3dB more compression with the ‘Limit’ setting than you will with the ‘Comp’ setting.
Want to see more Effects Tutorials?
To view more of my Behringer X32 Effects Tutorials, click here: dBB Audio FX Series


