Welcome to my Behringer X32 FX Series tutorials. Today we are going to be looking at the Sound Maxer. Be sure to watch my YouTube video that I released on the Sound Maxer as it goes along with this blog post!
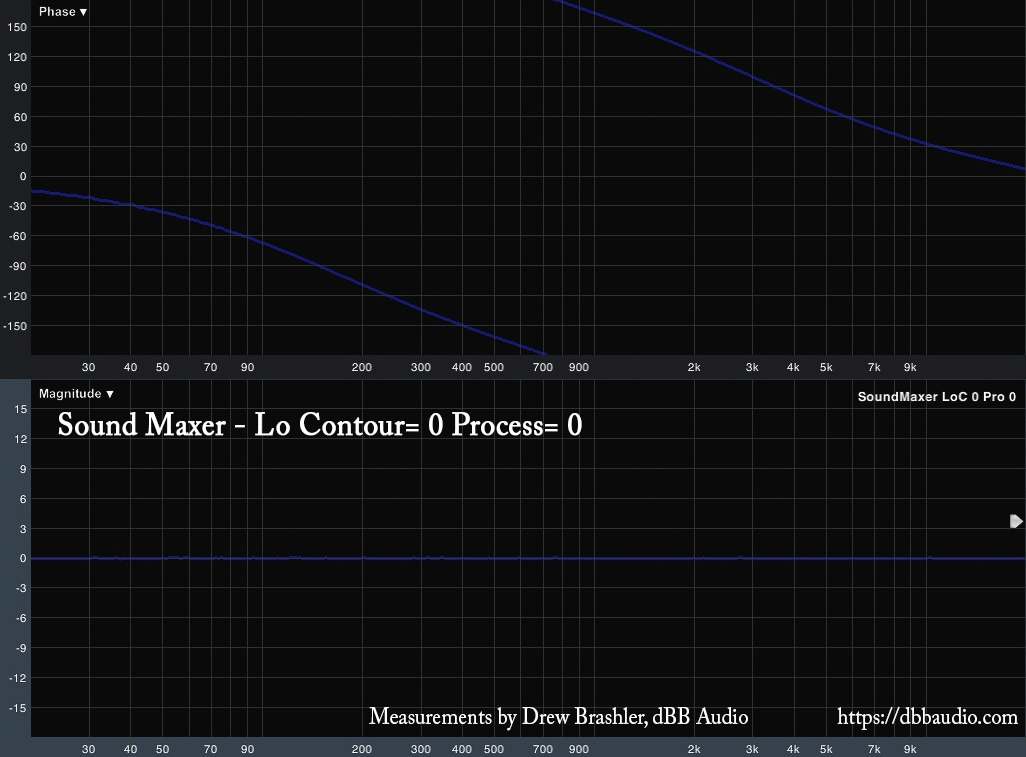
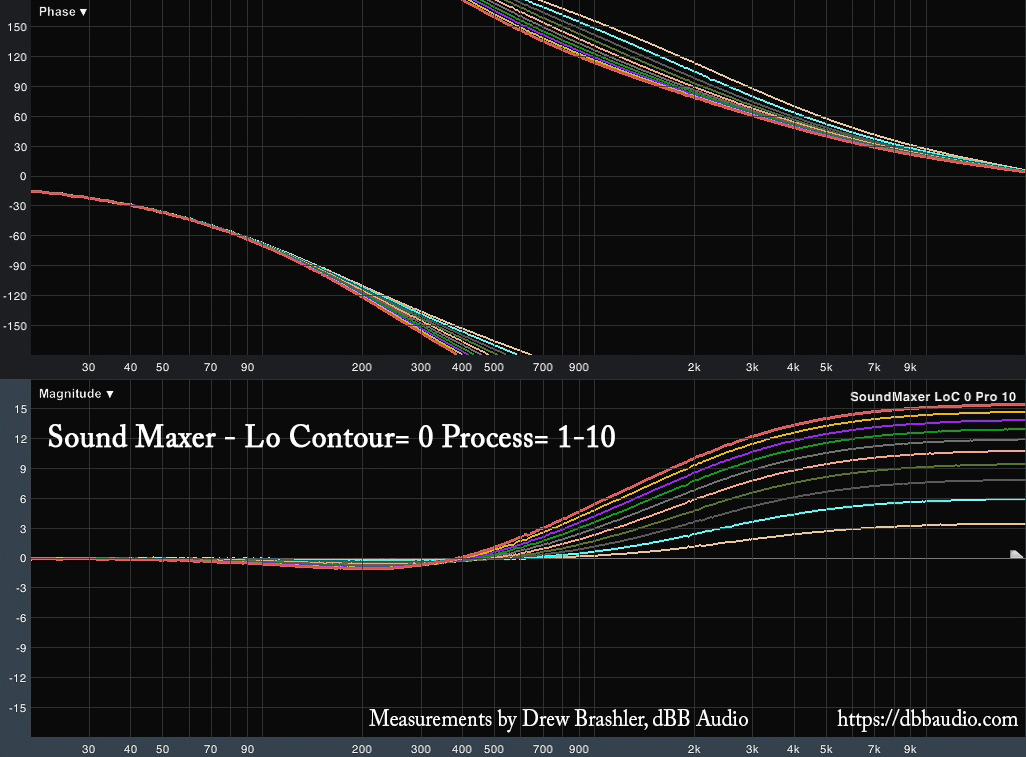
The Sound Maxer is a Behringer X32 Effect that is an audio enhancer. This effect is emulated after the BBE 482i Sonic Maximizer. The original theory behind the Sonic Maximizer is that the low frequency of a speaker would reach the listener slightly before the high frequency. This is because the woofer is placed at the front of a speaker cabinet and the tweeter is placed slightly back into the cabinet to give space for the horn. The Sonic Maximizer was designed to slightly delay the low end so that the high end would arrive at the same time as the lows creating a better listening experience. In actual reality, the low end barely delayed, and the high end is slightly delayed, in fact, 20kHz is about 360º out of phase (aka one wavelength delayed), and 20Hz is 15º out of phase as we can see below:
Another thing to mention is that the hardware version of the BBE Sonic Maximizer is not a true bypass when you deactivate the effect. So, when someone would go and insert it into their signal chain, and deactivate the effect, it would roll off the bottom two octaves of low end. Then when the effect was activated again, the low end would come back. Tricky tricky!
Thankfully, Behringer has decided to give this effect a true bypass, so no gimmicks here!
Behringer Sound Maxer
There is a single layer for the controls that we can see here:
- Lo Contour – Gives us our low-frequency processing amount for Channel A.
- Active – Allows us to deactivate the effect for Channel A.
- Process – Gives us our high-frequency processing amount for Channel A.
- Gain – Allows us to add or reduce gain for Channel A. Contol allows for adjustment from -12dB to +12dB in 0.5dB increments.
- Lo Contour – Gives us our low-frequency processing amount for Channel B.
- Active – Allows us to deactivate the effect for Channel B.
- Process – Gives us our high-frequency processing amount for Channel B.
- Gain – Allows us to add or reduce gain for Channel B. Contol allows for adjustment from -12dB to +12dB in 0.5dB increments.
Insert Delay
- 0.67ms delay
Default Settings
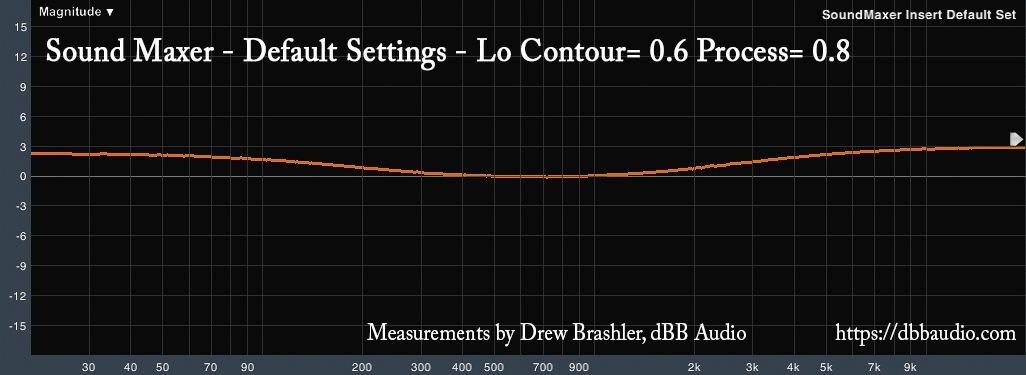
Default settings for the Sound Maxer is Lo Contour at 0.6 and Process at 0.8. We can see that below:
Lo Contour
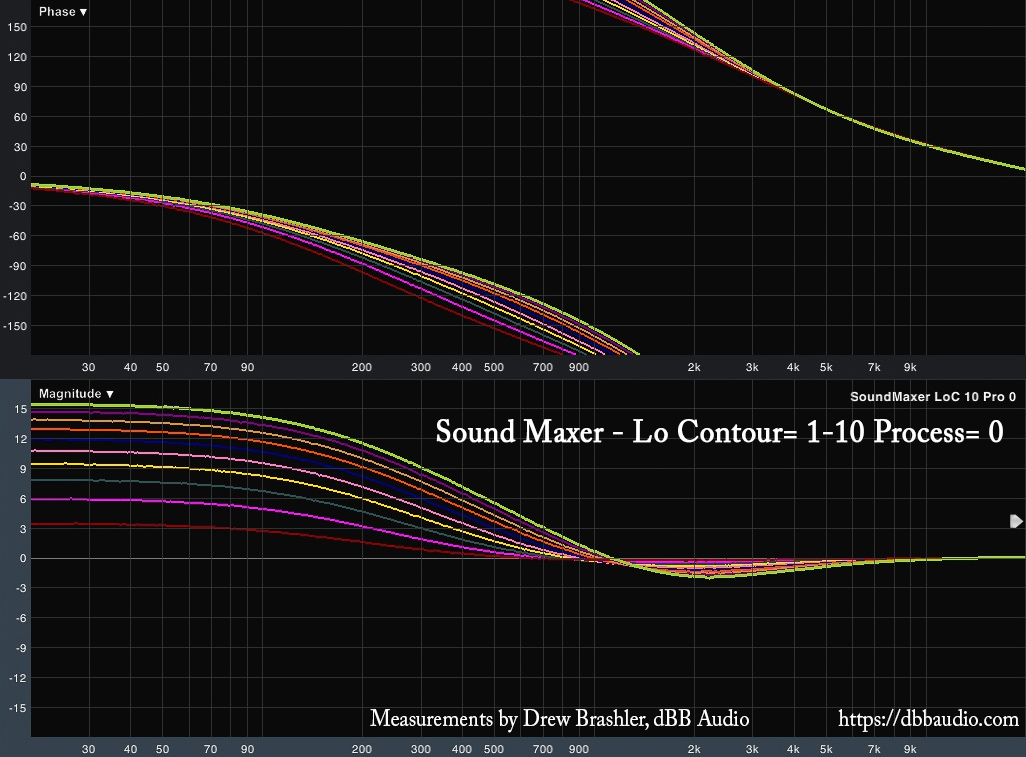
Lo Contour is a boost/adjustment for the low end. We can see by the control there is only one parameter that we can adjust for this. Below I have shown the Lo Contour adjustment for 1 through 10.
- Lo Contour 1 = +3.5dB
- Lo Contour 2 = +6.0dB
- Lo Contour 3 = +7.8dB
- Lo Contour 4 = +9.5dB
- Lo Contour 5 = +10.5dB
- Lo Contour 6 = +11.7dB
- Lo Contour 7 = +12.9dB
- Lo Contour 8 = +13.8dB
- Lo Contour 9 = +14.6dB
- Lo Contour 10 = +15.4dB
Process
Process is a boost/adjustment for the high-frequency. We can see by the control there is only one parameter that we can adjust for this. Below I have shown the process adjustment for 1 through 10.
- Process 1 = +3.4dB
- Process 2 = +5.9dB
- Process 3 = +7.8dB
- Process 4 = +9.4dB
- Process 5 = +10.7dB
- Process 6 = +11.9dB
- Process 7 = +12.9dB
- Process 8 = +13.8dB
- Process 9 = +14.7dB
- Process 10 = +15.4dB
Lo Contour & Process Together
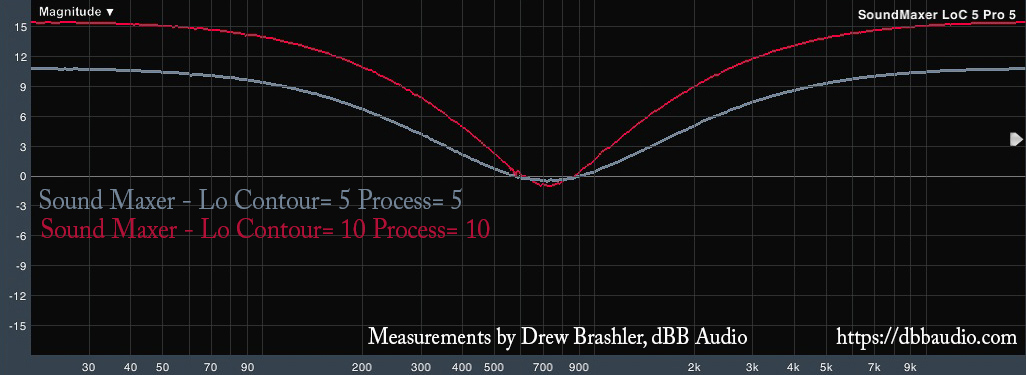
We are able to use the Lo Contour and Process adjustments together, and then by using the gain you could make a high & low-frequency boost and then by bringing the gain down, you would apply a mid-freqency cut. Below I show Lo Contour & Process at 5 and again at 10.
Practical Use of the Sound Maxer
The thing that I love about the Sound Maxer is that the controls are very simple, and a little bit goes a long way. As you will see in the YouTube video that I linked at the beginning, you can place this on the LR Bus as a polishing tool if you wish. I was able to get some great sounds with using this on a thin sounding guitar and a weak sounding keyboard. But, you could also do similar results using channel EQ.
Want to see more Effects Tutorials?
To view more of my Behringer X32 Effects Tutorials, click here: dBB Audio FX Series
