De-Feedback was all over my feed. Big shows, real engineers I respect were talking about it. I’d seen enough that I wanted to test it myself, so I bought the Option 1 with the recommended Focusrite Scarlett Solo 4th Gen and put it through its paces on two corporate shows in large convention center ballrooms.
The results were better than I expected. Using De-Feedback, I was able to get a solid 10 dB more gain before feedback, both on stage and even standing in front of the PA with a lav clipped to my shirt. That’s a real difference in rooms that fight you the whole time.
This post covers what De-Feedback actually does, how the two hardware packages compare, and the real latency and stability data I measured on the Option 1 with a Focusrite Scarlett Solo 4th Gen. If you are wanting to jump right into De-Feedback and get it working with your Behringer X32, check out this blog post about using the Alpha Labs De-Feedback Option 1 setup with the Behringer X32.
Take a look at my full YouTube Video on the testing and demo of De-Feedback.
What De-Feedback Actually Does
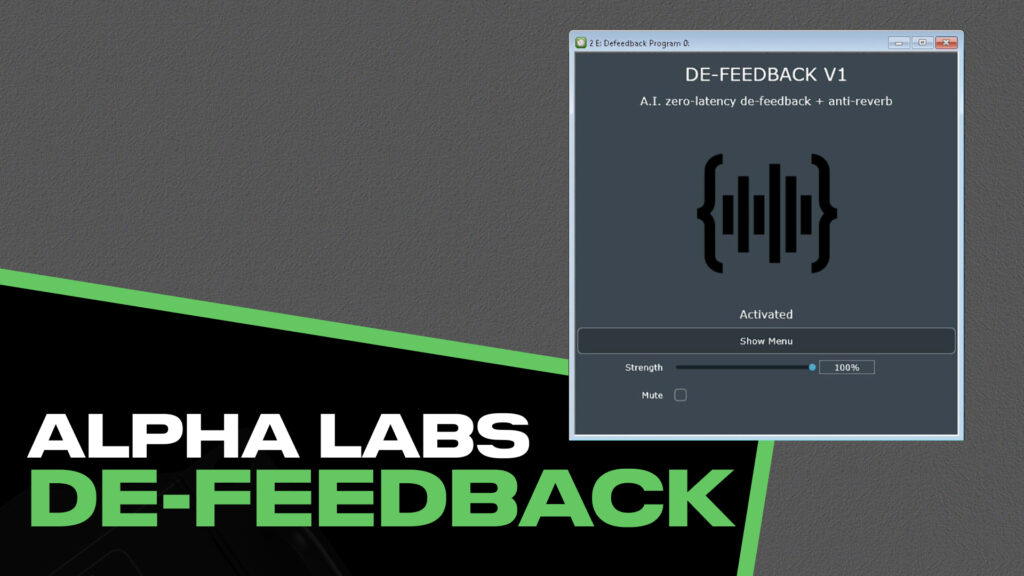
De-Feedback is an AI-powered VST3 plugin built for live sound. It reduces microphone feedback, removes room reverb, and reduces background noise, all with essentially zero added plugin latency beyond your hardware I/O. There are no EQ notches being cut, no gates, no thresholds to set.
The way it works is similar to how a balanced XLR cable rejects noise. What the plugin does is analyze the audio in real time, identify what is voice versus what is room noise and feedback, invert the polarity of the non-voice content, and combine that back with the original signal. The room noise and feedback cancel out, leaving the vocal behind.
One thing to understand right off the bat: De-Feedback is completely transparent to your EQ. If you do a bad job EQ’ing your microphone, it’s going to continue being a bad EQ on the output of De-Feedback. The plugin doesn’t change your frequency response. I verified this with Smaart transfer function measurements comparing pre and post De-Feedback, and the EQ curve was essentially untouched. Ring out your mic and do your EQ work as you normally would, then activate De-Feedback on top of that. If you need help with that process, check out my videos on how to prevent feedback and how to ring out a monitor wedge. What De-Feedback gives back to you is the EQ bands you would have otherwise burned fighting feedback nodes.
On a Yamaha CL5 with an 8-band PEQ and three notch filters, I normally have to use a lot of those bands cutting out problem frequencies. With De-Feedback running, I was down to two notch filters and one parametric band. That’s a significant difference.
Alpha Labs recommends starting the ‘Strength’ setting at 100%, and in some rooms that would be a perfect starting point. My happy spot ended up at 70%. At 100% in the room I was mixing, it felt like a little too much processing and noise reduction, so backing it off made it seem very natural. At 70%, you still get very strong feedback rejection and the vocal sounds more transparent and open.
Using Smaart to compare the signal pre and post De-Feedback, I measured approximately -10 dB of noise reduction at 100% strength while speaking. AC units, loud projectors, ambient room noise, a lot of that cleans up underneath the voice. I was using Waves WNS as my noise reduction tool on shows before this. With De-Feedback running, I didn’t need it.
Why the Hardware Matters
De-Feedback is extremely CPU-intensive. This is not something you can drop into your existing show laptop running Chrome and Spotify and expect reliable results at low latency. Alpha Labs spent about a year testing hardware before releasing their recommended packages, and the reason they sell pre-configured computers isn’t just convenience. It’s because the whole system has to be tuned together: the computer, the BIOS configuration, the Windows install, the audio interface, the ASIO driver settings, the buffer size, the sample rate, all of it.
Alpha Labs sells their hardware through a fulfillment partner called SNUC. You pay SNUC for the computer and separately purchase your De-Feedback license through Alpha Labs. The computers ship with Windows 11 IoT pre-installed, and this is by far the lightest Windows install I have ever seen. On the Option 1 I purchased, there were literally about nine programs installed. No bloatware, no telemetry apps, nothing that would interrupt the audio. You plug it in, it boots up, VST Host opens automatically, and De-Feedback loads with your previous configuration ready to go.
You can also run De-Feedback on your own computer. Alpha Labs fully supports it and lets you download the plugin in trial mode to test before buying.
Option 1 vs Option 2
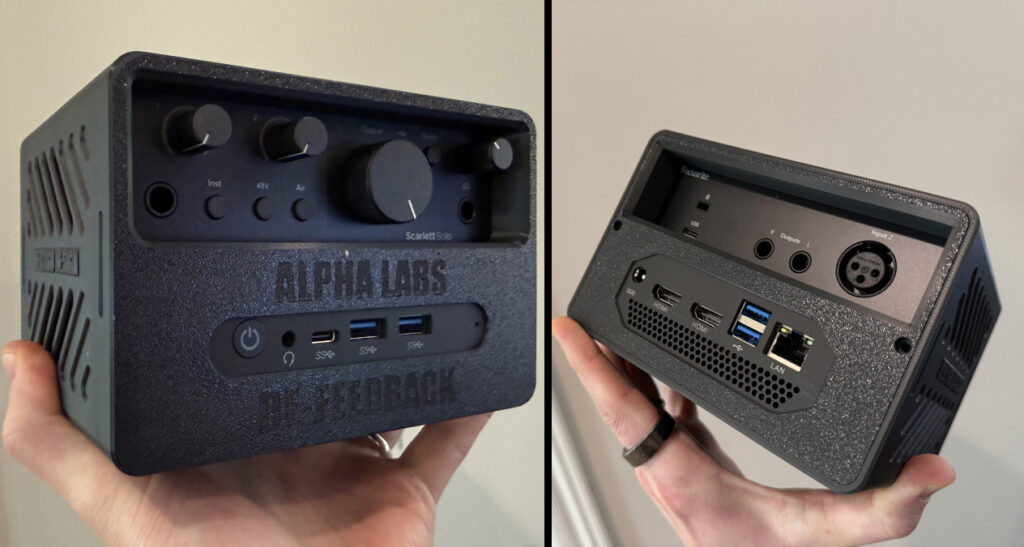
The Option 1 NUC mounted alongside the Focusrite Scarlett Solo 4th Gen in a 3D Printed case.
The Option 1 is a small NUC-style mini PC running an Intel N95-class processor, paired with a Focusrite Scarlett Solo 4th Gen. It’s small enough to fit in a 1U rack space, and I found a 3D printed case on Cults3D that holds both the NUC and the Scarlett Solo together nicely. At 48 kHz with a 16-sample buffer and Safe Mode on in the Focusrite ASIO driver, Alpha Labs rates it at 4.9 ms roundtrip latency. My own measurements came in at 4.83 ms, which lines up closely. One instance of De-Feedback at those settings ran at around 33% CPU.
Option 1 can also run two instances if you increase the buffer to 32 samples, which brings roundtrip latency to approximately 5.5 ms. Still well within the range where you won’t notice any delay. I’ll cover the two-instance setup in a dedicated post.
The Option 2 runs an Intel Core i7-13620H processor and is paired with a Focusrite Scarlett 18i16 4th Gen. Same 1U rack form factor, same 4.9 ms roundtrip latency at the same settings. The difference is capacity: Option 2 can run up to four mono instances at that low latency. (Alpha Labs FAQ states that Option 2 can run up to four mono, or two mono and one stereo, or two stereo instances. I have not been able to test this yet.) Push it to a larger buffer and you can run up to eight mono instances at around 10 ms roundtrip.
Option 2 is also more stable when a monitor, keyboard, and mouse are connected during the show. The Option 1 can have temporary audio glitches if you connect peripherals while it’s running, which is worth knowing if you want to keep a screen attached during the set. Alpha Labs has also indicated that future versions of De-Feedback may require more CPU, so Option 2 gives you more runway for that.
| Option 1 | Option 2 | |
| CPU | Intel N95-class | Intel Core i7-13620H |
| Paired Interface | Scarlett Solo 4th Gen or 2i2 | Scarlett 4i4, 16i16, 18i16, 18i20 |
| Instances at 4.9 ms | 1 instance of De-Feedback | 4 instances of De-Feedback |
| Max instances (higher latency) | 2 (at ~5.5 ms) | Up to 8 mono (at ~10 ms) |
| 1U rack compatible | Yes | Yes *Request ‘Thin NUC’ |
For most church applications with a single speech bus, Option 1 will do exactly what you need. Option 2 makes sense when you need multiple independent instances, say a separate instance for a pastor mic, another for a worship leader, and a stereo instance on a group.
Setting Up the Option 1
De-Feedback works as an analog insert. You’re sending a signal out of your mixer, into the Scarlett, through the plugin, and back to your mixer. The sample rate on the De-Feedback computer does not need to match your mixer’s internal sample rate because you’re working in the analog domain at the insert point. If you’re on a Yamaha console running at 96 kHz, it doesn’t matter. Set De-Feedback to 48 kHz and use an analog send/return.
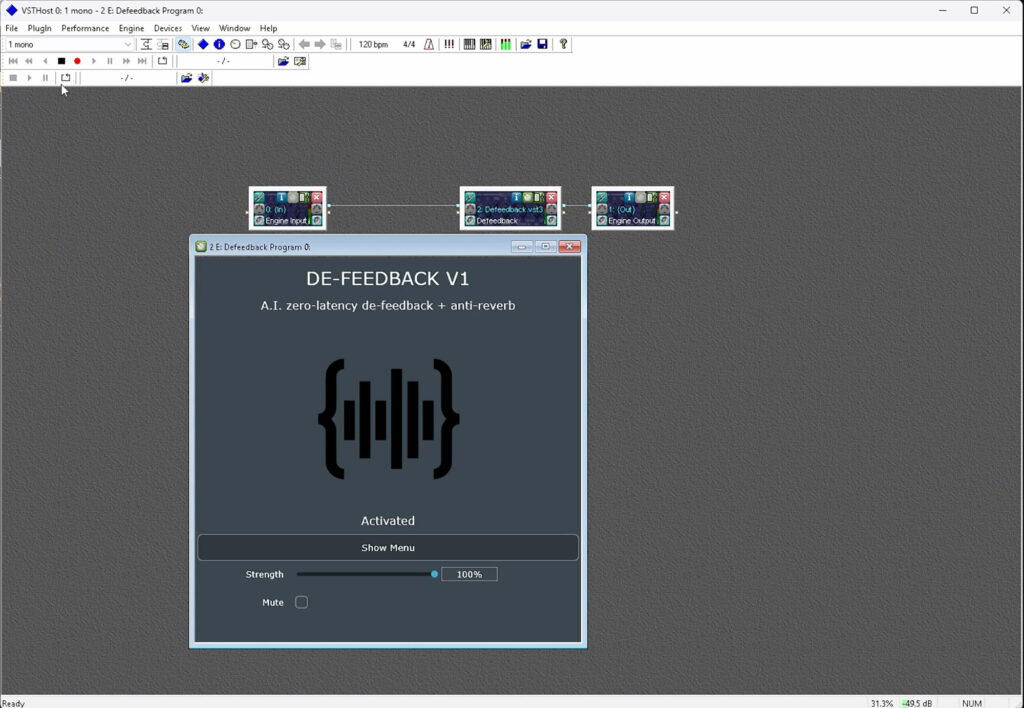
The Alpha Labs De-Feedback plugin running in VST Host on the Option 1.
A few things to get right before your first show:
- Turn on Safe Mode in the Focusrite ASIO control panel. Without it, at small buffer sizes you’ll get pops and clicks.
- Change sample rate and buffer size under Devices > Wave in VST Host, not in the ASIO device settings panel. If you try to change it there, it will snap back to the previous value.
- Use the Input 1 TRS input on the Scarlett Solo, not the XLR input. The Input 2 XLR has about 12.5 dB more gain than Input 1 at line level, which can cause issues. You’ll need TRS-to-XLR adapter cables for both the input and output connections to your console.
- Expect about -6.75 dB of insertion loss when using the Scarlett TRS input with the input gain all the way down and the output all the way up. You can either turn the preamp on the Solo up slightly, or gain it up at the console when it returns. Either approach works.
Inserting on a Bus
For a single mic, insert De-Feedback directly on that channel. For multiple mics that don’t all speak simultaneously, route them to a subgroup, insert De-Feedback on that bus, and let the bus feed your PA.
On one of the corporate shows, I was able to use an automixer on my console to really dial in the mix. I had 4 wireless lavs, 2 podium mics, 6 tabletop mics, and 4 wireless handheld audience Q&A mics, all going into one speech bus where I had De-Feedback inserted. Even the Q&A mics were out in front of the PA. The whole group got the benefit of that single instance, which is a great way to stretch what Option 1 can do.
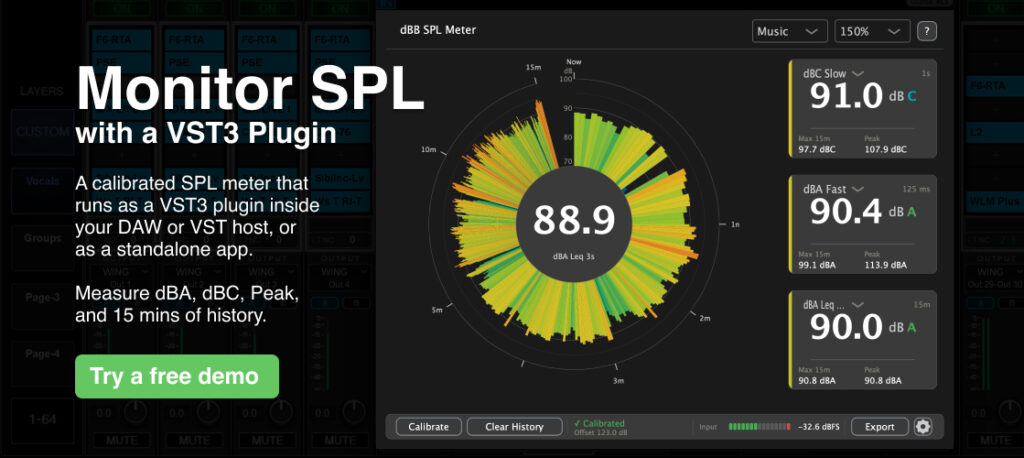
Stop switching apps to check your SPL. dBB SPL Meter does it differently by running as a VST3 plugin where you already are mixing in, your DAW or VST Host. View 15 minutes of volume history in an easy to read radar. Works on Mac and Windows. Check out the free demo today!
Latency and Stability Data
Alpha Labs publishes one reference number: 4.9 ms roundtrip at 48 kHz, 16-sample buffer, Safe Mode on. My measurements confirm it. But I tested every major sample rate and buffer size combination to give you a complete picture.
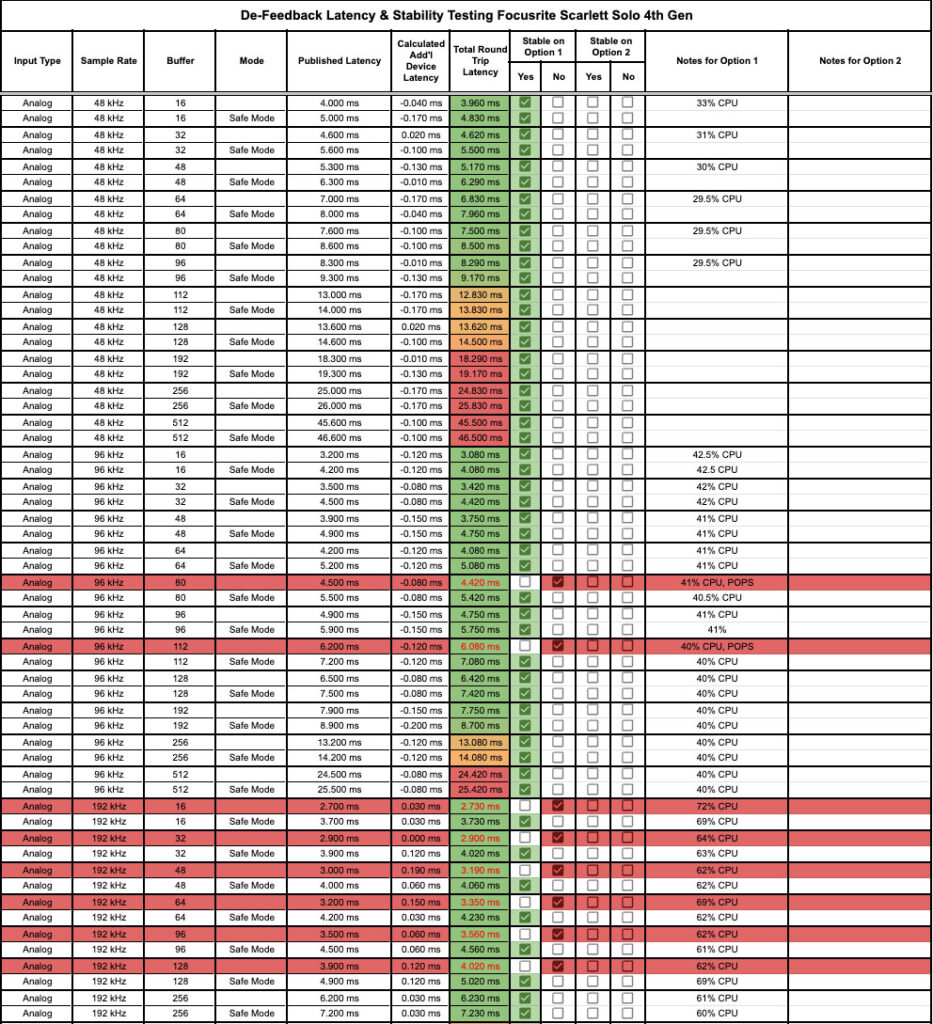
Alpha Labs De-Feedback Option 1 Latency at 48 kHz
At 48 kHz, the Option 1 is stable at every buffer size I tested, with or without Safe Mode. The sweet spot is 16 samples with Safe Mode on at approximately 4.83 ms roundtrip. If you want extra stability margin, 32 samples lands at about 5.5 ms, which is still excellent for a live insert.
Alpha Labs De-Feedback Option 1 Latency at 96 kHz
At 96 kHz, CPU usage jumps to around 41-42% compared to 33% at 48 kHz. Most buffer sizes were stable, but 80 samples and 112 samples without Safe Mode produced pops and clicks. Safe Mode resolved both.
Alpha Labs De-Feedback Option 1 Latency at 192 kHz
At 192 kHz, CPU usage climbs into the 60-72% range and Safe Mode becomes mandatory. Several buffer sizes were unstable without it. I would not run Option 1 at 192 kHz for a show-critical application.
My recommendation: run 48 kHz, Safe Mode on, and start at a 32-sample buffer for your first show. After a solid soak test where everything is running cleanly, try dropping to 16 samples. The latency difference is less than a millisecond, and the extra stability margin is worth more than that on a real show.
Alpha Labs De-Feedback Live Demo
Here’s what it looks like using De-Feedback in a large ballroom, standing in front of the PA.