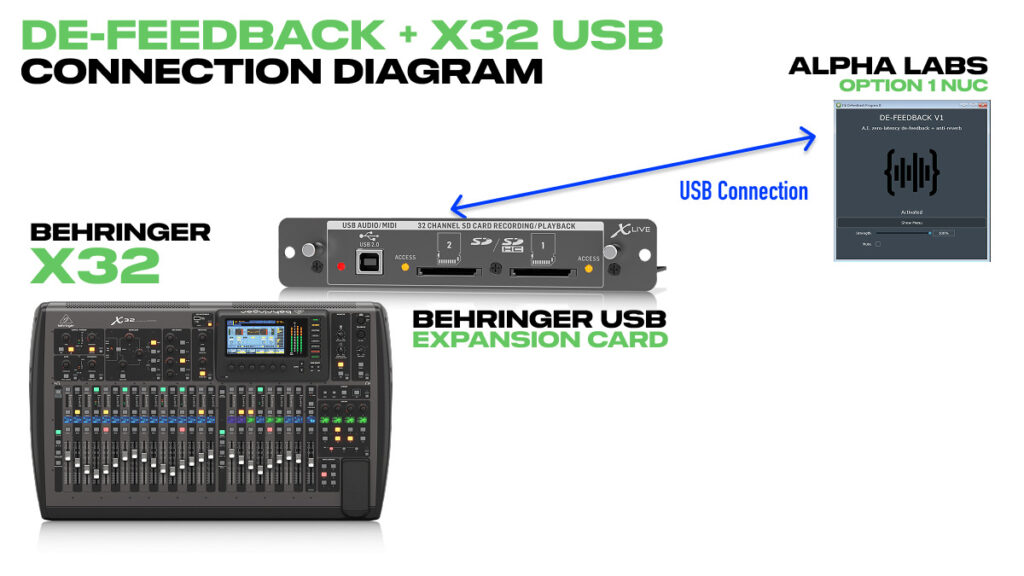
If you have an X-USB or X-LIVE expansion card in your Behringer X32 and you’re not already using the USB connection for broadcast, playback, or multitrack recording to a DAW, you have a built-in path for running Alpha Labs De-Feedback without any additional audio interface.
This post walks through the complete setup for routing De-Feedback through your expansion card. The latency numbers and process are almost identical for the Behringer X-USB, X-LIVE, X-UF and the Midas/Klark Teknik versions of the DN32-LIVE and DN32-USB. The only difference is which ASIO driver you install on Windows. If you’re on macOS, no drivers are required since it uses Core Audio. (NOTE: Alpha Labs De-Feedback is in Beta on MacOS (as of April 13th 2026), and I have found to be very difficult to get stability with the audio. Therefore whenever possible use Windows as it is fully supported on the Windows platform)
For background on what De-Feedback does and how it performs, check out my De-Feedback demo and latency testing post. If you’re using a separate audio interface like the Focusrite Scarlett Solo instead of an expansion card, see my De-Feedback with the Behringer X32 post.
Watch the full walkthrough in my De-Feedback X32 USB setup video.
Who This Is For
This setup is ideal if your expansion card’s USB connection is currently unused. If you’re already using USB for broadcast feeds, DAW playback, or running tracks, I’d recommend using the aux insert method with a dedicated audio interface like the Focusrite Scarlett Solo instead. For best results, the computer running De-Feedback should be dedicated to only that task.
If you have the X-LIVE card and only use the SD card recording function, this can still work. Just know that USB channels 1-8 will be used for the De-Feedback insert loop, so those won’t be available for SD recording in the default routing. You can work around this with User Output routing if you need full multitrack capability, but that’s a more advanced setup.
Console Setup
Before configuring VST Host on the computer, we need to set up the X32’s routing.
Card Tab Settings
Go to ‘Setup’ and navigate to the ‘Card’ tab. You’ll need to layer down to Layer 2 to see these options if you have the X-LIVE card.
Set the card configuration to ’32 in 32 out’. The X-USB and X-UF cards only have this option, but the X-LIVE gives you other choices. For De-Feedback, 32×32 works fine, and you can select less in/out channels if you want, but it does not change the latency.
FOR X-LIVE CARD: Set ‘Playback Config’ to ‘USB Interface’. If this is set to SD card playback, the console will read from the SD cards instead of the USB connection, and De-Feedback won’t work.
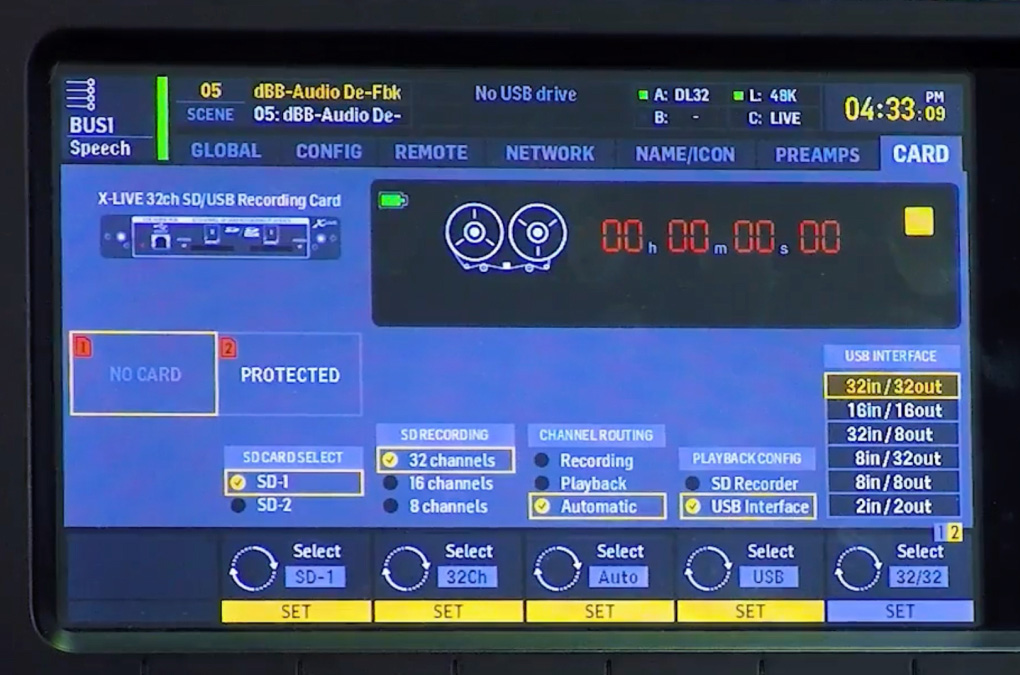
Card tab settings on Layer 2. Playback Config must be set to USB Interface.
Input Routing
Go to Routing and select the ‘Input’ tab (Block Input).
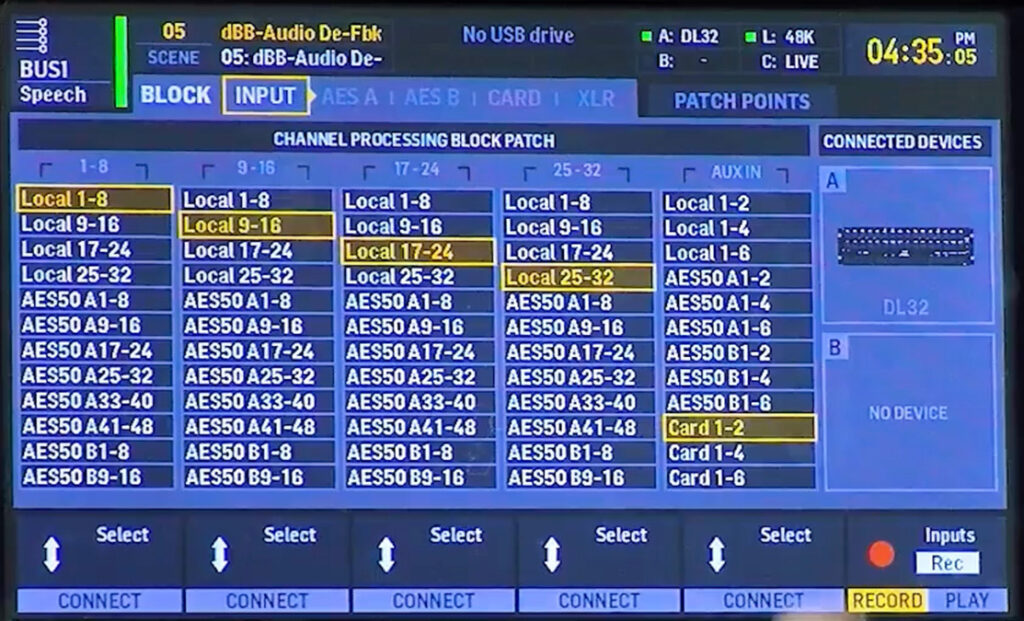
Find ‘Aux In’ and set it to ‘Card 1-2’. This routes the return signal from De-Feedback (coming back through the expansion card) into Aux In 1-2 on the console.
Your other input blocks (Local, AES50, etc.) can stay as they are.
Card Output Routing
Still in Routing, go to the ‘Card’ tab. This controls what gets sent FROM the console TO the computer.
Set Block 1-8 to ‘Aux 1-6/Mon’. This sends Aux Out 1-6 plus Monitor L/R to USB channels 1-8 on the expansion card. For De-Feedback, we only need Aux Out 1 (or 1-2 if running two instances), but this block assignment is the simplest approach.
Aux Output Routing
Go to Routing and select the ‘Aux’ tab.
Set ‘Aux Out 1’ to ‘Insert’. If you’re running two instances of De-Feedback, also set ‘Aux Out 2’ to ‘Insert’.
At this point, the console is ready to interface with the computer.
Computer Setup
Install the ASIO Driver (Windows Only)
Download and install the correct ASIO driver for your expansion card from the product page under ‘Downloads’:
On macOS, no driver installation is needed. The card works with Core Audio natively, and the latency numbers will be similar.
VST Host Configuration
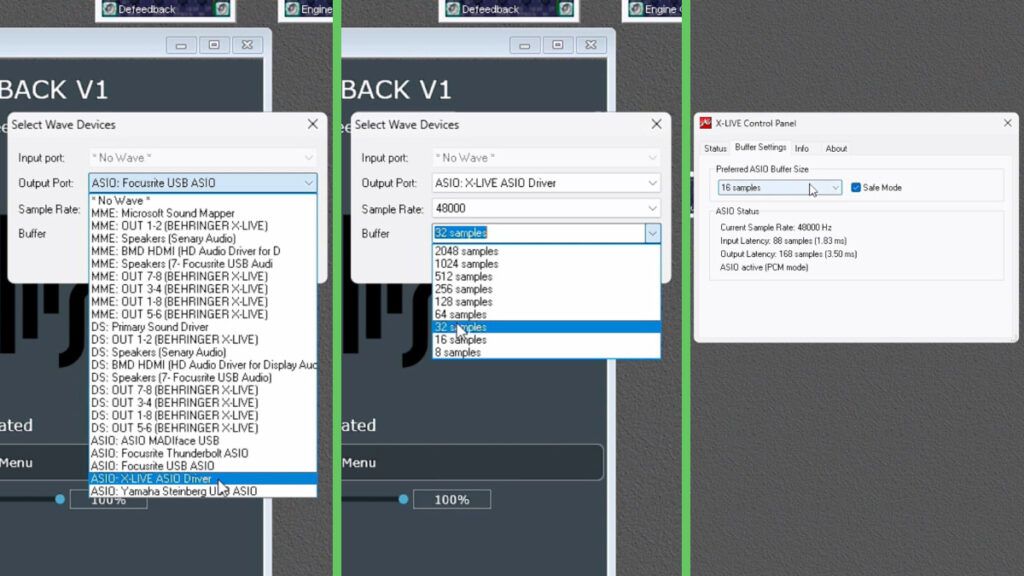
Open VST Host and go to Devices > Wave.
- Input port: Set to ‘No Wave’ (this is correct, don’t worry about it)
- Output port: Select your expansion card’s ASIO driver (e.g., ‘X-LIVE ASIO’)
- Sample rate: Match your console’s sample rate (48000 Hz or 44100 Hz)
- Buffer: Start with 16 samples for the lowest stable latency
Next, go to Devices > ASIO Control Panel and enable ‘Safe Mode’. This is required for stable audio at low buffer sizes. Without Safe Mode, buffer sizes of 16, 32, and 64 all produce static and dropouts. Safe Mode adds a small amount of additional buffer to ensure clean audio processing.
If you change settings in VST Host and experience pops or dropouts, close VST Host completely and reopen it. This often clears up any audio issues.
Latency Numbers
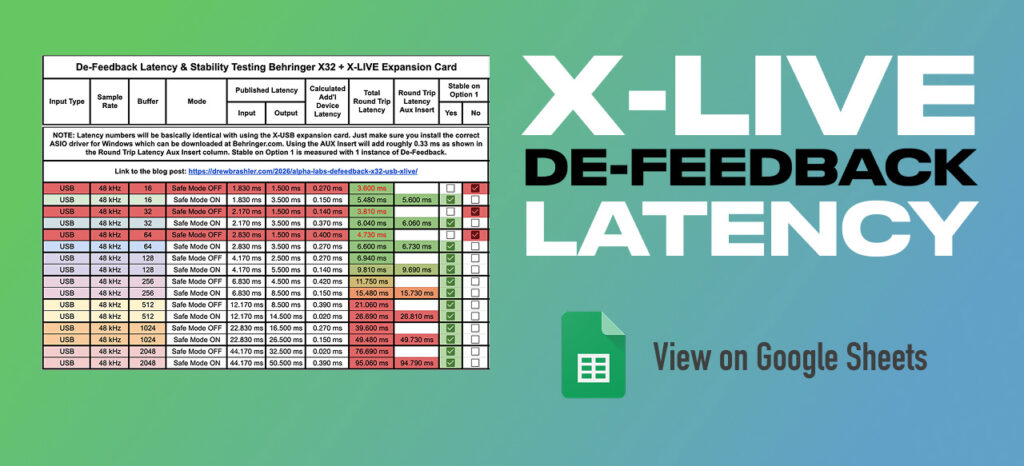
Here are the measured latencies using the aux insert method at 48 kHz with Safe Mode enabled:
| Buffer | Round Trip Latency: | Stable (1 instance Option 1): |
| 16 | 5.6 ms | Yes |
| 32 | 6.06 ms | Yes |
| 64 | 6.73 ms | Yes |
| 128 | 9.69 ms | Yes |
| 256 | 15.73 ms | Yes |
Without Safe Mode, buffers 16, 32, and 64 produce static and are unusable. Buffer 128 is the first stable setting without Safe Mode (6.94 ms), but there’s no reason not to use Safe Mode since it enables much lower latency operation.
The aux insert path adds roughly 0.33 ms to the round trip compared to a direct USB loopback. Which would have the Expansion Card Out taking the direct input like [Card Out 1-8 > Local 1-8], and then the X32 Channels taking from the Expansion Card Input like [X32 Channel Input Block 1-8 > Card 1-8].
For front of house in a small room, stay under 15 ms. In larger rooms, 15-20 ms is acceptable. For broadcast applications where video latency is higher than audio anyway, you can use larger buffers without concern.
Inserting De-Feedback on a Bus
The recommended approach is to insert De-Feedback on a bus rather than directly on individual channels. This way, you can send multiple speech channels to one bus and process them together with a single instance of De-Feedback.
- Select the bus you want to use (e.g., Mix Bus 1)
- Press ‘Home’, then go to the ‘Config’ page
- Set the bus to ‘Post Fader’ and confirm
- On the same Config page, use the sixth rotary encoder to select ‘Aux 1’ for the insert
- Press ‘Connect’, then press ‘Insert’ to activate it
Now route your speech channels to this bus:
- With the bus still selected, press ‘Sends on Fader’
- Bring up the faders for any channels you want processed by De-Feedback
- Exit Sends on Fader mode
- Make sure the bus is routed to the stereo bus (Main LR)
Important: If you’re routing channels through a bus with De-Feedback inserted, make sure those channels are NOT also routed directly to the stereo bus. Having both paths active causes a robotic, phasey sound because you’re hearing the dry signal and the processed signal summed together with a slight time offset.
Either insert De-Feedback on the channel and send that channel to the stereo bus, OR route the channel through a bus with De-Feedback inserted and send that bus to the stereo bus. Don’t do both.
Latency Considerations for Monitors
I wouldn’t recommend inserting De-Feedback directly on a channel that feeds in-ear monitors. The 5-6 ms of latency, while fine for front of house, can be noticeable to performers in their ears.
If you need De-Feedback on a monitor console, use the bus insert method and keep the buffer as low as possible. At 5.6 ms, most musicians won’t notice, but it’s worth being aware of.
YouTube Video
Watch the full walkthrough in my De-Feedback X32 USB setup video.