One of the most important tools on an audio console is the ability to listen to a specific channel by itself without any of the other channels. That action is what we call a ‘solo’
*cue guitar solo*
In all joking aside, the solo is one of the key components to a quick audio workflow with using our consoles. Not only does this allow us to listen to the specific channel in our headphones or control room outputs, but it also gives us more detailed metering on the X32 (and most consoles).
With soloing, there are two types of solo, one is PFL (Pre-Fader Listen) and the other is AFL (After-Fader Listen).
PFL – Pre-Fader Listen
Just like it sounds, the Pre-Fader Listen lets us listen to the channel before the channel fader. This is helpful for initially setting up the channel when the fader is down at -∞. No matter what the volume of the channel fader, you will be able to listen to the channel as if the channel fader was up at +0dB in your headphones
Another useful part of the PFL is for when you are initially setting the gain on the channel or placing the microphone.
Pro-Tip: On the X32/M32, the Pre-Fader Listen tap is after all of the channel processing, so anything you are adjusting on the channel with EQ, Dynamics, or Gating will be included in the PFL Solo.
Because the PFL is after channel processing, the best part is that we can listen to the EQ, Dynamics, Gating, and the sound of that channel before it hits the Stereo Bus.
AFL – After-Fader Listen
You are probably thinking right now if the PFL does all of that, why would I need an AFL? The After-Fader Listen, AFL, is after the channel fader. This will apply any gain or attenuation that the channel fader is set to.
The main benefit of this is when you solo multiple sources, for example, the Kick and Bass Guitar. The AFL will show you how they are interacting with each other after the channel fader, which is where it would hit the stereo bus.
Pro-Tip: One thing that the AFL will not do is include all of the signal path after the channel fader. If you are doing advanced routing like subgroups, you will need to keep that routing and processing in mind. However AFL solo WILL include DCA adjustments. So, if the channel you are soloing via AFL is assigned to a DCA, the combination of the DCA fader & Channel fader level will cue up in your monitors.
My Favorite Hidden Feature!
The X32/M32 has a feature that I wish other boards had, it is the ability to solo a DCA. DCA’s as some of you know are NOT an audio path, they do not sum audio together, it is only a ‘remote control’ of the faders that are assigned to it. For more information on the difference between DCA’s and Subgroups watch this video!
Now, because DCA’s are not a summing point/audio path, a lot of consoles do not allow you to solo them. The X32/M32 does allow you to solo the DCA, AND there is a function that you should enable.
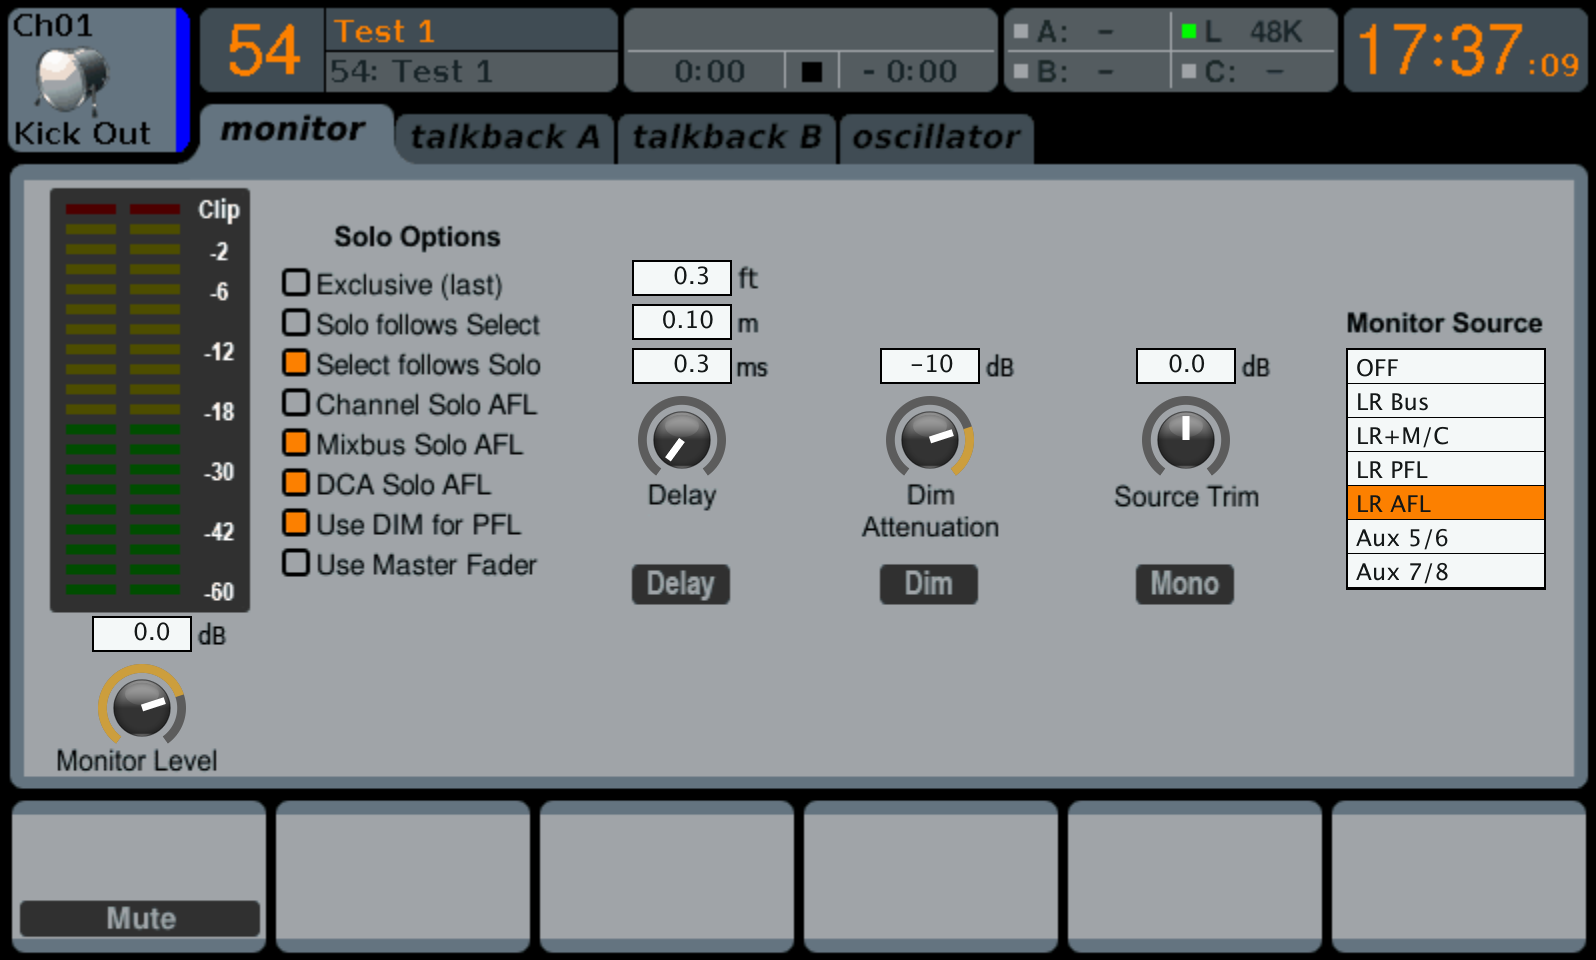
Press ‘view’ on the Monitor section > Tab over to the Monitor Tab > Use the 2nd Rotary knob to select ‘DCA Solo AFL’.
What this enables is that you can solo AFL a DCA. This is perfect when you have all of the drums assigned to a single DCA! You can solo the Drum DCA and are able to listen to all of the group of drums just as they are mixed into the Stereo Bus!
Other Solo Settings on the X32
I want to run through the other settings that we have available to us with the solo on the X32/M32. We find them in the Monitor section, so press ‘view’ on the Monitor section, then tab over to the ‘Monitor’ Tab.
- Exclusive (last) – When this is selected, only one channel will solo at a time.
- Solo Follows Select – When changing channels using the select button, the solo will follow to the current channel you are adjusting.
- Select Follows Solo – When soloing a channel, the select will follow to the current channel you are soloing.
- Channel Solo AFL – Allows for an After Fader Listen for the channel solo
- MixBus Solo AFL – Allows for an After Fader Listen for the mixbus solo
- DCA Solo AFL – Allows for an After Fader Listen for the channels that are assigned to the DCA that is soloed
- Use Dim for PFL – Turns down the output of the monitor by the level set in the ‘Dim Attenuation’ when soloing a channel in a Pre Fader tap.
- Use Master Fader – This uses the Master Fader as your volume for your headphones/monitor.
What About Us Using the iPad?!
If you are fortunate enough to have wired up your X32 with a network and gotten X32-Mix app to work, you may be wondering how can I get solo working when I am walking around? When you solo anything, it will route out of two main places:
- #1 Headphone outputs
- #2 Control Room output
The control room output is a perfect place to connect to a wireless in-ear transmitter system like:
Once you have done this, you can now solo via the X32-Mix or X32-Edit apps and cue things up wirelessly! This is a really great solution for the X32-Rack and X32-Core when you have it rack mounted and need to use the iPad as your main control surface.
As for the question of AFL vs PFL?
Which is best?! Well, they both have their uses. AFL wouldn’t be the right solo if you are initially building your gain structure, but PFL wouldn’t be the right solo if you are making polishing touches on your mix!
As for how I have my board typically set up? I have my solo settings as this:
You can see above that I love having the select automatically follow the soloed channel. This makes for a fast workflow. Mixbus and DCA Solo AFL, this is useful because I utilize subgroups and DCA’s in my board workflow, an AFL helps to listen to these as how they would be hitting the stereo bus.
DIM for PFL is important as I run my preamps fairly hot, so having this set will lower the volume in the headphones when I PFL a channel.
As for the channel itself? I prefer to leave this on PFL. I like to be able to listen to the channel nice and loud and not have to worry about the volume of it in the house. The PFL allows me to do this, also when setting channel gain, PFL is the only way to go!

