Last week I started my X32-Mix App Tutorial series with the Home Tab, if you haven’t seen the blog post, check it out here: X32-Mix App Tutorial Home Tab. This week I want to go over the meaty portion of the application, the ‘Detail Tab’. This is going to be the tab that covers all of the main adjustment of each channel.
Detail – Config/Preamp
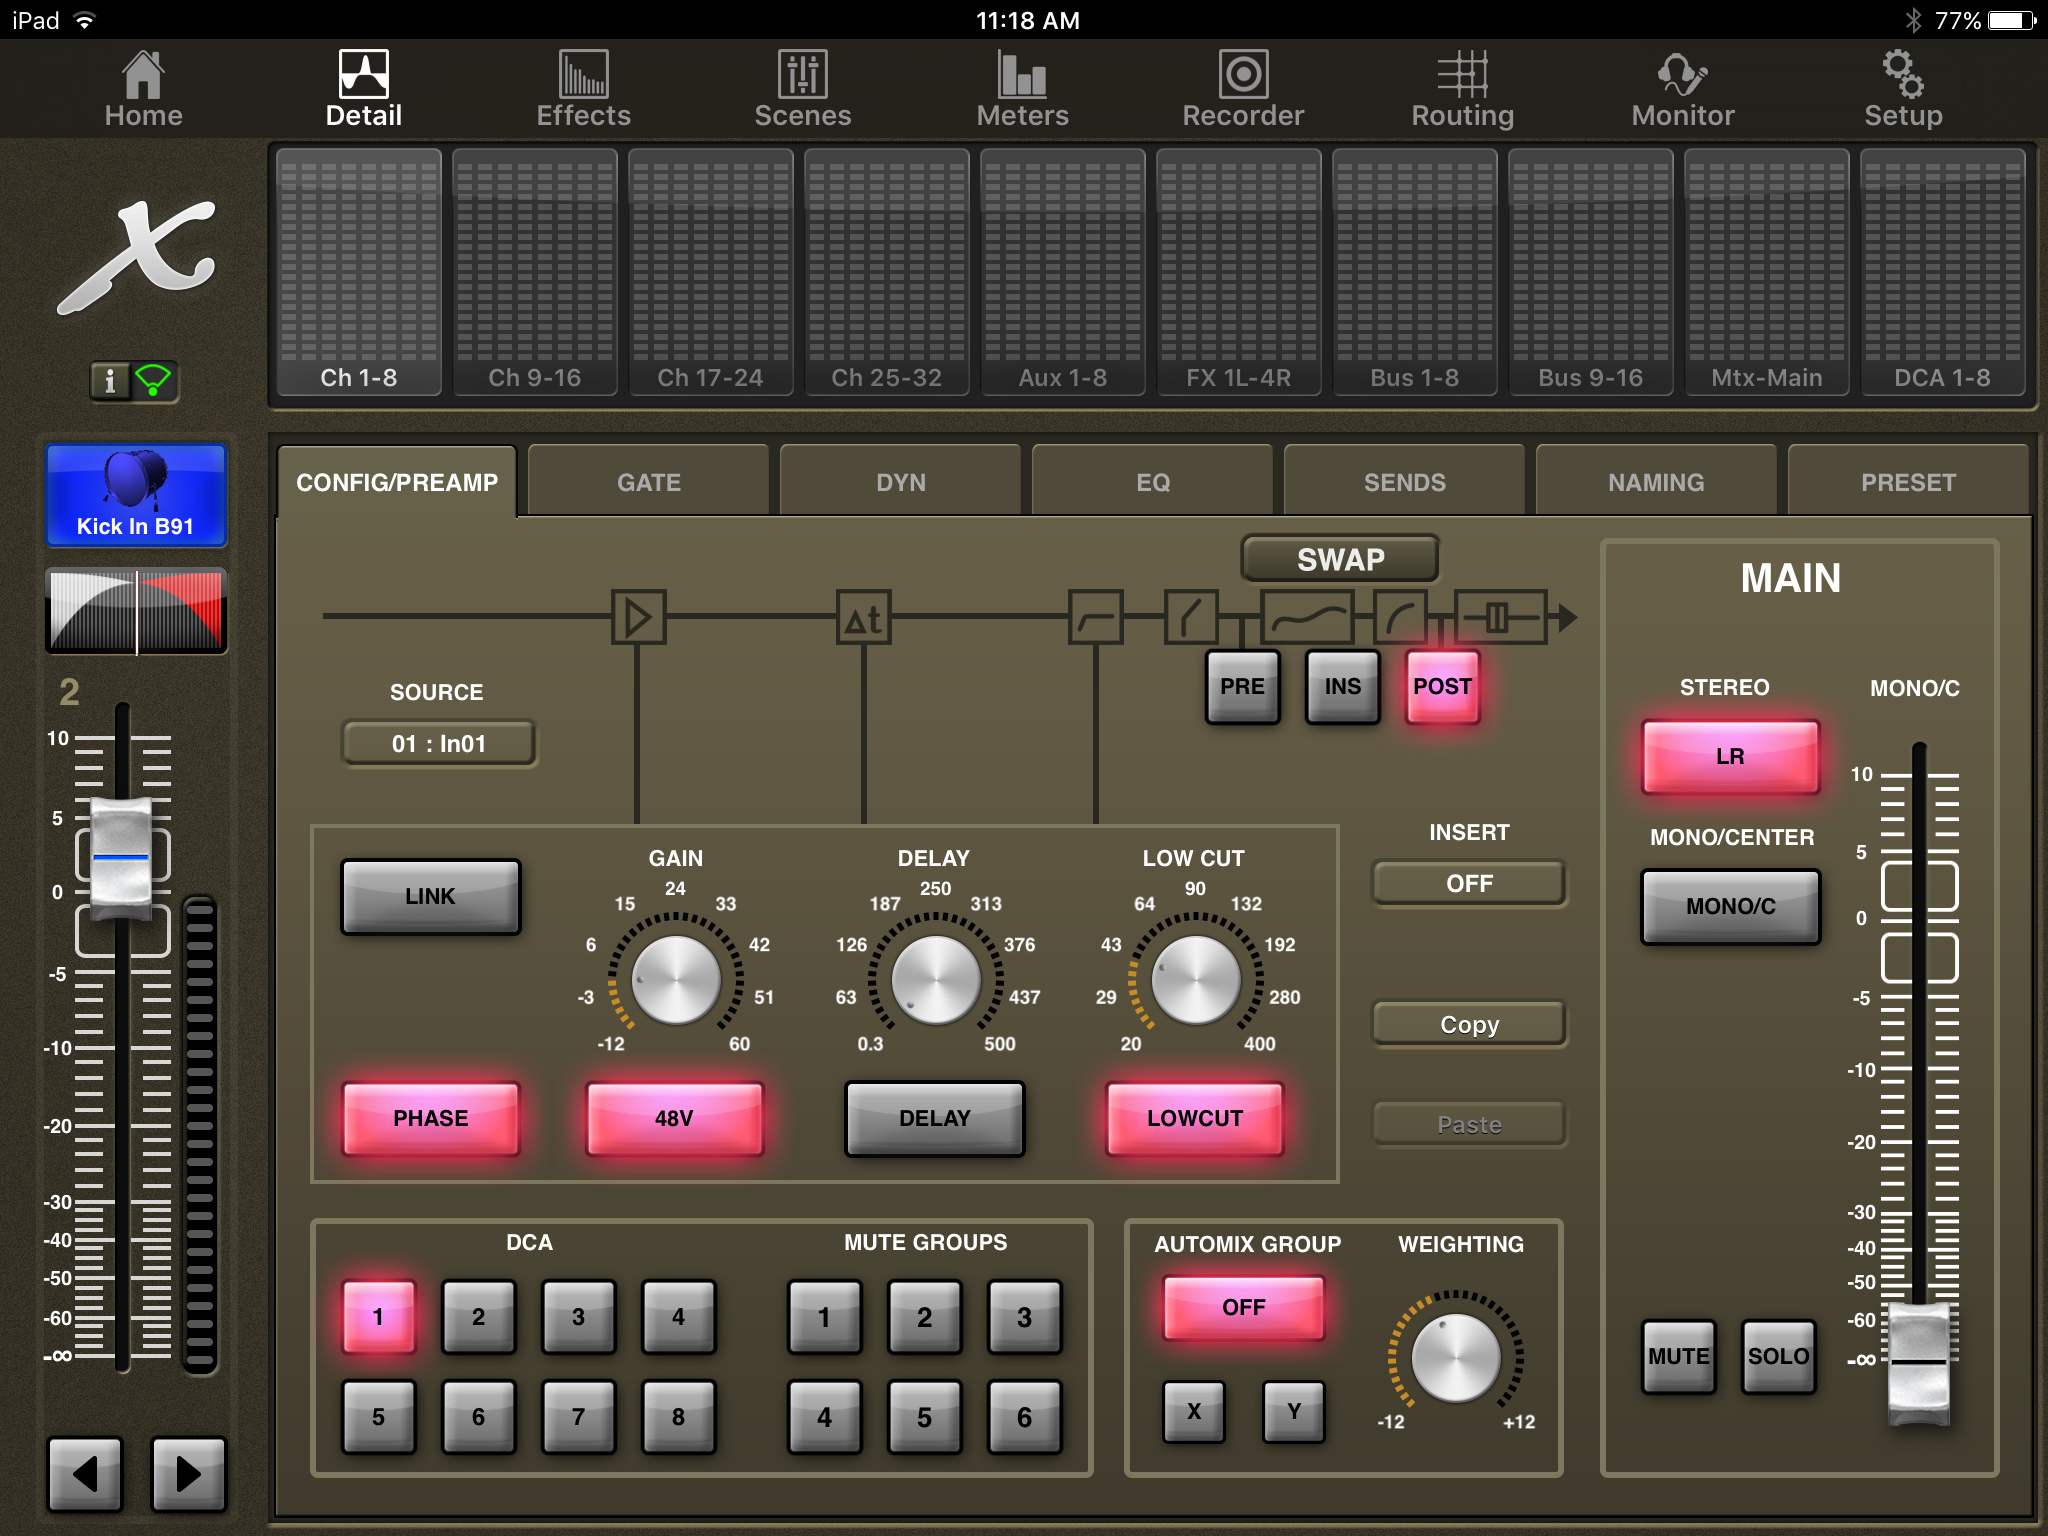
The Config/Preamp tab has a TON of settings on it, here is the list of settings that it controls:
- Source – Sets the input source for the channel.
- Swap – Swaps the position of Dynamics to Pre-EQ or Post-EQ.
- Pre/Ins/Post – Pre and Post account for the insert being Pre EQ/Dynamics or Post EQ/Dynamics. INS accounts for the physical insert of the channel.
- Insert – Allows adding an insert for the selected channel.
- Link – Links the odd/even channel pair.
- Phase – This changes the polarity of the channels audio.
- 48V – Turns on and off +47V Phantom Power for the channel input source.
- Gain – Allows you to set the input gain of the channel.
- Delay – Turns on and off the channel input delay, and allows for delay adjustment of 0.30ms to 500ms.
- Low Cut – Turns on and off the Low Cut, or High Pass Filter. Control allows for 20Hz to 400Hz.
- Copy/Paste – This is one of my favorite features, it allows you to copy and paste channels with the ability to choose the scope of paste (Head Amp, Configuration, Gate, Compressor, Equalizer, Sends).
- DCA Assignment – Let’s you assign the selected channel to any of the DCA’s 1-8.
- Mute Groups Assignment – Let’s you assign the selected channel to any of the Mute Groups 1-8.
- Automix Group – This is available on channels 1-8 and control which automix group the channel will be assigned to. Control allows for Off, X, and Y.
- Automix Weighting – This is a control of the Automix feature of the board, this will allow you to give more weight to a channel to allow it to always be louder or quieter than the other channels in the same automix group.
- Main Stereo LR – Assigns the channel into the Main LR Bus.
- Mono/Center MONO/C – Assigns the channel into the Mono/C Bus.
- Mono/C Fader – Allows adjustment of channel send into the Mono/C Bus.
Detail – Gate
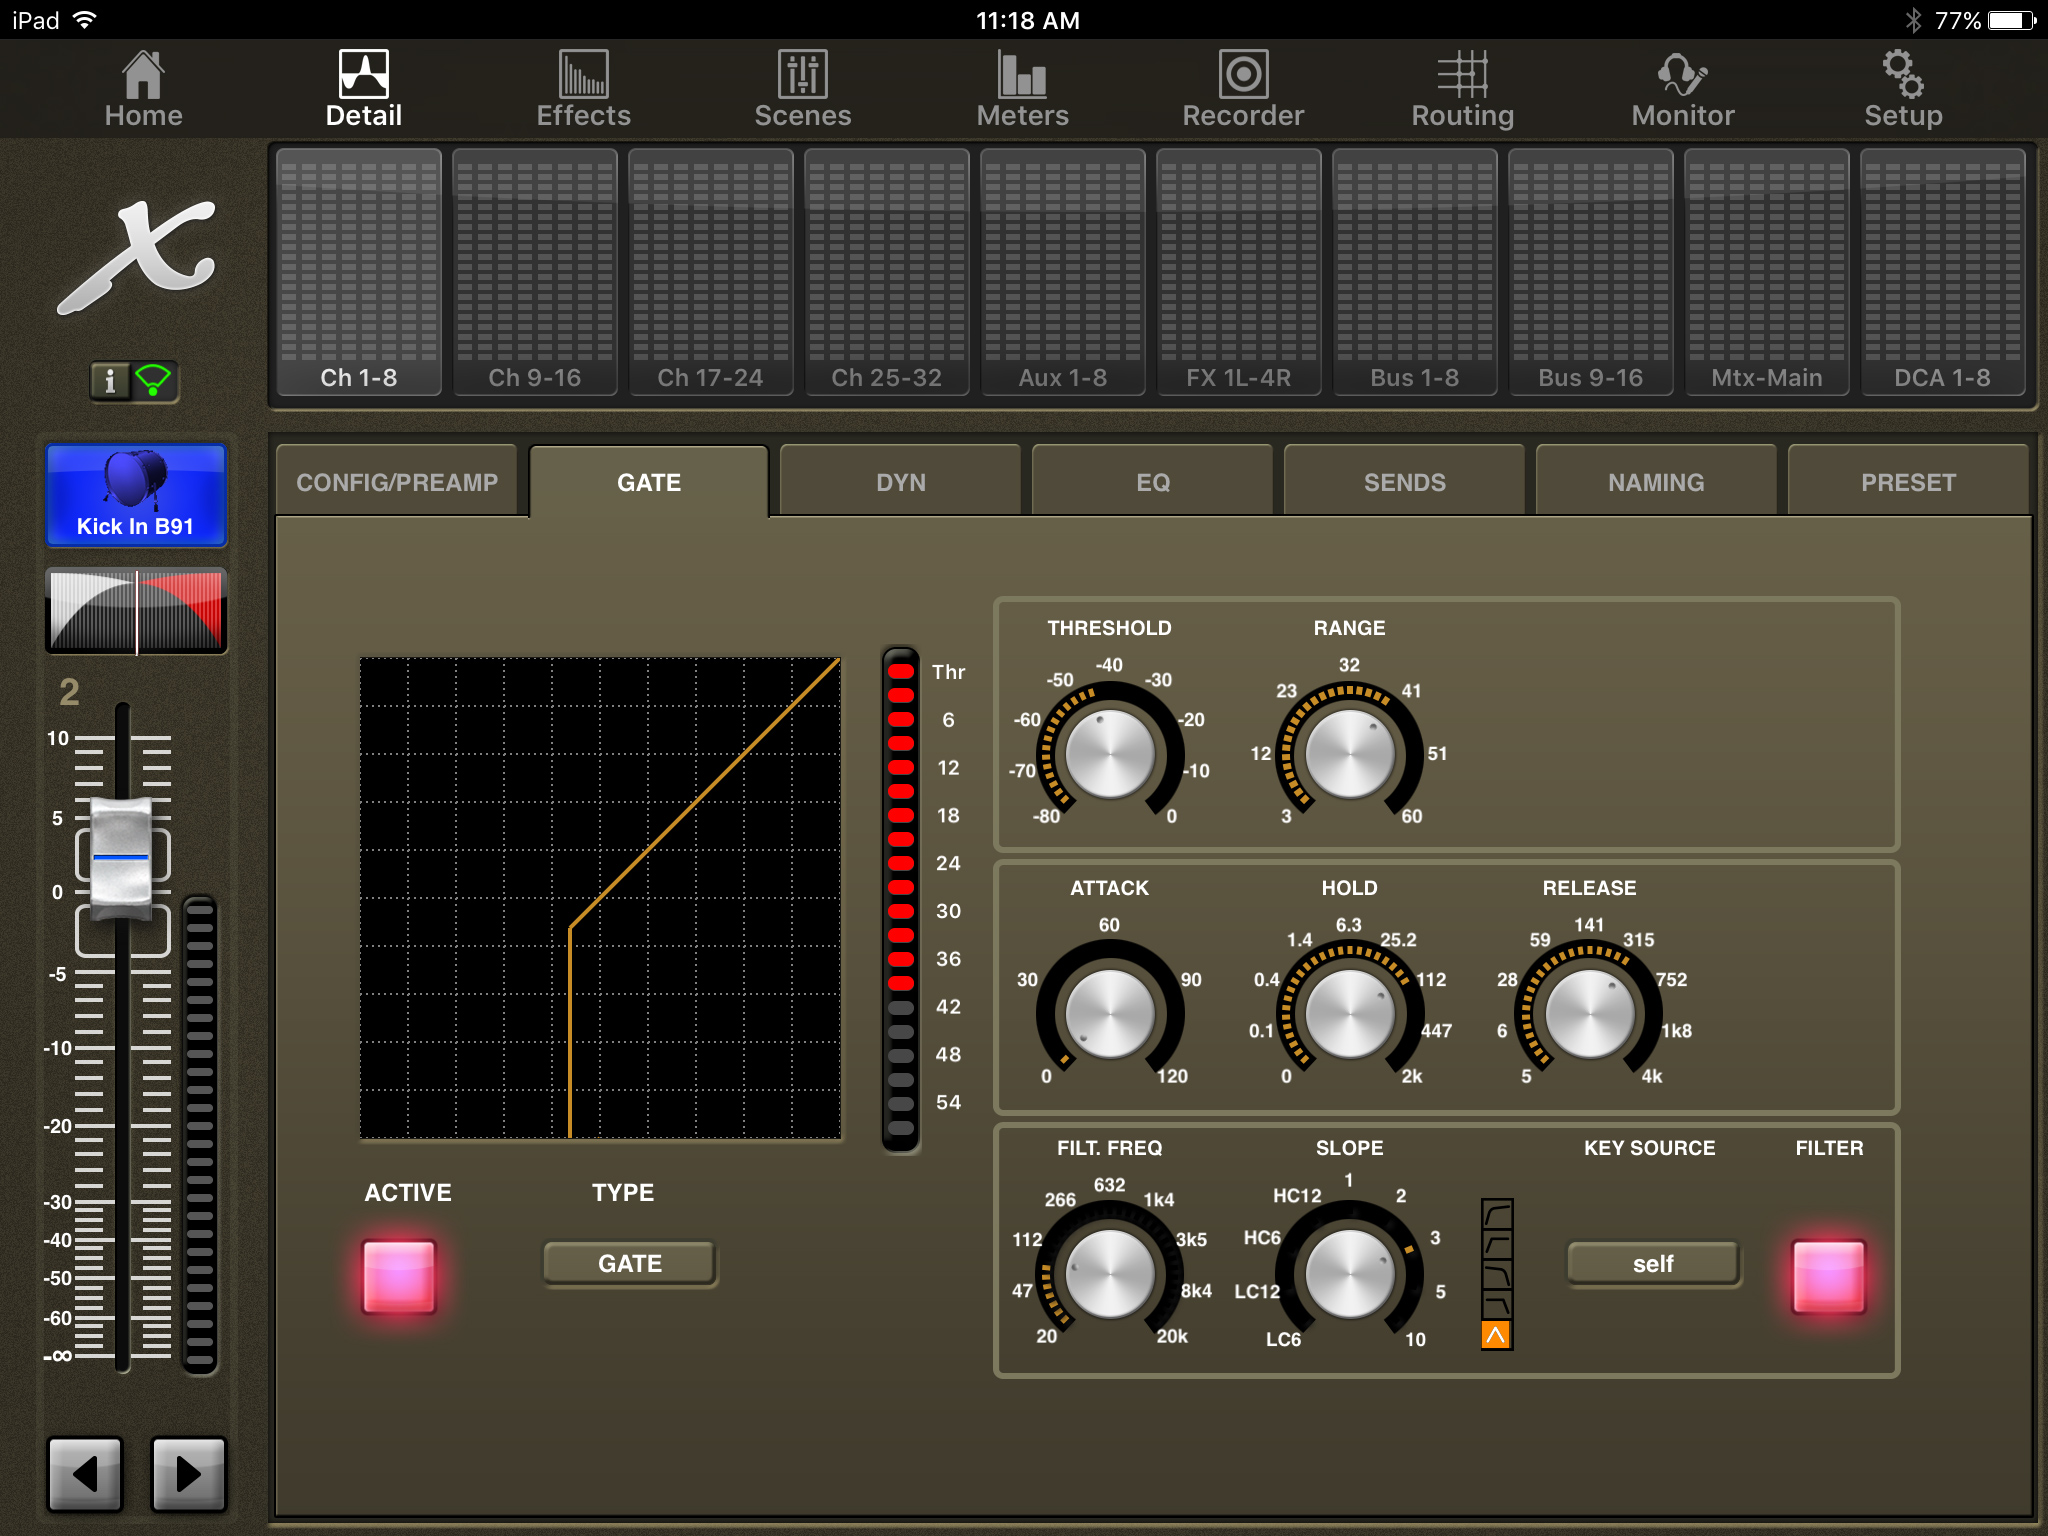
The Gate tab controls the Gate and Expander function of the X32. If you press and drag on the graph, you can set threshold and range at the same time. Right and Left controls the threshold, up and down controls the range.
You also have the following controls:
- Active – Turns on and off the Gate/Expander.
- Type – Allows you to select between Duck, Gate, EXP2, EXP3, and EXP4.
- Threshold – Sets the Threshold of the Gate/Expander. This is the level at which the gate would start to attenuate the channel. Control allows for -80dB to 0dB.
- Range – Sets the amount the gate would attenuate the channel once the level has passed below the Threshold. Control allows for 3dB to 60dB of attenuation.
- Attack – Sets the attack time for the Gate/Expander. This is the time that the Gate/Expander will take to go from closed (attenuated) to fully open (non-attenuated). Control allows for 0.0ms to 120ms.
- Hold – Sets the Hold time for the Gate/Expander. This is the time that the Gate/Expander will delay before the release will start to close. Control allows for 0.2ms to 2000ms.
- Release – Sets the Release time for the Gate/Expander. This is the time that the Gate/Expander will take to go from fully open (non-attenuated) to closed (attenuated). Control allows for 5ms to 4000ms.
- Filt. Freq – Filter Frequency gives the Gate/Expander a specific frequency area to listen to for cueing the threshold.
- Slope – Works in conjunction with Filt. Freq. Control allows for the following
- LC6 – Low Cut 6dB/Oct
- LC12 – Low Cut 12dB/Oct
- HC6 – High Cut 6dB/Oct
- HC12 – High Cut 12dB/Oct
- 1 – Bell Shape Curve with Q of 1.0
- 2 – Bell Shape Curve with Q of 2.0
- 3 – Bell Shape Curve with Q of 3.0
- 5 – Bell Shape Curve with Q of 5.0
- 10 – Bell Shape Curve with Q of 10.0
- Key Source – Key Source allows for the gate to be cued from a different channel.
- Filter – Turns on and off the Filtering circuit (Filt. Freq and Slope). When this is off, the gate will listen to ALL frequencies of the channel for threshold measurement.
Detail – Dynamics
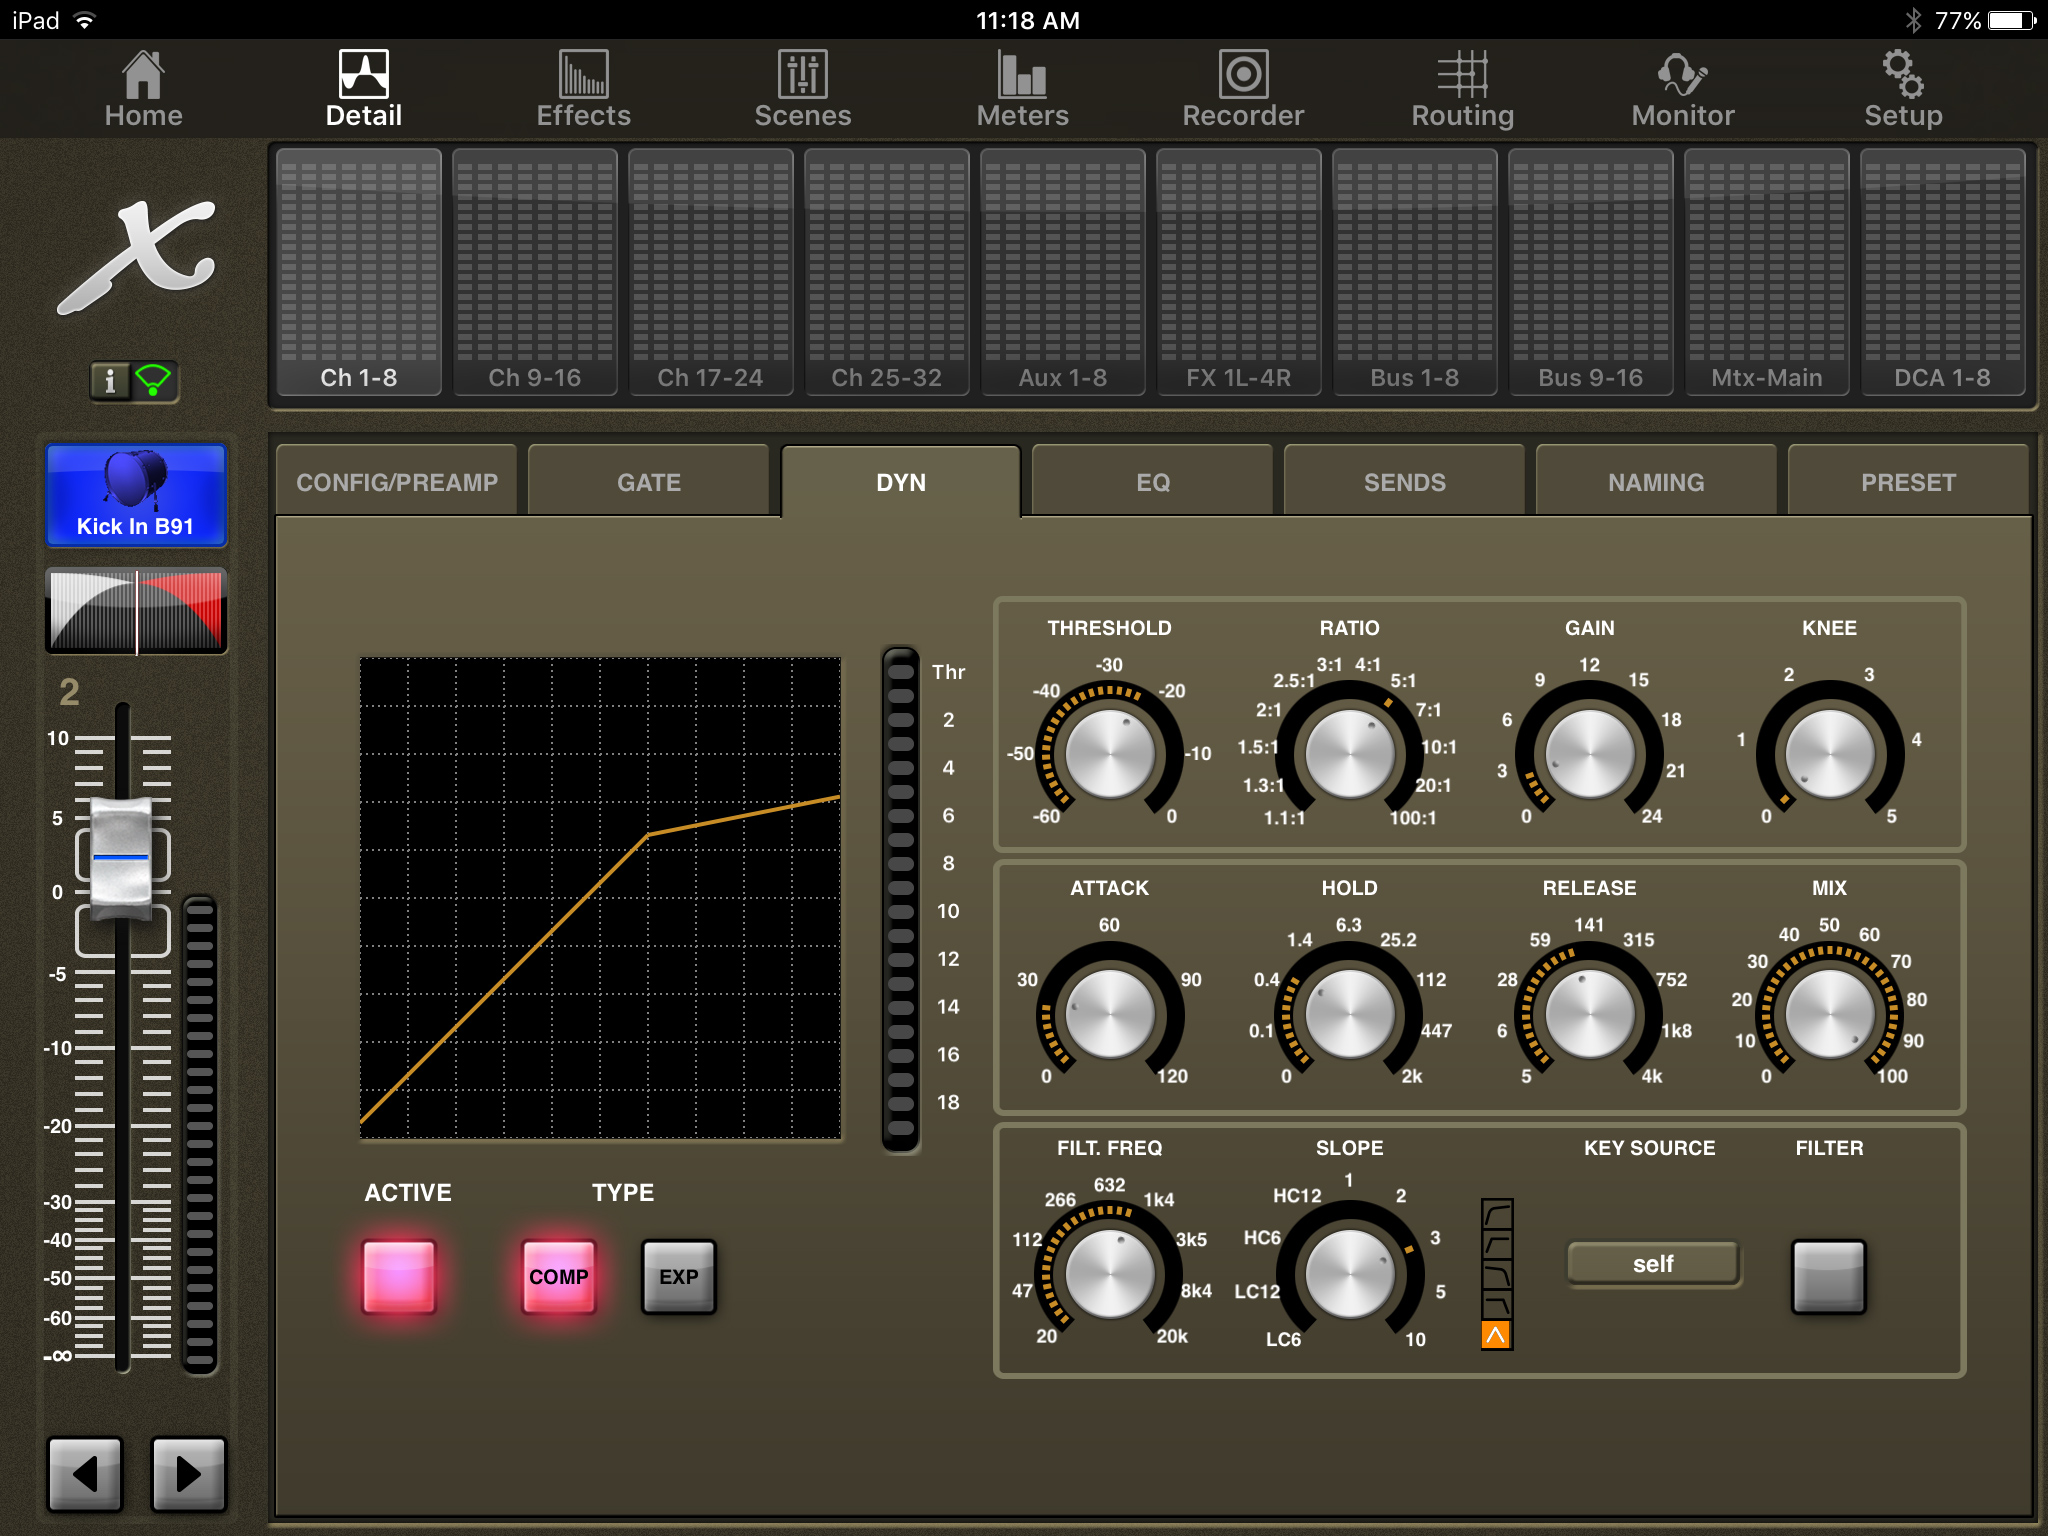
The Dynamics tab controls the Compression/Limiting and Expansion function of the X32. If you press and drag on the graph, you can set threshold and ratio at the same time. Right and Left controls the threshold, up and down controls the ratio.
You also have the following controls:
- Active – Turns on and off the Dynamics.
- Type – Allows you to select between Compression/Limiting and Expansion.
- Threshold – Sets the Threshold of the Dynamics. This is the level at which the Dynamics would start to compress the channel. Control allows for -60dB to 0dB.
- Ratio – Sets the compression ratio for the Dynamics. Control allows for 1.1:1, 1.3:1, 1.5:1, 2:1, 2.5:1, 3:1, 4:1, 5:1, 7:1, 10:1, 20:1, and 100:1.
- Gain – This is the makeup gain for the Dynamics section which is post compression. Control allows for 0.0dB to 24dB.
- Knee – This sets the knee of the Dynamics. To have a softer transition between uncompressed and compressed, you can put the knee to a higher value. Control allows for 0, 1, 2, 3, 4, and 5.
- Attack – Sets the attack time for the Dynamics. This is the time that the Dynamics will take to go uncompressed to compressed. Control allows for 0.0ms to 120ms.
- Hold – Sets the Hold time for the Dynamics. This is the time that the Dynamics will delay the release. Control allows for 0.2ms to 2000ms.
- Release – Sets the Release time for the Dynamics. This is the time that the Dynamics will take to go from compressed to uncompressed. Control allows for 5ms to 4000ms.
- Mix – This gives the ability to mix the compressed signal back with the original uncompressed signal. To have only the compressed signal passing through, have this set to 100%. Control allows for 0% to 100%.
- Filt. Freq – Filter Frequency gives the Dynamics a specific frequency area to listen to for cueing the threshold.
- Slope – Works in conjunction with Filt. Freq. Control allows for the following
- LC6 – Low Cut 6dB/Oct
- LC12 – Low Cut 12dB/Oct
- HC6 – High Cut 6dB/Oct
- HC12 – High Cut 12dB/Oct
- 1 – Bell Shape Curve with Q of 1.0
- 2 – Bell Shape Curve with Q of 2.0
- 3 – Bell Shape Curve with Q of 3.0
- 5 – Bell Shape Curve with Q of 5.0
- 10 – Bell Shape Curve with Q of 10.0
- Key Source – Key Source allows for the gate to be cued from a different channel.
- Filter – Turns on and off the Filtering circuit (Filt. Freq and Slope). When this is off, the Dynamics will listen to ALL frequencies of the channel for threshold measurement.
Detail – EQ
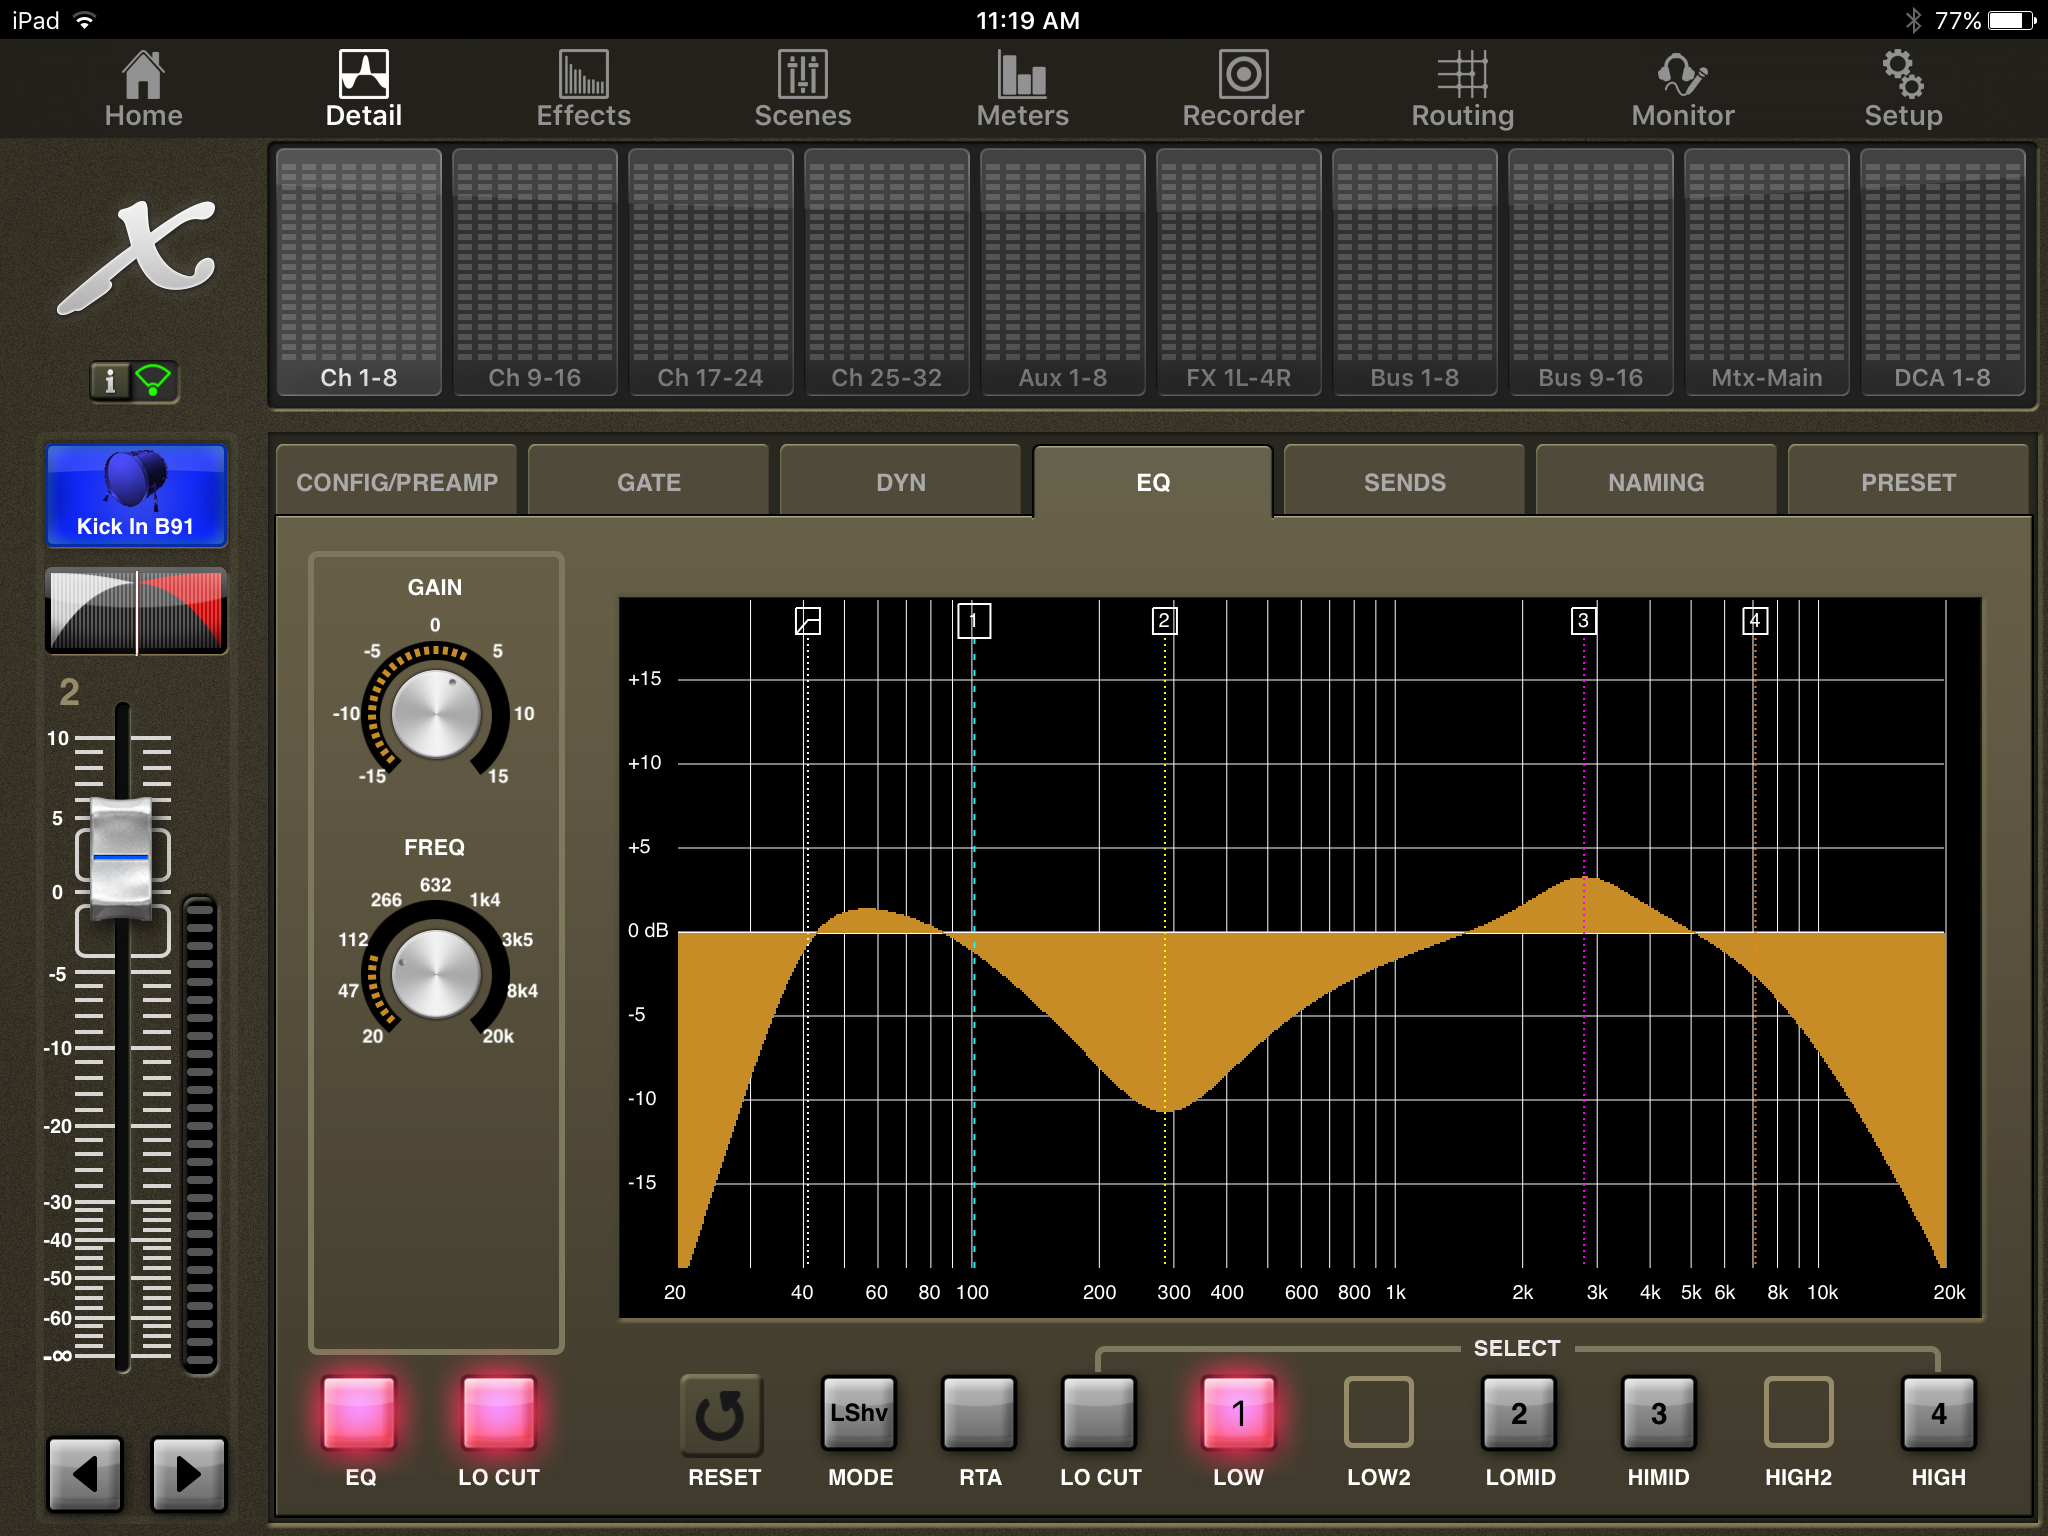
The EQ Tab is awesome. Not only do you get to see all of the EQ in a visual sense, but you also get to use your fingers to raise (up and down), change frequency (side to side), and even change the bandwidth (pinch wider or smaller).
From this screen, we can control gain, frequency, bandwidth, and filter types for Low, Low2, LoMid, HiMid, High2, and High. Also, we can control the lo cut from this screen as well.
You will see an RTA button which when you press you can display the RTA on the screen:
Detail – Sends
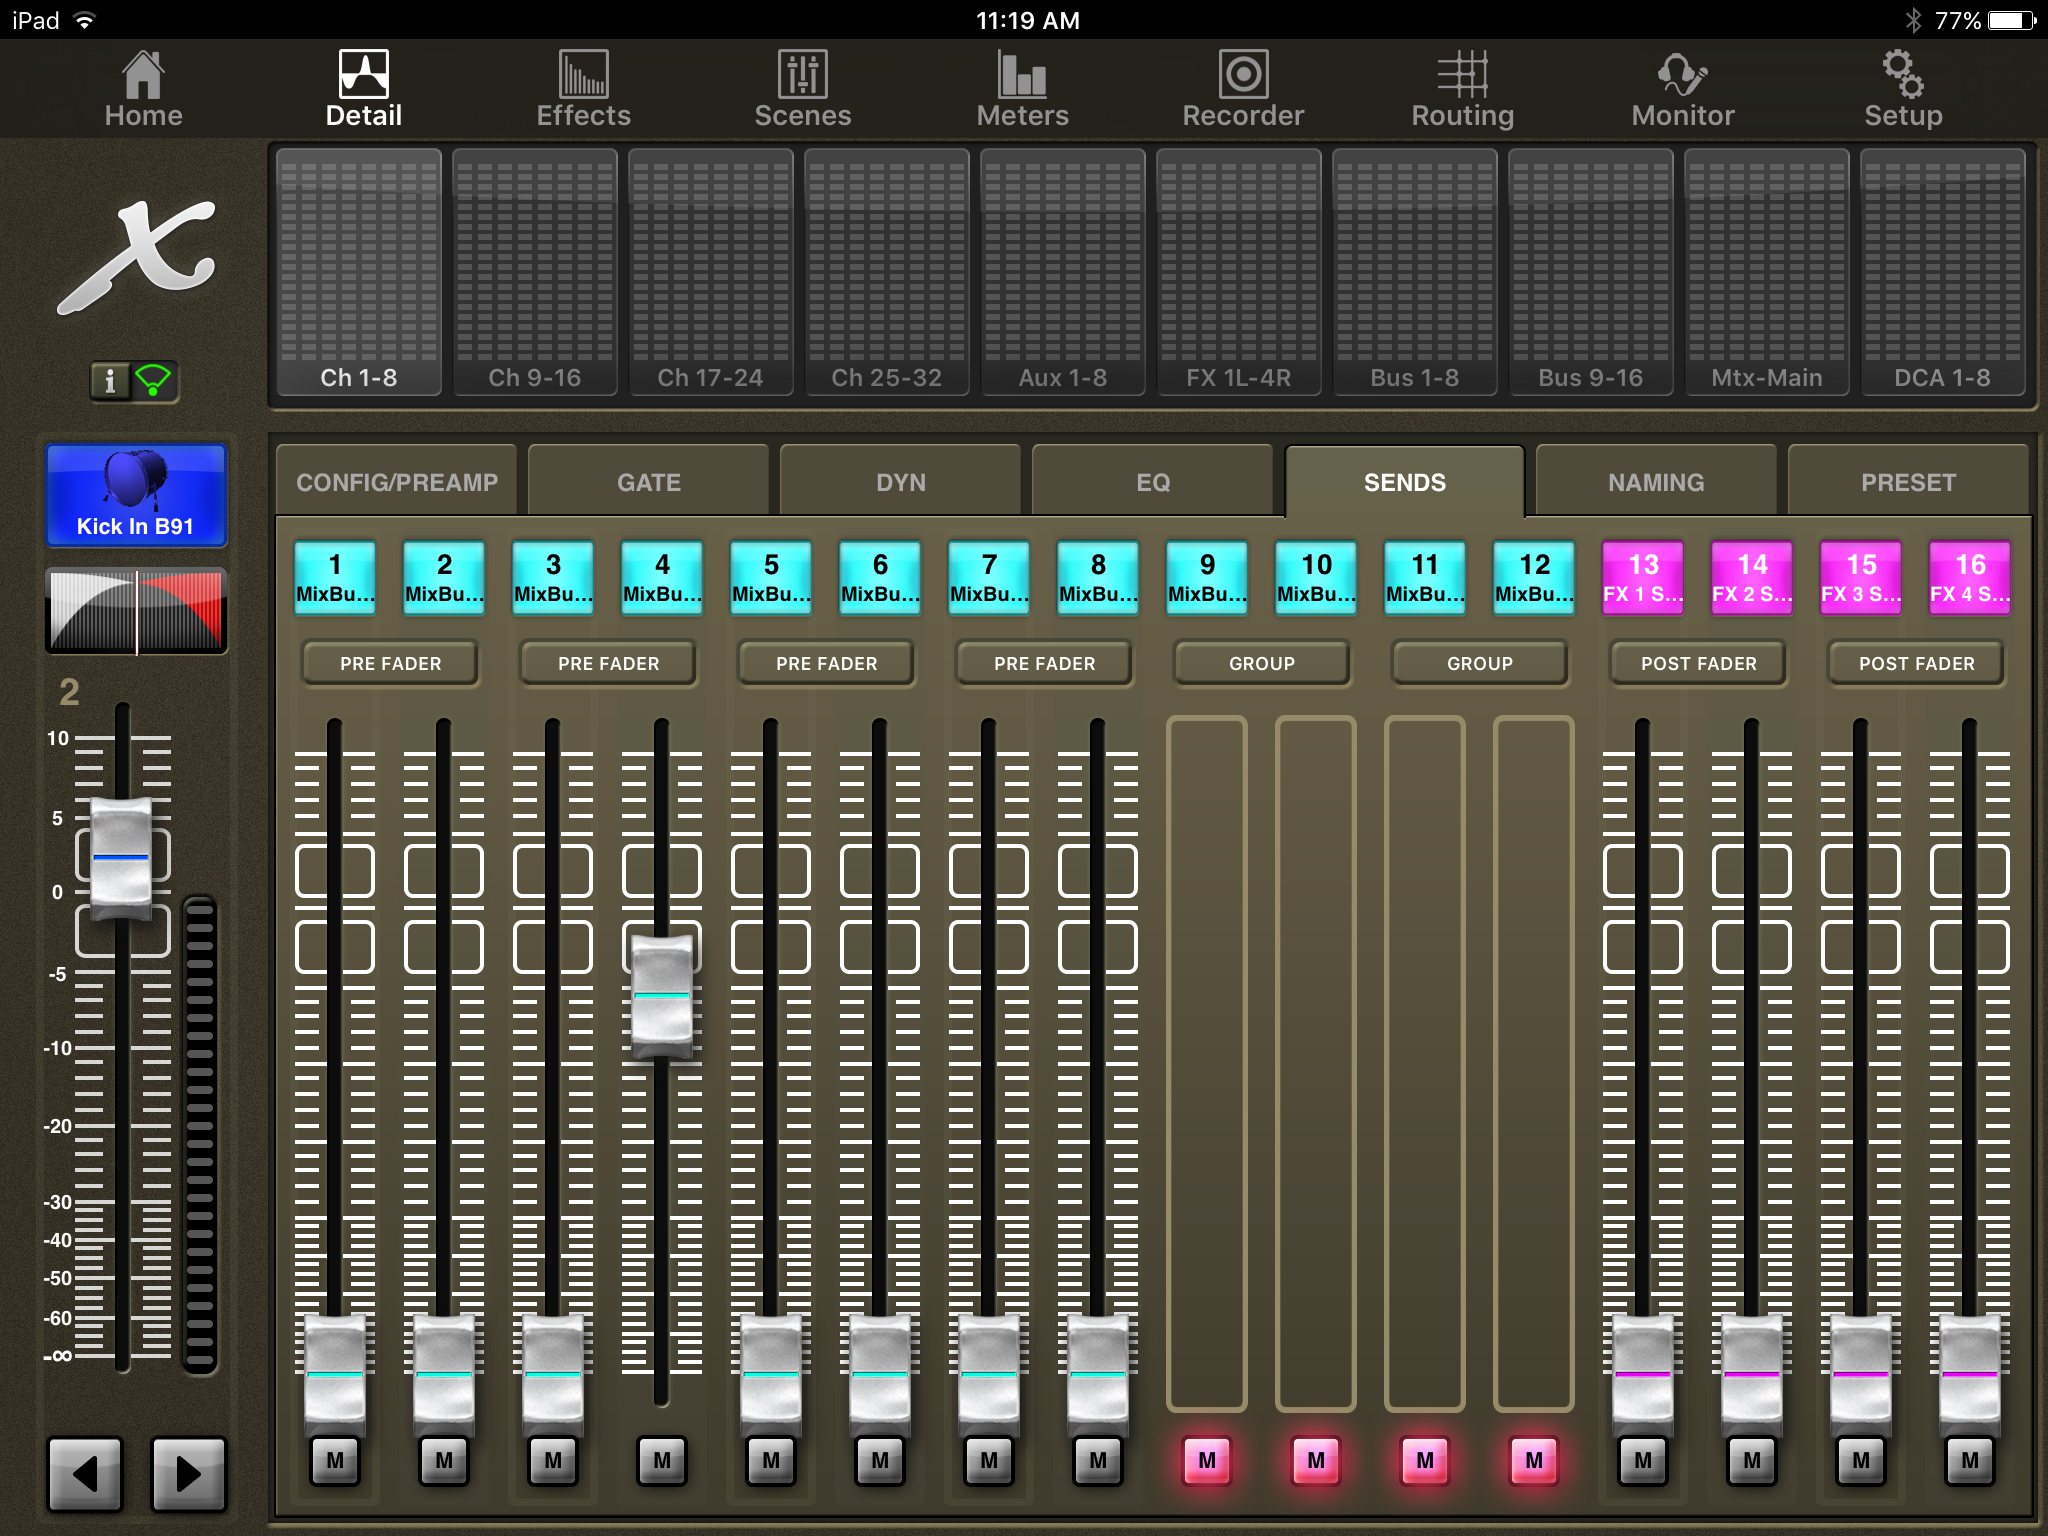
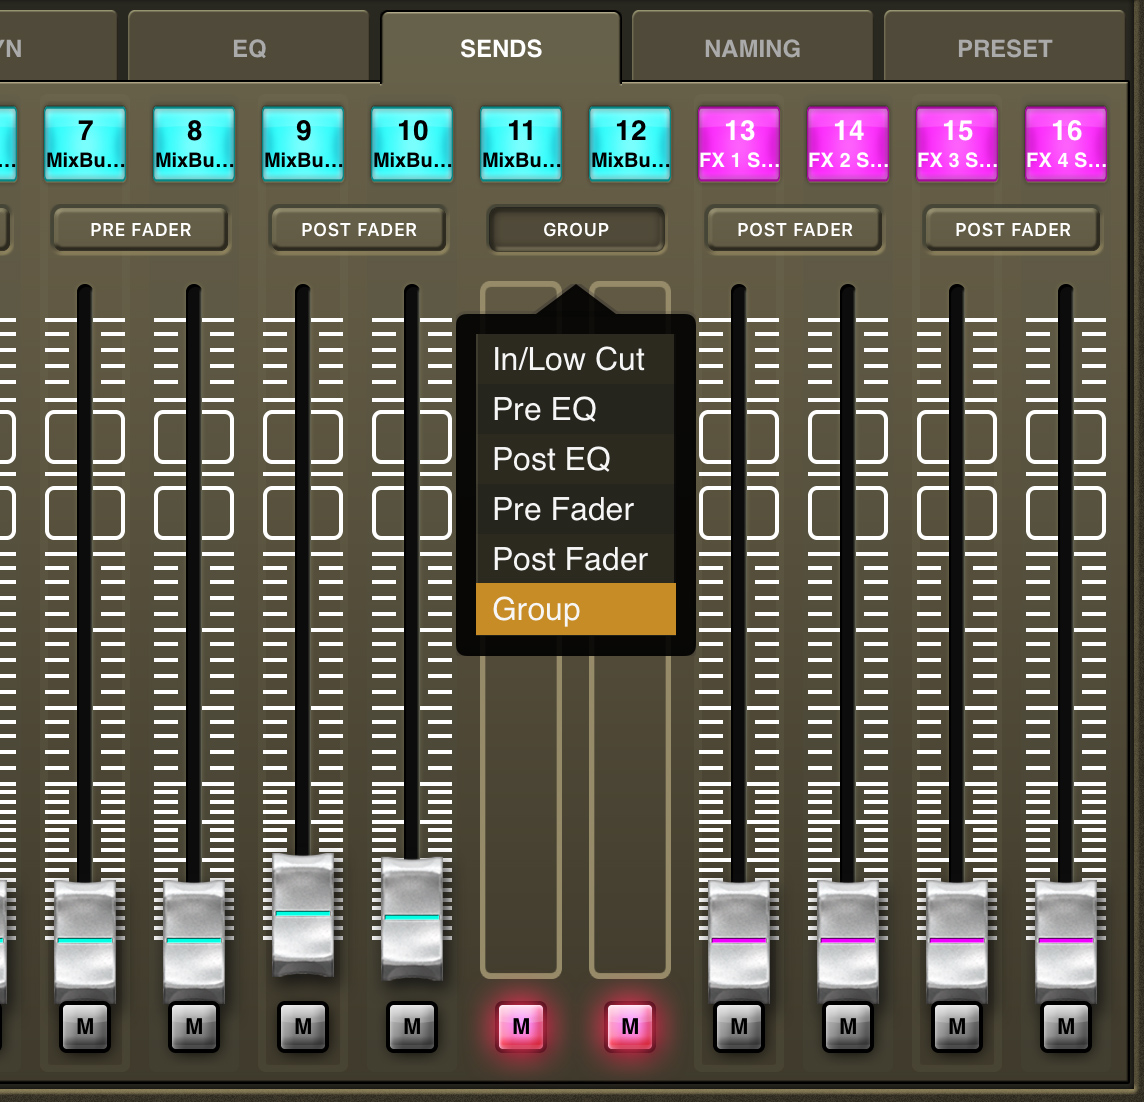
On our Sends tab, you can mix the selected channel into the mixbusses. Another thing that you can change from this screen is the sends configuration channel by channel. This means on Channels 1 & 2 you can have Mixbus 11&12 set as a group, but on Channel 3 you can have Mixbus 11&12 set as a post-fader send.
Detail – Naming
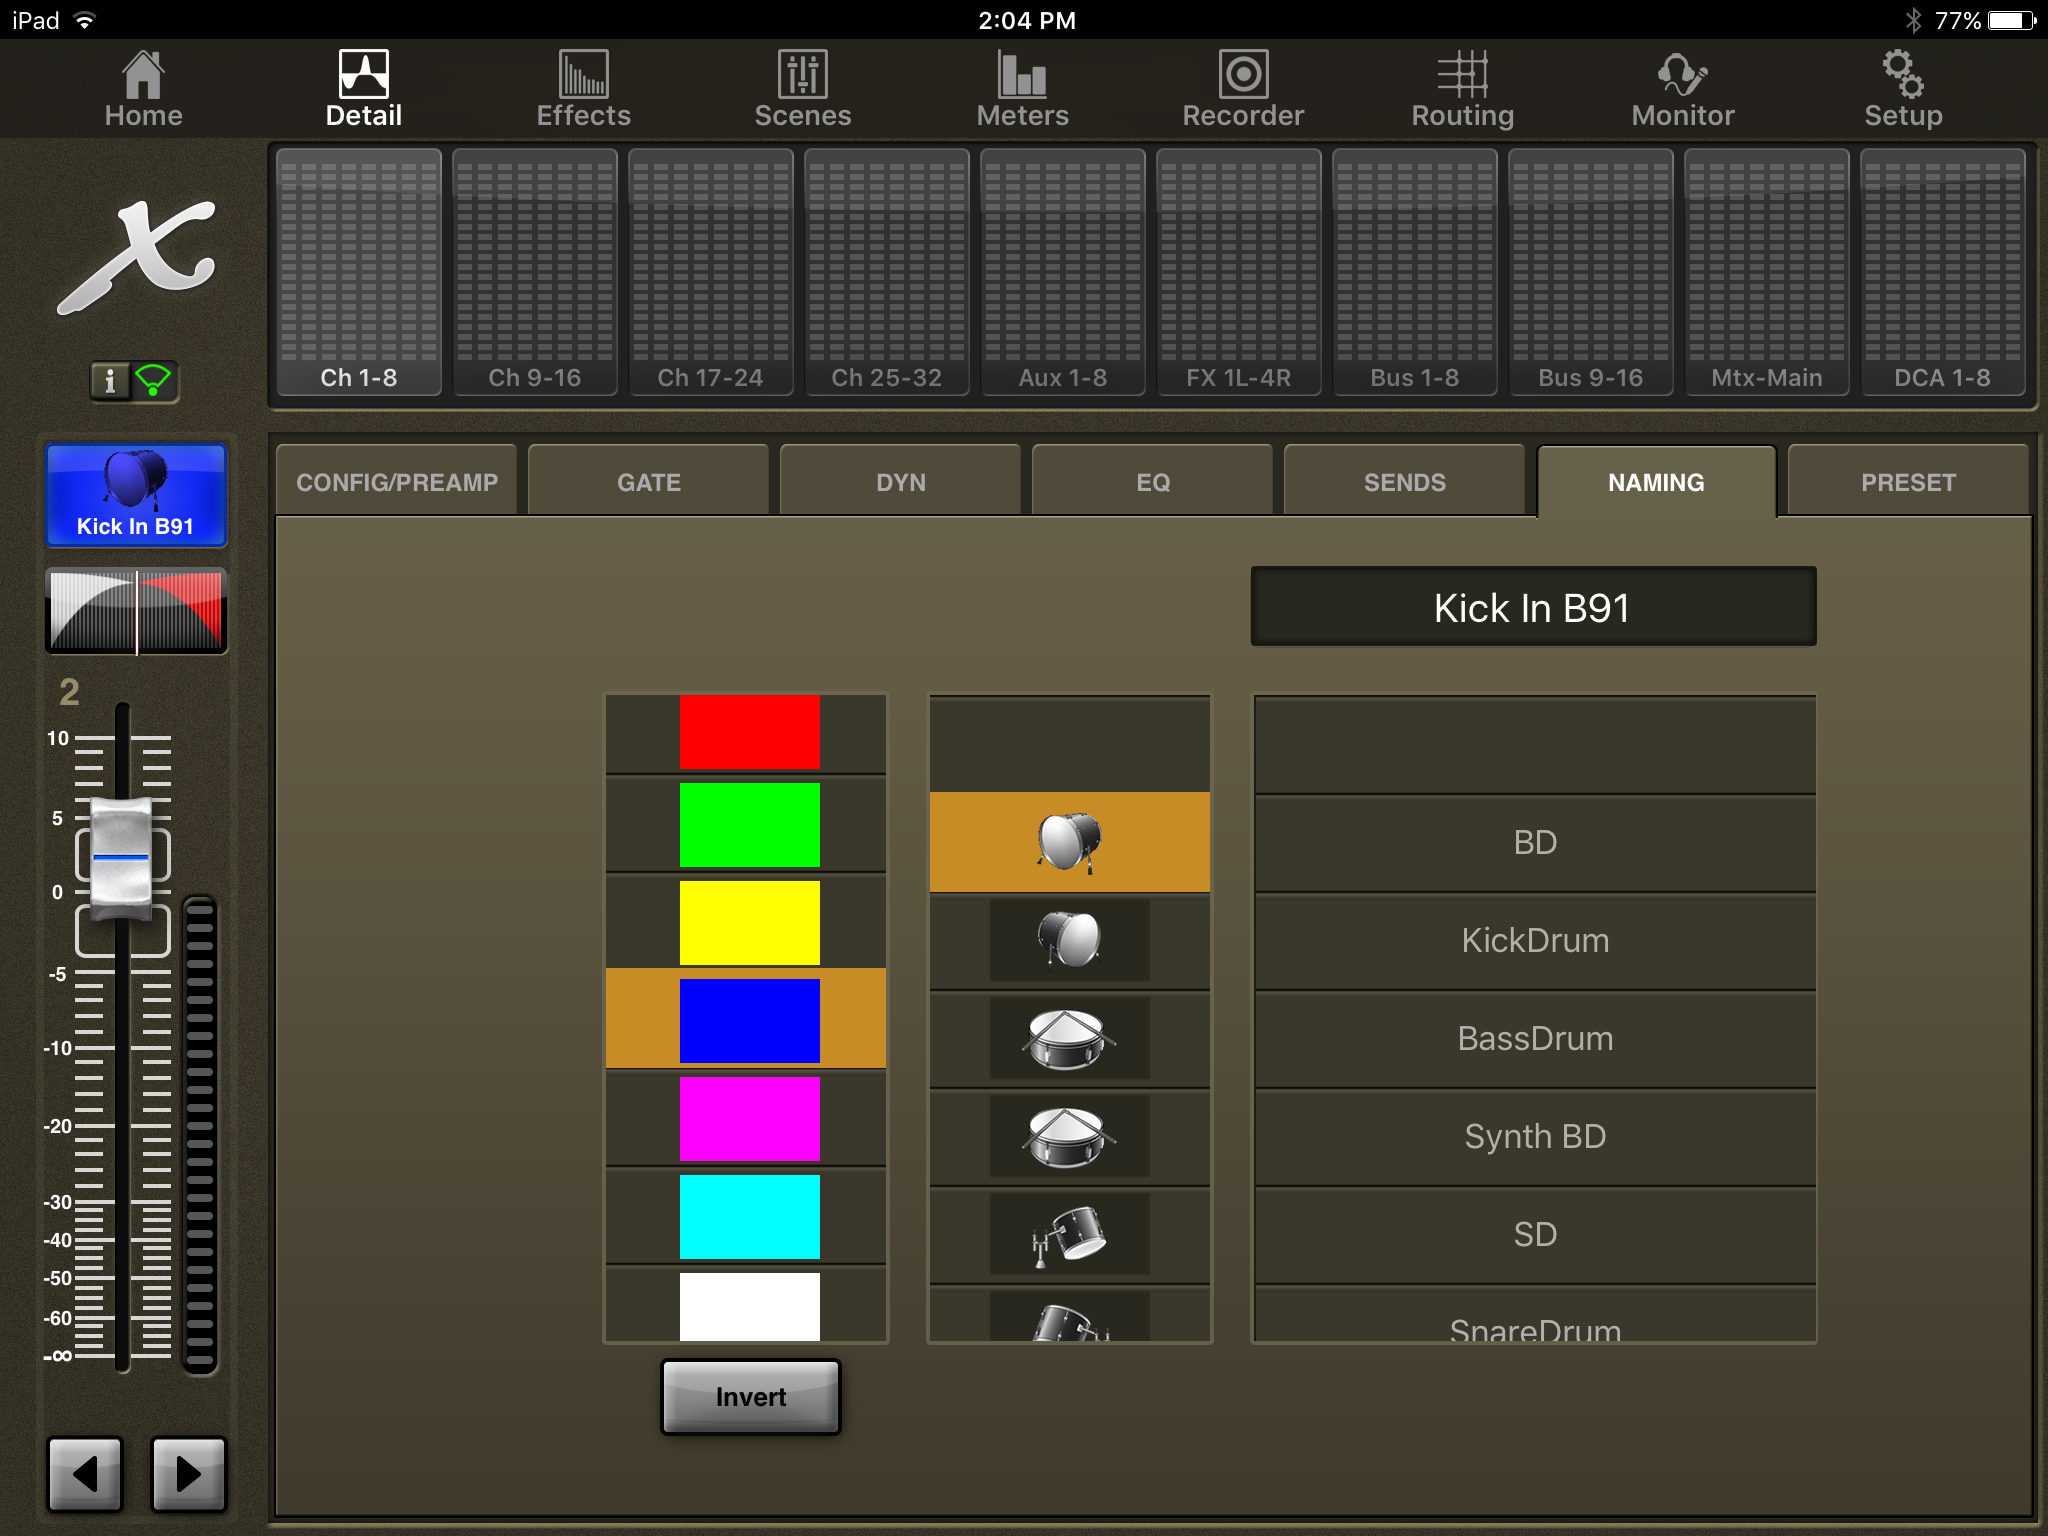
The Naming tab gives us the ability to change the names, colors, and icons on all of the channels, busses and DCA’s. This is my preferred way of changing the names of channels on the X32. It is so nice being able to use the keyboard of the iPad for naming things, WAY faster than using the rotary knobs on the X32.
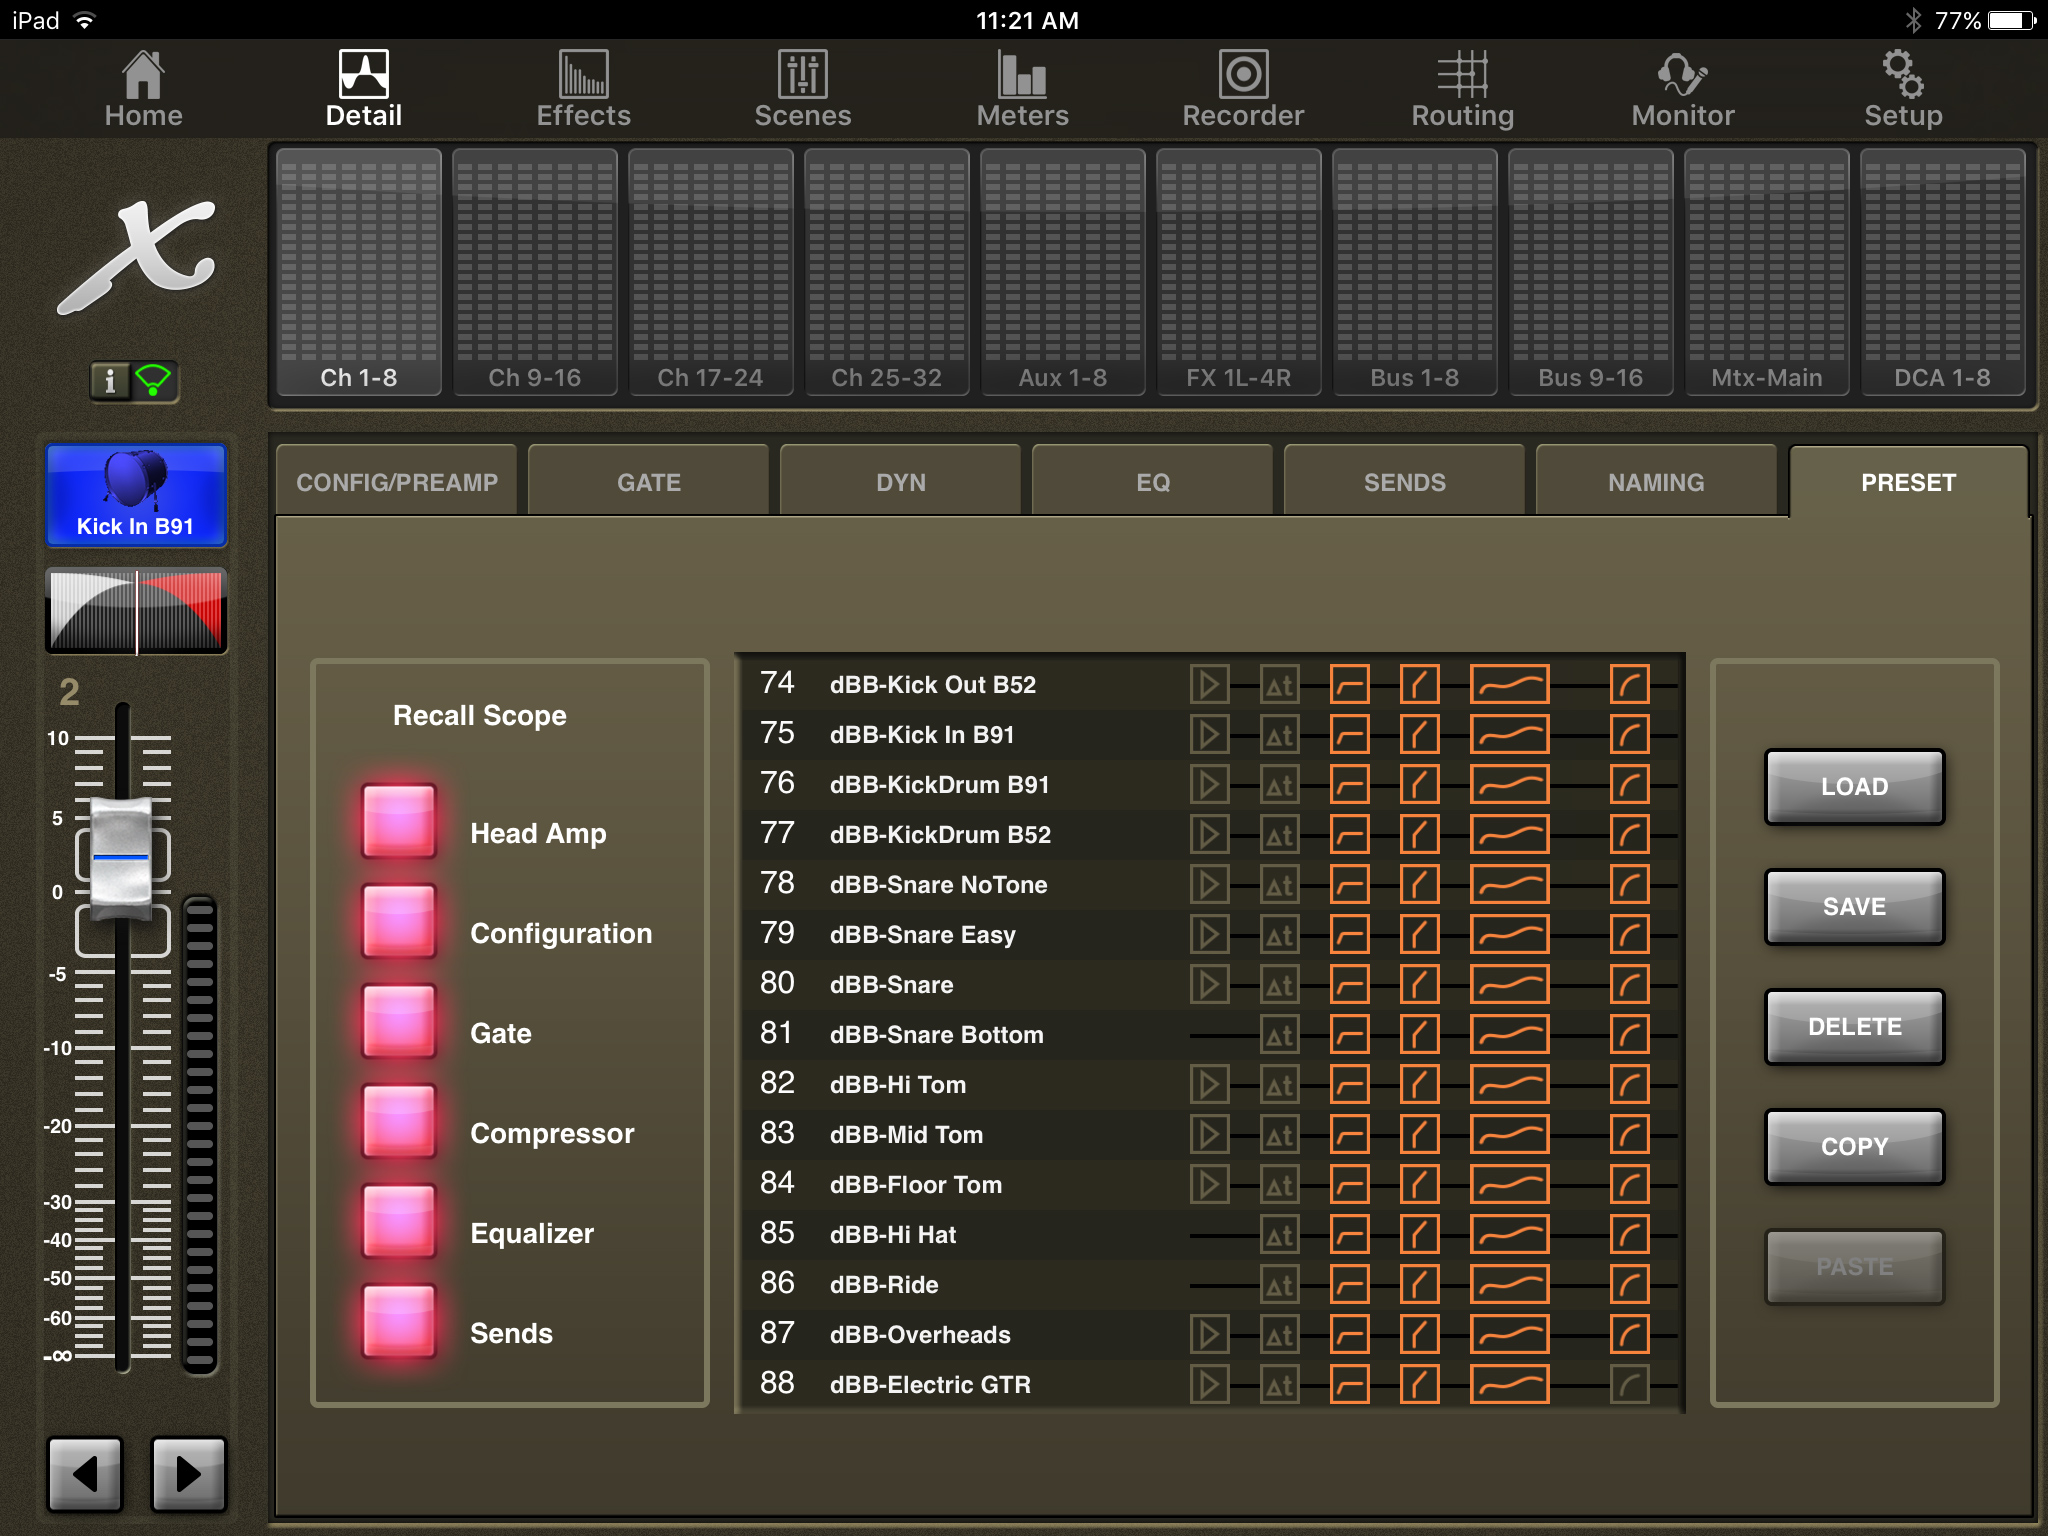
Detail – Preset
Lastly, we have the Preset tab. This is where you can load and save your channel presets onto the selected channel. You can also utilize the recall scope to define what parameters you would like to write over. When you save, the recall scope has no effect on what is saved, it will save all of the parameters of the selected channel.
X32-Mix App Tutorial Detail Tab
That is all for this week’s X32-Mix App Tutorial Detail Tab! Next week, we will take a look at the Effects tab of the X32-Mix App!
