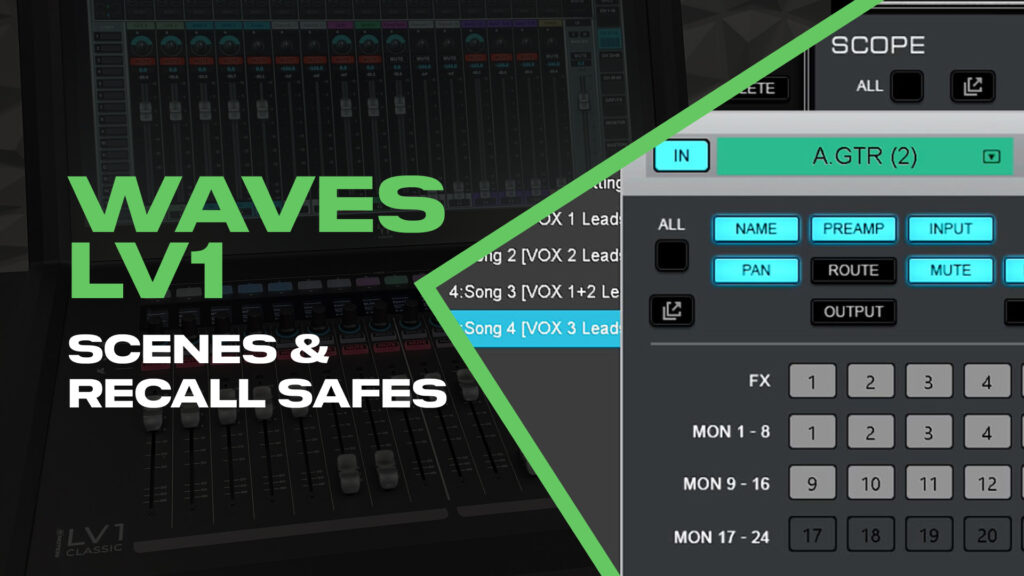
Waves LV1 scenes are powerful—until they accidentally change something you didn’t want changed. A scene recall at the wrong moment can wipe out the EQ tweaks you made during soundcheck, reset your pastor’s mic settings, or worse, change your PA routing mid-service.
The good news is that the Waves LV1 gives you precise control over what scenes change and what stays protected. In this guide, I’ll walk you through everything: creating scenes, understanding scope, using the Filter function for channel-by-channel control, and setting up Recall Safe to protect your critical channels and outputs.
What Are Waves LV1 Scenes?
A scene is a snapshot of your mixer parameters at a specific moment. When you recall a scene, the Waves LV1 loads those saved parameters back into the console. You can store up to 1,000 scenes per session, which gives you plenty of room for complex productions.
Here’s the key distinction: scenes save parameters, not architecture. Your I/O configuration, rack slots, inventory, and system preferences are stored at the session level—scenes only affect things like fader positions, EQ settings, plugin parameters, and routing within the mixer.
| Saved With Session | Saved With Scene |
| External patching | Internal mixer patches |
| I/O and server inventory | Channel conditions |
| Rack slots and plugin sequence | Faders, panning, aux channels |
| System preferences | Individual plugin settings |
This matters because Recall Safe (which we’ll cover later) only protects against scene changes—loading a new session will replace everything regardless of your Recall Safe settings.
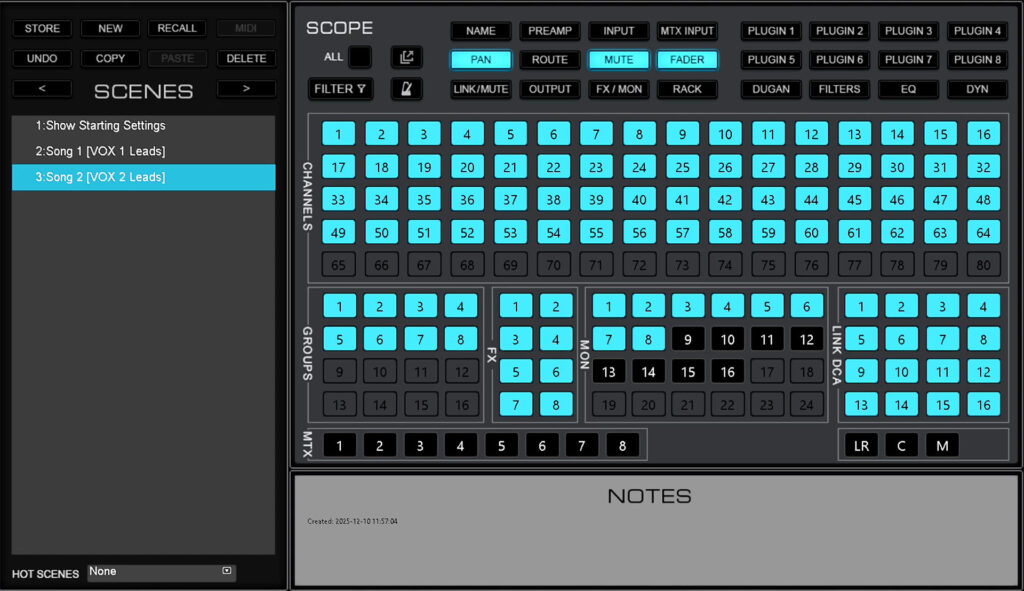
The Scenes Page
Navigate to the Scenes page by clicking Show in the top menu, then selecting Scenes from the left sidebar.

The Waves LV1 Scenes page with scope controls on the right
The interface is divided into several sections:
Left side:
- Store — Overwrites the current scene with the current mixer state
- New — Creates a new scene based on current settings (like “Save As”)
- Recall — Loads the selected scene
- Undo — Reverts the last change (one level only)
- Copy/Paste/Delete — Scene management
- MIDI — Enables scene-follow-program-change for external control
- Scenes List — All scenes in the current session
- Hot Scenes — Up to 8 scenes for quick recall
Right side:
- Scope — Controls what parameters the scene will recall
- Notes — Text notes for each scene
Creating Your First Waves LV1 Scene: Show Starting Settings
Before you start creating song-specific scenes, I recommend saving a complete “starting point” scene that captures everything on your board. This becomes your baseline—you can always recall it to get back to a known good state.
- Get your board set up the way you want it for the start of your show
- Go to Show → Scenes
- Press New
- Name it something like “Show Starting Settings”
- In the Scope section, leave everything selected (the default)
- The scene is automatically stored
This scene captures every parameter: names, preamp settings, EQ, dynamics, routing, fader positions—everything. If something goes wrong during the show, you can recall this scene to reset.
To update this scene later: Make your changes on the board, select the scene in the list, and press Store. This overwrites the scene with your current settings.
Understanding Scope: What Gets Recalled
This is where most people get confused—and where the Waves LV1 becomes incredibly powerful once you understand it. Scope determines which parameters and channels are affected when you recall a scene. Every scene has its own scope settings.

The Scope section controls what parameters and channels are included in scene recall
Channel Parameters
The top row of the Scope section controls which types of parameters are recalled across all selected channels:
| Parameter | What It Controls |
| Name | Channel name |
| Preamp | 48V phantom power, preamp gain level |
| Input | Trim, phase |
| MTX Input | Matrix input faders |
| FX/MON | Send levels, on/off, pan, routing to FX and monitor buses |
| Pan | All pan, balance, and rotate controls |
| Route | Channel routing assignments |
| Mute | Mute state (on/off) |
| Fader | Fader position |
| Mute GRP | Mute group assignments |
| Output | Output delay, on/off, gain |
| Rack | Whether rack processing is on/off |
| Plugins 1-8 | Individual plugin slot settings |
| Dugan | Automix settings (auto, weight, override, group) |
| Filters | High-pass/low-pass filter settings |
| EQ | Equalizer settings |
| Dyn | Dynamics/compressor settings |
Important: If you select Dyn, EQ, or Filters in the scope, it will override the state of Plugins 1-8 for those functions. For example, if EQ is set to Off in scope, EQ won’t change even if Plugins 1-8 are set to On.
Channel and Bus Selection
Below the parameter row, you’ll see a grid of numbered buttons representing:
- Channels — Input channels 1-80 (depending on your license)
- Groups — Stereo groups
- FX — Effects buses
- MON — Monitor/aux buses
- MTX — Matrix outputs
- Link/DCA — DCA assignments
- LR, C, M — Main outputs (Left/Right, Center, Mono)
Color Coding
The button colors tell you the scope status at a glance:
| Color | Meaning |
| Light Blue | Parameter/channel is in scope (will be recalled) |
| Black | Parameter/channel is NOT in scope (won’t change) |
| Dark Blue | Channel has custom Filter settings (different from global scope) |
| Grey | Channel has been edited via Filter but is not currently in scope |
Creating Song Scenes
For song-to-song changes, you typically don’t want to recall everything—just the things that actually change between songs. If you recall EQ and dynamics with every song change, you’ll wipe out any tweaks you made during the previous song.
For most worship applications, your song scenes should recall:
- Pan — In case vocalist positions change
- Mute — Which channels are active
- Fader — Volume levels for the mix
And should NOT recall:
- Preamp — Gain structure shouldn’t change song to song
- EQ/Dynamics/Plugins — Your processing should stay intact
- Monitor sends — The band’s mix shouldn’t change (unless you specifically want it to)
- Main outputs and matrices — Your PA routing should never change mid-show
Step-by-Step: Creating a Song Scene
- Set your board up for Song 1 (fader positions, mutes, etc.)
- Go to Show → Scenes and press New
- Name it “Song 1 – Vox 1 Leads” (or whatever helps you remember)
- Add notes in the Notes section: “Lead vocal is Vocal 1, guitars up, bass down”
- In the Scope section, press All to deselect everything
- Select only: Pan, Mute, Fader
- Select the channels you’re actively mixing (inputs, groups, effects, DCAs)
- Deselect: Monitor buses, matrices, main LR/C/M
- Press Store to save
For song to song changes, select all of your mixing channels, and scope Pan, Mute and Fader
When you create your next song scene, the scope settings carry over—so you only need to set this up once, then just adjust your board and press New for each subsequent song.
The Filter Function: Channel-by-Channel Control
Here’s where it gets really powerful. The Filter function lets you set different scope parameters for individual channels within the same scene. This is perfect for handling instrument changes mid-show.
Example scenario: Song 4 has a different acoustic guitar player with a different guitar. You need to recall not just fader/pan/mute for all channels, but also the EQ, dynamics, preamp, and name for that specific acoustic guitar channel.
How Filter Works
- In the Scope section, click the Filter button (top left, next to All)
- Select the channel you want to customize (e.g., Channel 27 for Acoustic Guitar)
- A detailed panel opens showing all parameters for that specific channel
- Select everything you want to recall for this channel (Name, Preamp, Input, EQ, Dyn, Plugins, etc.)
- Click OK
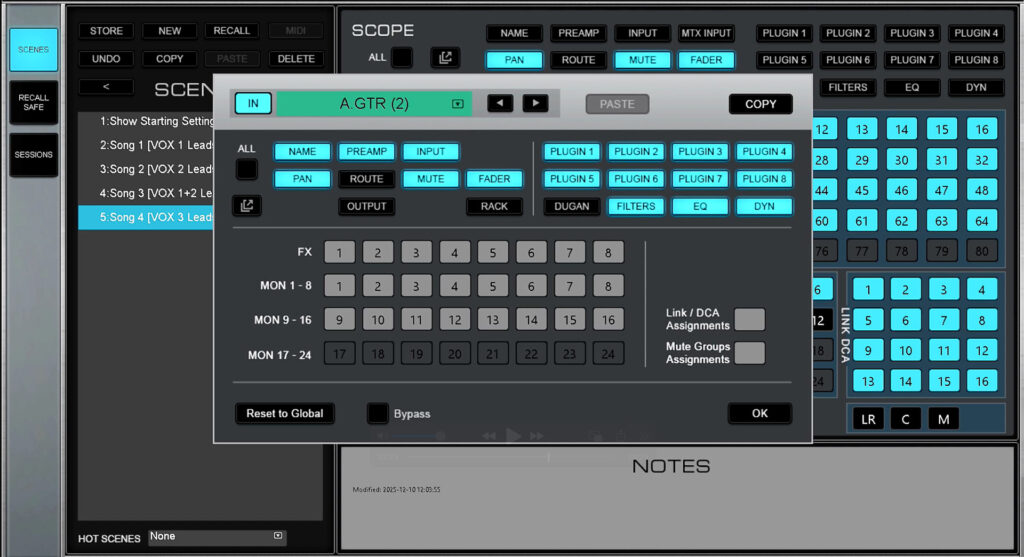
The Filter panel lets you set custom scope for individual channels
Now when you recall this scene:
- All other channels follow the global scope (just Pan, Mute, Fader)
- Channel 27 recalls everything you specified in the Filter (Name, Preamp, EQ, Dynamics, etc.)
The channel will appear dark blue in the scope grid, indicating it has custom Filter settings that differ from the global scope.
Filter Controls
- Reset to Global — Clears all custom settings for this channel, returns to global scope
- Bypass — Temporarily deselects all choices in the Filter window
- Arrow buttons — Navigate between channels without closing the panel
- Copy — Copy Filter settings to paste to another channel
This means you can have one scene that handles both your normal song change (fader/mute/pan for the band) AND a complete channel reset for an instrument swap—all in a single recall.
Navigating Scenes During the Show
You have several options for recalling scenes during performance:
Method 1: Scene Dropdown
In the mixer view, there’s a dropdown at the top that shows your current scene. Click it to select any scene directly.
Method 2: User Keys
My preferred method. Assign Previous Scene and Next Scene to User Keys:
- Go to Setup → UI Settings
- Assign User Key 15 to Scenes → Previous Scene
- Assign User Key 16 to Scenes → Next Scene
Now you can step through your scenes with dedicated buttons.
Method 3: Shortcut Buttons
If you’re using a hardware controller with shortcut buttons:
- Go to Setup → System Inventory
- Click the gear icon to open Shortcuts
- Assign buttons to scene navigation
Important: No Crossfade
LV1 scenes recall instantly—there’s no crossfade or transition time. When you press recall, every parameter in scope snaps to its new value immediately.
This means you should recall scenes during quiet moments: between songs, during applause, or during spoken transitions. Don’t recall a scene while the band is playing unless you want an abrupt change.
Waves LV1 Recall Safe: Protecting Critical Channels
Recall Safe is your safety net. Any channel or parameter you set to Recall Safe will never change when you recall a scene—even if that scene has those parameters in scope.
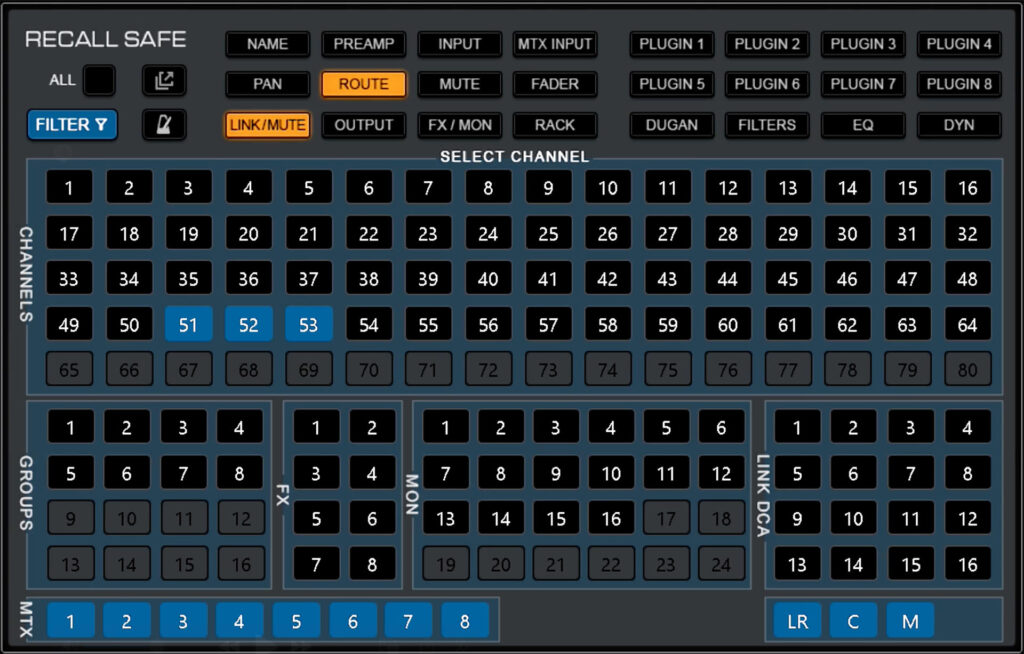
The Recall Safe page protects channels and parameters from all scene changes
Key difference from Scope:
- Scope is set per scene—each scene can have different scope settings
- Recall Safe is set for the entire session—it applies to ALL scene recalls
What to Protect
Based on my workflow, here’s what I recommend setting to Recall Safe:
Channels:
- Pastor/speaker microphones
- Handheld announcement mics
- Any channel that should never change during the show
Outputs:
- Main LR, Center, Mono
- All matrices (especially if feeding PA zones or broadcast)
- Any output feeding your sound system
Parameters (globally):
- Routing — Changing routing can cause a brief mute while latency compensation updates
- Link/DCA assignments — You probably don’t want DCA assignments changing mid-show
- Mute Group assignments — Same reasoning
Setting Up Waves LV1 Recall Safe
- Go to Show → Recall Safe
- Select the channels you want to protect
- Select which parameters to protect for those channels (or use All for complete protection)
- For system outputs, select your matrices and main buses
The Recall Safe interface works exactly like the Scope interface—same parameter buttons, same channel grid, same color coding.
Additional Waves LV1 Recall Safe Options
Channel Recall Safe from Preset Menu: You can also set a channel to Recall Safe directly from its Preset dropdown menu. A “SAFE” indicator appears next to the channel name.
Preamp Recall Safe: In the Recall Safe page, selecting Preamp is a global command that protects all preamps on all Recall Safe selected channels. This ensures your gain structure never changes during scene recalls.
Plugin Recall Safe: Individual plugins can be set to Recall Safe from the plugin’s dropdown menu. A “Safe” indicator appears on the plugin icon. This is useful when you want scene recalls to affect most of a channel’s plugins but protect one specific plugin.
Recall Safe Limitations
Remember: Recall Safe only protects against scene recalls, not session loads. If you load a different session, everything gets replaced regardless of your Recall Safe settings.
Also, if you toggle Routing in and out of Recall Safe, you may get a warning about potential brief mutes during scene changes due to automatic latency compensation updates.
Practical Workflow Summary
Here’s how I set up a typical show:
- Create “Show Starting Settings” scene — Everything in scope, complete board snapshot
- Set up Recall Safe — Pastor mics, matrices, main outputs, routing, link/mute assignments
- Create song scenes — Scope limited to Pan, Mute, Fader for mixing channels only
- Use Filter for instrument changes — Add full channel recall for any instrument swaps
- Assign User Keys — Previous/Next Scene for easy navigation
- Add notes to each scene — Who’s leading, any special considerations
During the show, I step through scenes at natural transition points and let Recall Safe protect everything that shouldn’t change.
More Waves LV1 Resources
If you’re expanding your Waves eMotion LV1 Classic to 80 channels, check out my guide on the LV1 80 Channel Expansion which covers the new V16 features including expanded buses and DSP efficiency improvements.
YouTube Video
For a complete walkthrough of Waves LV1 scenes and Recall Safe, watch the full tutorial:
[VIDEO LINK PLACEHOLDER]