A good Behringer WING vocal reverb can make or break your mix. Too much and your vocals sound washed out and distant. Too little and they feel dry and disconnected from the band. Getting it right means understanding not just which reverb to use, but how to set up your bus routing so the reverb responds naturally to your mix.
In this guide, I’ll walk you through setting up a vocal reverb on the Behringer WING using the Blue Plate effect—from bus configuration to dialing in settings that actually work in a live mix.
Why Bus Routing Matters for Your WING Vocal Reverb
Before we touch the reverb itself, we need to set up a dedicated bus. This is where a lot of people go wrong—they’ll insert a reverb directly on a channel or skip important routing steps, and then wonder why their reverb sounds flat or doesn’t respond to their fader moves.
Here’s what we’re going to do: dedicate a bus (I’m using Bus 13) as our vocal reverb return, configure it properly, insert the Blue Plate effect, and then send our vocals to it. This gives us a stereo reverb that follows our vocal mix naturally.
Setting Up Your Vocal Reverb Bus
Step 1: Select and Name Your Bus
Navigate to your bus masters and select the bus you want to use for your vocal reverb. I like using buses 13-16 for effects, keeping 1-12 available for monitor mixes or other purposes.
- Select your bus (I’m using Bus 13)
- Press HOME
- Name it something clear like “Vox Verb”
Step 2: Verify Stereo Mode
One thing to check right away: make sure the MONO button is NOT engaged. We want this to be a stereo bus. If it’s set to mono, your reverb output will sound flat and lifeless—you’ll lose all that nice stereo spread that makes a plate reverb sound good.
Step 3: Configure Bus Feed Settings
This is the critical step most people skip. Press into the Bus Feed section and configure these settings:
Select All Channels, then set:
- Send Mode: POST (this is important, more on why below)
- Ignore Channel Mute: OFF
- Send Panning: Link to Channel Pan
- Send Level: Infinity (all the way down)
- Send Enable: OFF
Press Apply to set all channels to these defaults.
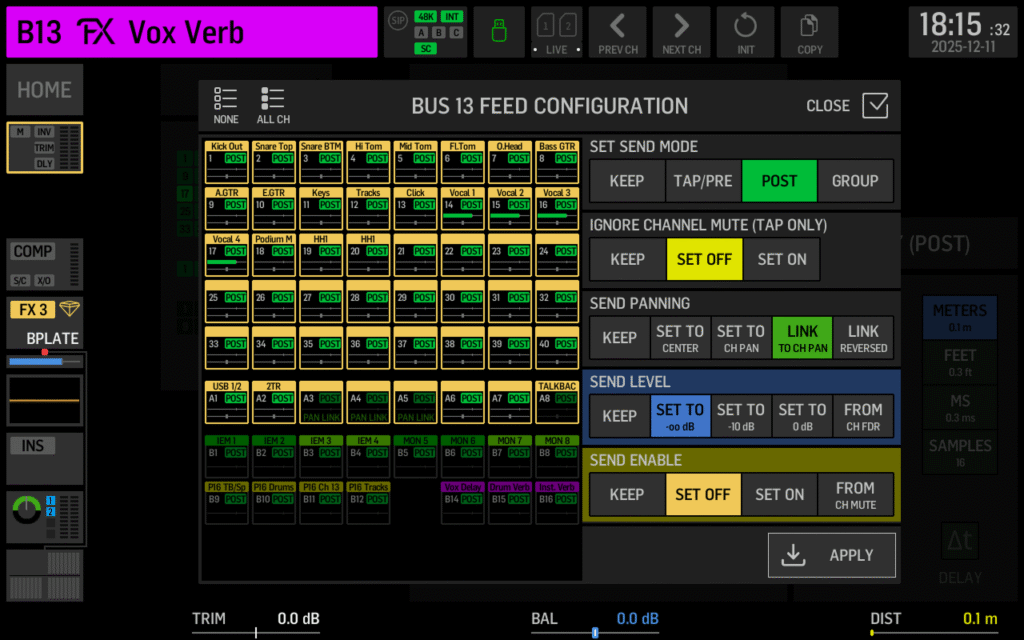
Bus feed configuration, note Post mode and pan linking enabled
Why Post-Fader Matters
Setting your sends to POST fader means your reverb follows your vocal mix. When you push a lead vocal louder, more of that vocal goes to the reverb. When you pull back a background vocal, less goes to the reverb.
If you set it to PRE fader, your reverb mix stays static regardless of what you’re doing with your faders. You might have a background vocal turned way down in the mix, but it’s still sending full blast to your reverb—and now your reverb mix doesn’t match what the audience is hearing.
Why Link Send Panning
If you’re panning your vocalists across the stereo field (vocal 1 slightly left, vocal 2 slightly right, etc.), you want that panning reflected in the reverb too. Linking send pan to channel pan keeps everything cohesive.
Step 4: Verify Main Bus Assignment
While you’re on the bus, click into the Main section and verify that Main L/R is turned on. If you’re also feeding a broadcast mix or other mains, turn those on too, otherwise your vocal reverb won’t reach those outputs.
Adding the Blue Plate Effect
Now we need to insert our reverb. The WING has 16 effects racks, but here’s something important: time-based effects like reverbs and delays must go in racks 1-8. Racks 9-16 are limited to channel-type effects only.
Choosing Your Insert Point
You have two options for where to insert the effect:
- Pre-fader insert (INS1): The bus EQ comes AFTER the reverb
- Post-fader insert (INS2): The bus EQ comes BEFORE the reverb
This comes down to personal preference. If you do the Pre-Fader insert it lets us use the bus EQ to shape the reverb output. Want a darker reverb? Roll off some high end with the EQ. Want to tame some muddy low-mids? Cut them on the bus. You’re EQing the reverb itself, not the signal going into it.
To set this up:
- On your vocal verb bus, navigate to INS1 (pre-fader insert)
- Turn the insert ON
- Select Effects Processor
- Choose a rack (1-8)
- Select Blue Plate from the reverb options
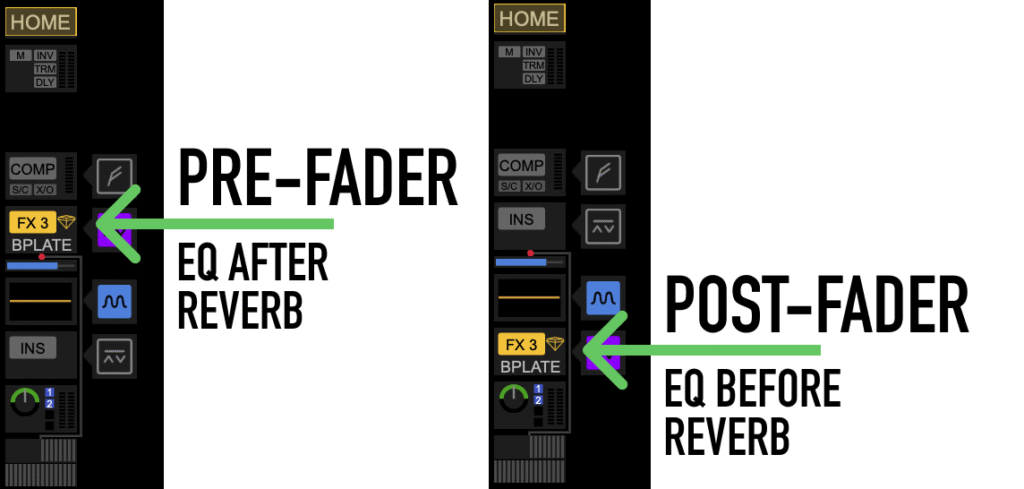
Selecting the pre-fader insert point or post-fader insert point and effects rack
If you want to EQ the signal before it goes into the reverb, then you will want to chose the Post-Fader insert point, INS2.
To set this up:
- On your vocal verb bus, navigate to INS2 (post-fader insert)
- Turn the insert ON
- Select Effects Processor
- Choose a rack (1-8)
- Select Blue Plate from the reverb options
Bring Up the Bus Fader
With the effect inserted, bring your vocal verb bus fader up to 0 dB. We’ll control the actual reverb level from here, and we want our sends to feed at a consistent level.
Dialing In Blue Plate Settings
Now for the fun part, actually shaping your WING vocal reverb. Here’s what each Blue Plate parameter does and where to start:
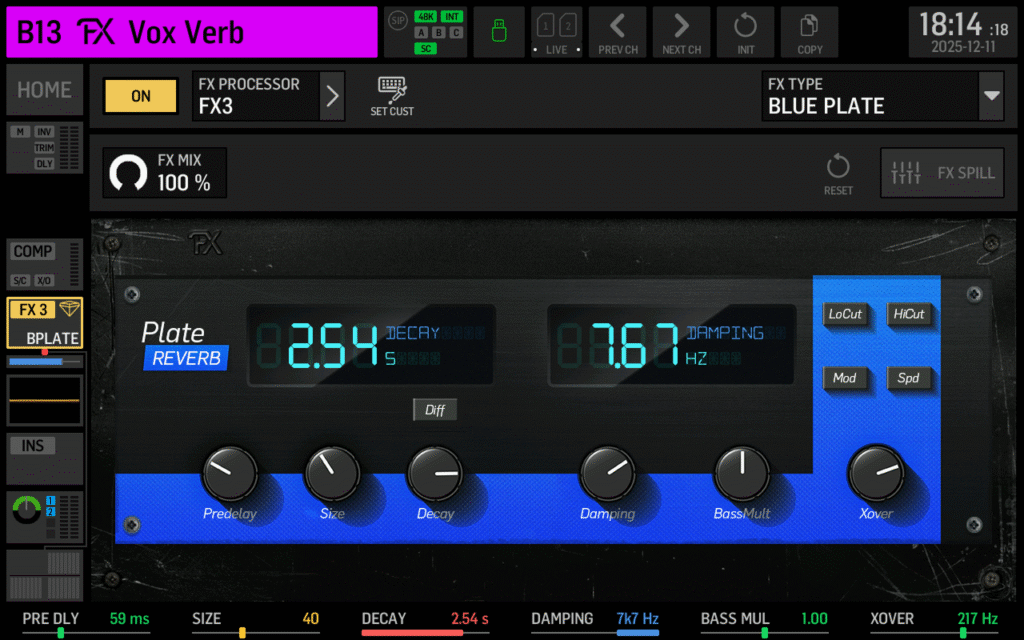
Blue Plate reverb parameters on the WING
Pre-Delay
Pre-delay is the time between the dry vocal and the first reflection of the reverb. It creates a sense of space and size.
- 0 ms: Reverb starts immediately, can sound cluttered
- 50-100 ms: Good starting range for vocals
- 200 ms: Large, dramatic space, can sound disconnected
Start at 50-100 ms and adjust based on the size of room you want to create.
Size
Size affects how large the virtual “plate” sounds. Larger size = bigger, more spacious reverb with longer reflections.
Decay
Decay is how long the reverb tail lasts. This is where tempo matters:
- 0.2 s: Tiny room, almost like a slap
- 1.5-2.5 s: Sweet spot for most contemporary music
- 5 s: Very long tail, works for slow ballads, but will muddy up faster songs
Start around 1.5-2.5 seconds and adjust based on song tempo. Faster songs generally need shorter decay times.
Dampening
Dampening controls the high-frequency rolloff of the reverb reflections. Lower values = darker, warmer reverb. Higher values = brighter, more present reverb.
- 20 kHz: Very bright, almost harsh
- 5-6 kHz: Good starting point for vocals
- 2 kHz: Dark and warm
Start around 5-6 kHz for a natural-sounding vocal reverb.
Bass Multiplier and Crossover
Bass Multiplier affects how much low-end energy is in the reverb tail. The Crossover sets where this low-end boost/cut applies.
For vocals, I typically leave the Bass Multiplier at 1.0 and don’t worry about the crossover. We’re going to control low-end with the filters anyway.
Low Cut
This is crucial for keeping your reverb from getting muddy. The low cut removes low frequencies from the reverb signal.
- 20 Hz: No filtering, lots of low-end buildup
- 150-200 Hz: Good range for vocals
- 400 Hz: Very thin reverb
Start at 150-200 Hz. If your mix still feels muddy with the reverb engaged, push this higher.
High Cut
High cut removes high frequencies, making the reverb darker and less harsh.
- 20 kHz: No filtering, full brightness
- 7 kHz: Good balance for vocals
- 2 kHz: Very dark
Start around 7 kHz for a balanced vocal reverb that sits well in most mixes.
Starting Settings Table
Here’s a quick reference for dialing in your WING vocal reverb with Blue Plate:
| Parameter | Starting Value | Notes |
| Pre-Delay | 50-100 ms | Creates sense of space |
| Decay | 1.5-2.5 s | Shorter for fast songs |
| Dampening | 5-6 kHz | Lower = darker reverb |
| Low Cut | 150-200 Hz | Higher if mix is muddy |
| High Cut | ~7 kHz | Lower for darker sound |
| Bass Multiplier | 1.0 | Leave at unity for vocals |
These are starting points—adjust to taste based on your room, your vocalists, and the style of music.
Sending Vocals to Your Reverb
With everything configured, it’s time to actually send some vocals to the reverb:
- Select your Vox Verb bus
- Press Sends on Fader
- Navigate to your vocal channels
- Unmute the send and bring the fader up to 0 dB for each vocal you want in the reverb
I like setting my sends at 0 dB (unity) and then controlling the overall reverb level with the bus master fader. This keeps things simple, if I want more reverb in the mix, I push the Vox Verb fader up. If I want less, I pull it down.
Now exit Sends on Fader and listen to your mix. Bring the vocal verb bus fader up gradually until you hear the reverb sitting nicely behind your vocals without washing them out.
Advanced: Reverb for Broadcast Only
Here’s a trick for broadcast or streaming mixes. If your room already has natural reverb and you don’t need it in the PA, but your stream sounds too dry, you can send the vocal reverb only to your broadcast output.
Simply go to your Vox Verb bus, navigate to the Main section, and turn OFF Main L/R while leaving your stream/broadcast main turned ON. Now your vocal reverb only goes to the stream.
One thing to note: if you do this, make sure you’re regularly monitoring your stream mix with headphones. You can’t hear what the reverb is doing if it’s not in your main speakers.
Advanced: Sending Reverb to In-Ear Monitors
Vocalists often want reverb in their in-ears, it helps them feel less isolated and sing more naturally. With the WING’s bus-to-bus routing, this is easy:
- Select your Vox Verb bus
- Go to the Sends section (you’ll see “Bus to Bus Sends”)
- Find your vocalist’s IEM bus
- Turn it on and adjust the level
Now that vocalist gets the vocal reverb blended into their monitor mix. Keep in mind this is your front-of-house reverb mix, if they want a custom reverb blend, you’d need to set up a separate reverb bus fed only by the channels they want.
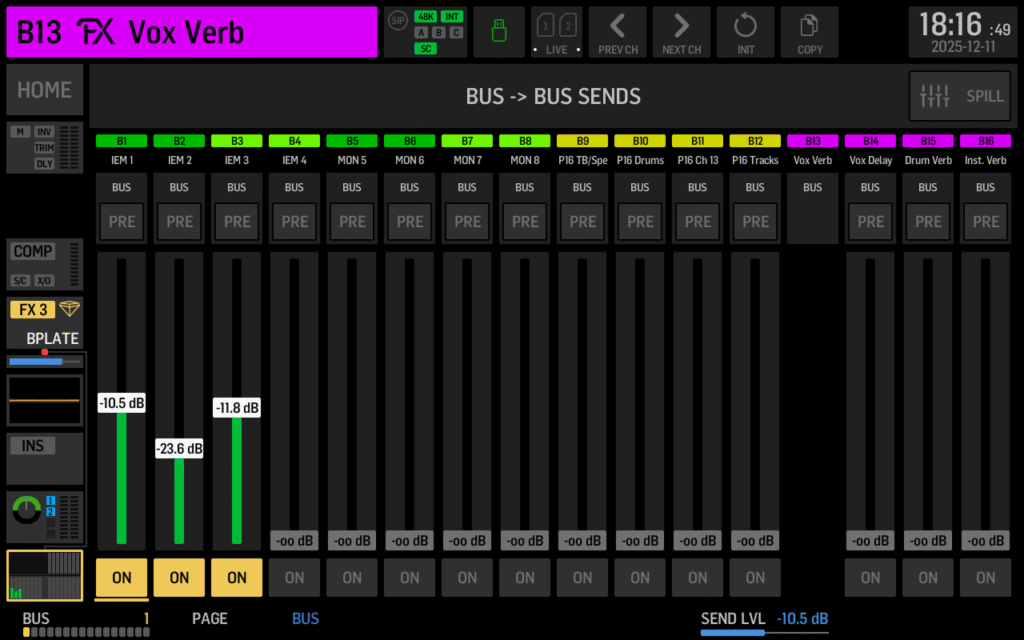
Bus-to-bus sends let you route your vocal reverb to IEM mixes
Get More WING Effects
If you want to skip the setup and get straight to mixing, check out my WING Effects Presets which include vocal reverbs, delays, and more, all ready to load and tweak for your room.
YouTube Video
For a complete walkthrough with audio examples, watch the full tutorial: How to Create a Vocal Reverb on the Behringer WING (Blue Plate FX Tutorial)