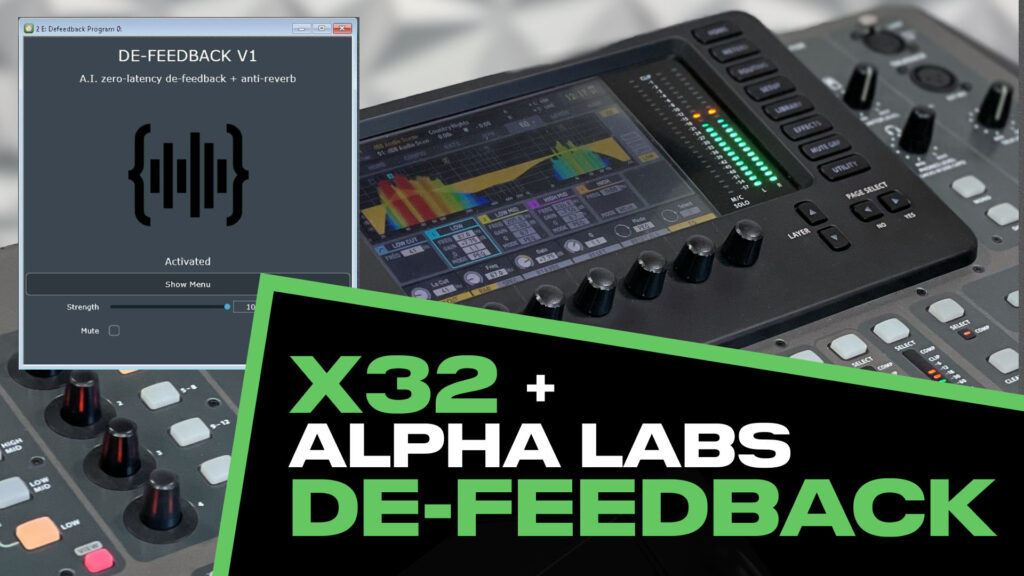
If you’ve been following my Alpha Labs De-Feedback content, you know I’m a fan. I bought the Option 1 with my own money, tested it on real shows, and the results speak for themselves. This post walks through exactly how to set up De-Feedback on your Behringer X32 using the Aux insert method, including the physical connections, gain structure, and the latency you can expect.
If you’re not familiar with Alpha Labs De-Feedback or want to compare the Option 1 and Option 2 hardware packages, start with my De-Feedback Demo & Latency Testing post first.
The De-Feedback X32 Aux Insert Method
The Behringer X32 handles inserts through its Aux inputs and outputs. The signal flow of the De-Feedback X32 Aux Insert Method looks like this:
Channel or Bus → Aux Send → Scarlett Solo Input 1 → De-Feedback Computer connected to Scarlett Solo via USB → Scarlett Solo Output L → Aux Return → Back to your Channel or Bus
This works on a single channel if you want De-Feedback on just one mic, or on a bus if you want to process multiple mics through one instance. For most church applications, inserting on a speech bus makes the most sense. Route your pastor mic, podium, and any other speech sources to a subgroup, insert De-Feedback on that bus, and let the bus feed your PA.
De-Feedback X32 Physical Connections
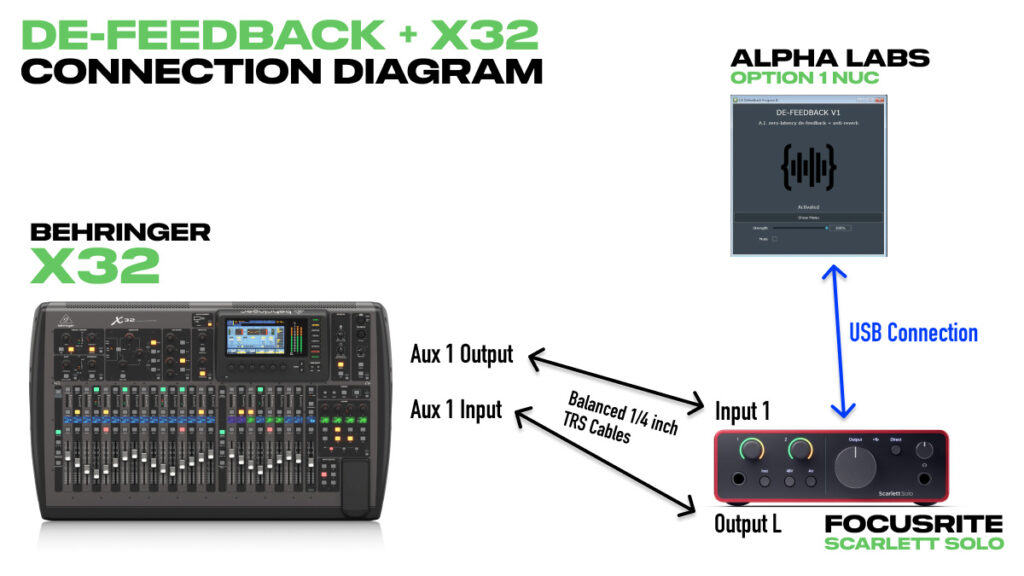
Physical connections required for using the De-Feedback X32 Aux insert method
For the Alpha Labs De-Feedback Option 1 setup with the Focusrite Scarlett Solo 4th Gen, you’ll need 1/4 inch TRS balanced cables to connect to Input 1 and the outputs of the Scarlett solo. If you want to use Input 2 you will need a TRS-to-XLR adapter cable since the X32’s Aux outputs and inputs are all TRS.
- X32 Aux Output → TRS-to-TRS cable → Scarlett Solo Input 1 (TRS)
- Scarlett Solo Output L → TRS-to-TRS cable → X32 Aux Input
One thing to note: always use Input 1 (the TRS input on the front) on the Scarlett Solo, not Input 2 (the XLR on the back). I’ll explain why in the gain structure section.
Scarlett Settings
Before you start routing, make sure your Scarlett is configured correctly:
- Both input gains turned all the way down
- Output knob turned all the way up
- All button lights should be white (Instrument, 48V, Air)
- Direct must be off (not green). If Direct is on (green is on), it mixes the input back to the output and bypasses De-Feedback entirely, giving you a doubled signal.
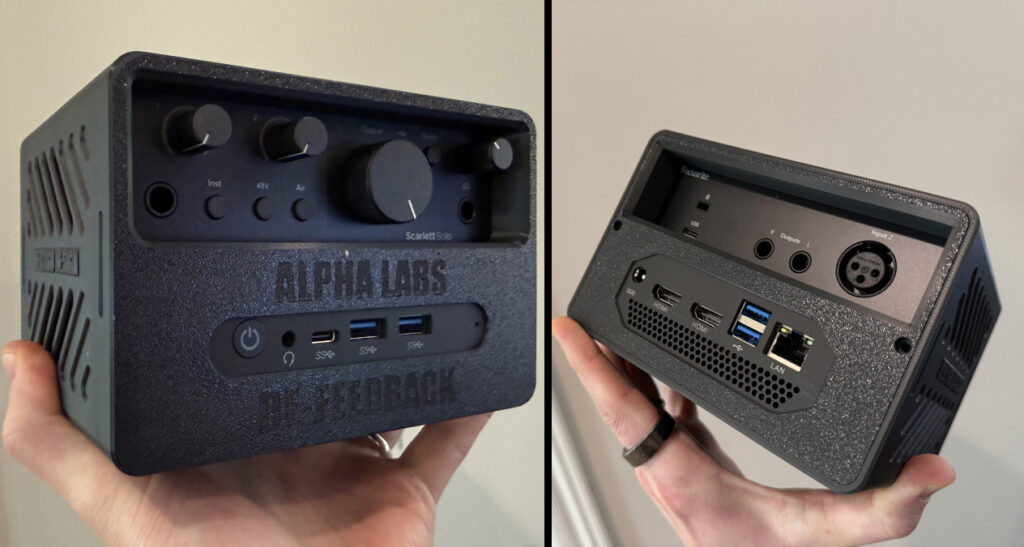
I’m using a 3D printed case from Cults3D that holds the Option 1 NUC and the Scarlett Solo together. It makes the whole rig much easier to deploy.
Gain Structure
When we talk about gain structure, we are looking at what happens to the audio when it passes through a device. That device can be an EQ, compressor, physical audio equipment, effect, plugin, ect. With gain structure we also want to ensure we don’t clip or distort any devices.
Focusrite Scarlett Solo 4th Gen Max Level:
When looking at a piece of gear we need to make sure the max level matches any equipment we are plugging into it. For instance the Behringer X32 Aux Output has a max level of +16 dBu. Now when we look at the two inputs of the Focusrite Scarlett Solo 4th Gen we see this:
| Input | Max Level |
| Input 1 (TRS) | +22 dBu |
| Input 2 (XLR) | +9.5 dBu |
Notice Input 2 of the Focusrite Scarlett Solo, the max level is +9.5 dBu, which is lower than the +16 dBu of the Behringer X32 Aux Output. If you end up taking the aux output from your Behringer X32 into the XLR input of Input 2 of the Scarlett Solo, you would end up getting very close to clipping the input, which would add distortion.
This is why I recommend setting up the Input 1 of the Scarlett Solo with your Behringer X32 when using the Aux Insert method
The lower max level of the XLR input is only on the Scarlett Solo. When looking at the Focusrite Scarlett 2i2, 4i4, 16i16, 18i16, and the 18i20, they all have a max level of +16 dBu on the XLR input.
Input/Output Gain Comparison Scarlett Solo
When we connect the Scarlett Solo to the Behringer X32 Aux Input/Output for the Aux Insert method, there is a bit of a gain structure level change:
- Input 1 (TRS): -6.73 dB of insertion loss
- Input 2 (XLR): +6.33 dB of gain
This is with the Scarlett Solo input gain turned all the way down and output turned all the way up. That’s a 13 dB difference between the two inputs. The reason for this difference is again that Input 2 is a mic preamp calibrated for much lower level signals and Input 1 is designed for line level signals. Another reason we want to use only Input 1 of the Scarlett Solo with the Behringer X32.
Compensating for the -6.73 dB Loss
Turn the Input 1 gain knob up slightly, about 7 dB from minimum. This compensates for the insertion loss and gets you back to unity gain through the loop. When you bypass De-Feedback in VSTHost or pull the insert out of your signal chain on the Behringer X32, the level shouldn’t change.
What If You Need to Use Input 2?
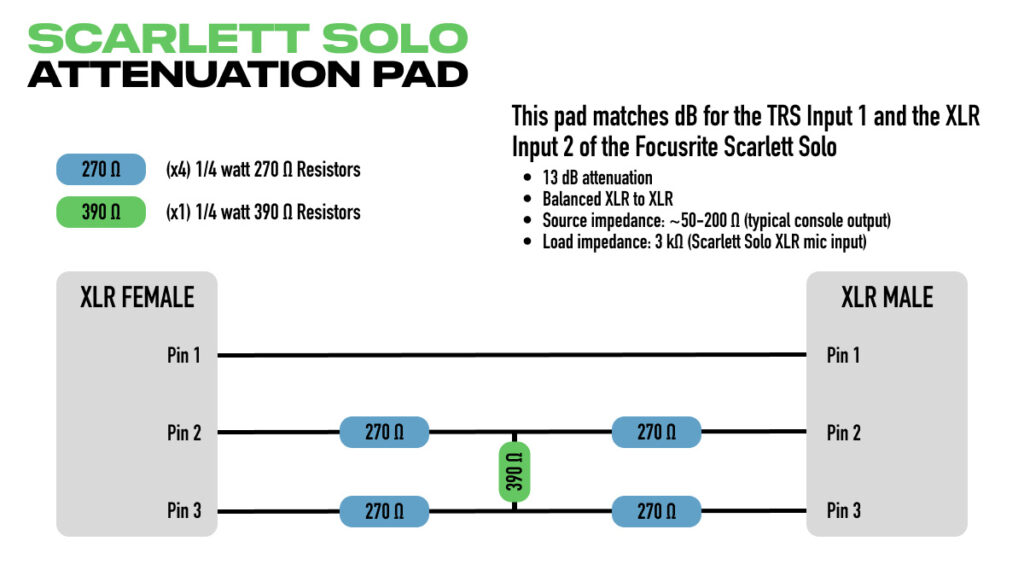
If you’re running two instances of De-Feedback on the Option 1 (which is possible at 48 kHz with a 32-sample buffer), you’ll need both inputs. To deal with that 13 dB gap, you’ll need an inline attenuator on Input 2 and then compensate with more preamp gain on the Scarlett for input 2.
The Shure A15AS is a switchable XLR barrel attenuator with -15 dB, -20 dB, and -25 dB positions. The -15 dB setting gets you close to matching Input 1’s behavior, leaving only about 2 dB to make up by turning up the Input 2 gain knob slightly. It’s an off-the-shelf solution with no soldering required.
If you prefer a DIY approach, you can build a 13 dB balanced H-pad inside an XLR barrel using five resistors shown below:
VST Host Setup
Once the Scarlett is connected to the Option 1 computer, you need to select it as your audio device in VST Host:
- Go to Devices > Wave
- Set the Input port to ‘No Wave’ (it doesn’t need anything there)
- Set the Output port to ‘Focusrite USB ASIO’
- Sample rate and buffer size are also set from this menu (for 1 instance of De-Feedback use 48 kHz sample rate with a buffer of 16 or 32)
One more setting: go to Devices > ASIO Control Panel and make sure Safe Mode is turned on. This improves stability at low buffer sizes.
X32 Routing
First, set up your Aux I/O for the insert path:
- Press ‘Routing’
- Go to the ‘Inputs’ tab and make sure Aux In is set to ‘Aux In’
- Go to the ‘Aux’ tab and set Aux Out 1 to ‘Insert’
Inserting on a Single Channel
If you just want De-Feedback on one microphone:
- Select the channel
- Press ‘Home’, then tab over to ‘Config’
- Use the 6th rotary knob to scroll down to ‘Aux 1’
- Press ‘Connect’ with the 6th rotary knob
- Press ‘Insert’ with the 5th rotary knob
At this point, talking into that mic should show metering in the De-Feedback plugin.
Inserting on a Bus (Multiple Mics)
Alpha Labs De-Feedback can also be used with multiple microphones at the same time. I have had great results with this in my testing. For multiple speech mics going through one instance of De-Feedback:
- Create a mixbus and name it something like ‘Speech’
- Select the mixbus, press ‘Home’, tab over to ‘Config’, and set the bus configuration to ‘Post Fader’ (so your channel fader moves are reflected in the bus)
- Press ‘Sends on Fader’ and raise your speech channels to 0 dB
- Exit Sends on Fader
- With the mixbus still selected, tab over to the ‘Main’ tab, enable the mixbus to feed the stereo LR bus
- Important!! Go to each speech channel and remove it from the stereo bus. If you skip this, you’ll hear a weird robotic sound because the channel is going direct to mains AND through the latent De-Feedback path at the same time.
- Select each speech channel, tab over to ‘Main’ tab, remove the channel from the Stereo LR bus.
- Select the mix bus, go to ‘Config’
- Scroll the insert to ‘Aux 1’, press ‘Connect’, then press ‘Insert’
You’ll have two options: Pre EQ or Post EQ. I typically insert Post so that any ring-out EQ I’ve done on the bus happens before De-Feedback processes the signal.
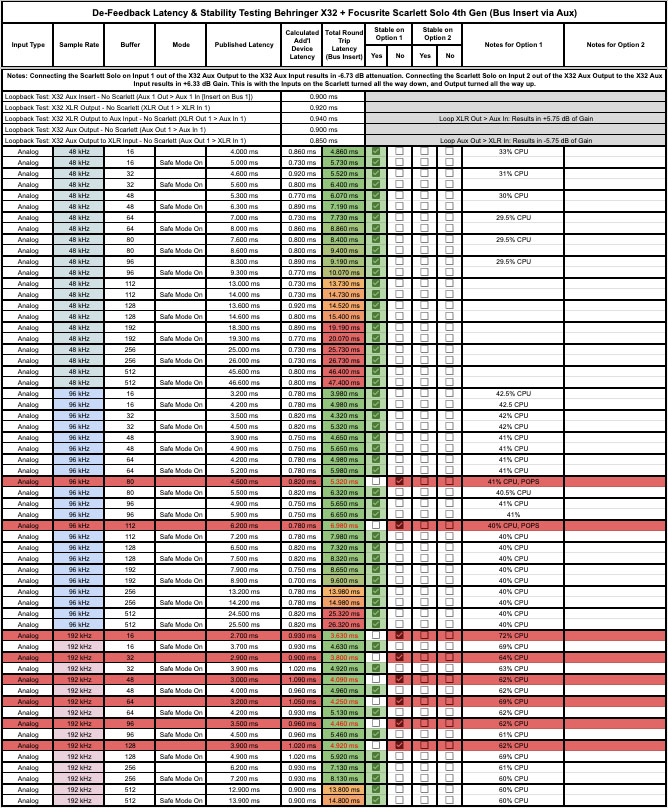
Latency of De-Feedback on the Behringer X32
Using the Aux insert method adds about 0.9 ms of roundtrip latency compared to a direct insert. That’s the X32’s own A/D and D/A conversion on the Aux path.
At 48 kHz with a 16-sample buffer and Safe Mode on, the total roundtrip latency through the X32 Aux insert is approximately 5.73 ms. For comparison, measuring just the Scarlett Solo alone (as I did in my first De-Feedback post), the roundtrip was 4.83 ms. The difference is that 0.9 ms from the X32’s Aux path.
5.73 ms is still well under the threshold where you’d notice any delay on speech.
Alpha Labs recommends running at 48 kHz for the best balance of stability and low latency, and my testing confirms that. At 48 kHz, the Option 1 is rock solid at every buffer size with Safe Mode on. If you want the absolute lowest latency, 16 samples is the sweet spot. If you want a little extra stability margin for your first show, start at 32 samples (approximately 6.4 ms total roundtrip with the X32 Aux insert).
| Sample Rate | Buffer | ASIO Driver Mode | Total Roundtrip (with X32 Aux) |
| 48 kHz | 16 | Safe Mode On | 5.73 ms |
| 48 kHz | 32 | Safe Mode On | 6.4 ms |
| 48 kHz | 64 | Safe Mode On | 8.86 ms |
I have linked to a Google Sheet below for the complete latency data of all sample rates and buffer sizes tested with the Alpha Labs Option 1 NUC, Focusrite Scarlett Solo and the Behringer X32 with the Aux Insert method.
YouTube Video
Here’s the full video walkthrough covering everything in this post.