If you’ve ever run a service or event with multiple bands, scene changes, or complex cue sequences, you know how chaotic things can get when you’re trying to make changes on the fly. Behringer WING snapshots, snippets, and shows give you three powerful tools to manage all of this. Understanding the difference between them—and knowing when to use each—will completely change how you approach those more complicated services.
Let’s break down what each one does and how you can use them together for seamless show control.
The Big Picture: How WING Snapshots, Snippets and Shows Work Together
Think of it this way:
Snapshots capture everything on your console—every fader position, every EQ setting, every routing assignment—and save it to a single file. When you load a snapshot, you’re essentially restoring the entire board to that saved state.
Snippets capture only the specific parameters you choose. Maybe you just need to save the fader and mute positions for your input channels, or perhaps you need to store all the settings for a single guitar channel. Snippets ignore everything else on your console and only affect what you’ve told them to.
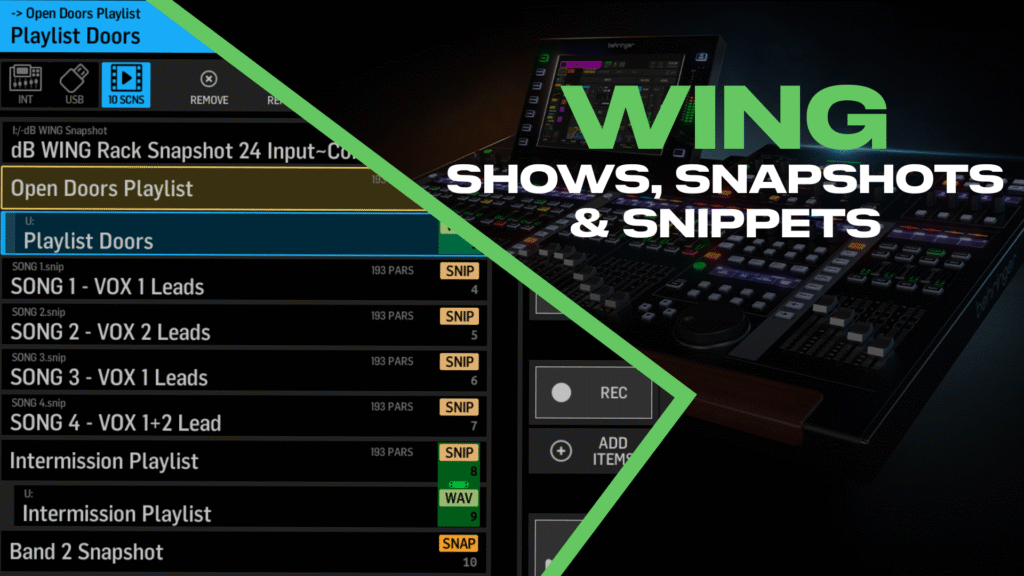
Shows tie everything together. A Show is a container that holds your snapshots, snippets, and even audio clips in a sequential cue list. Once you’ve built a show, you can navigate through your entire service using the Go, Next, and Previous buttons in the Custom Controls section.
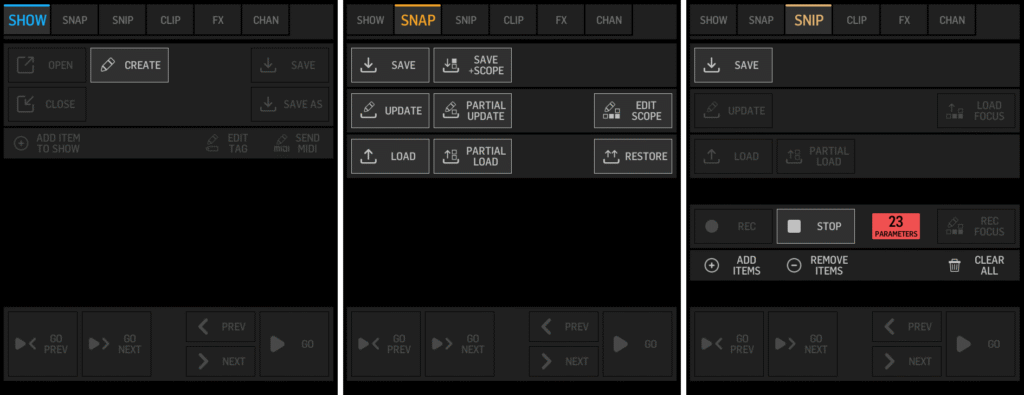
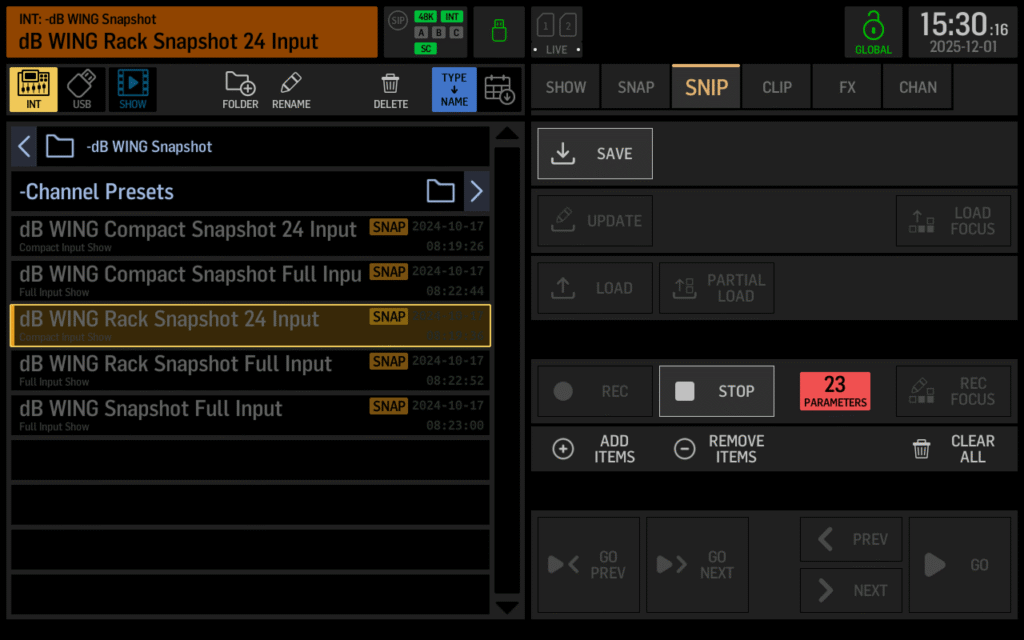
The Library screen with Show, Snap, and Snip tabs visible on the right panel.
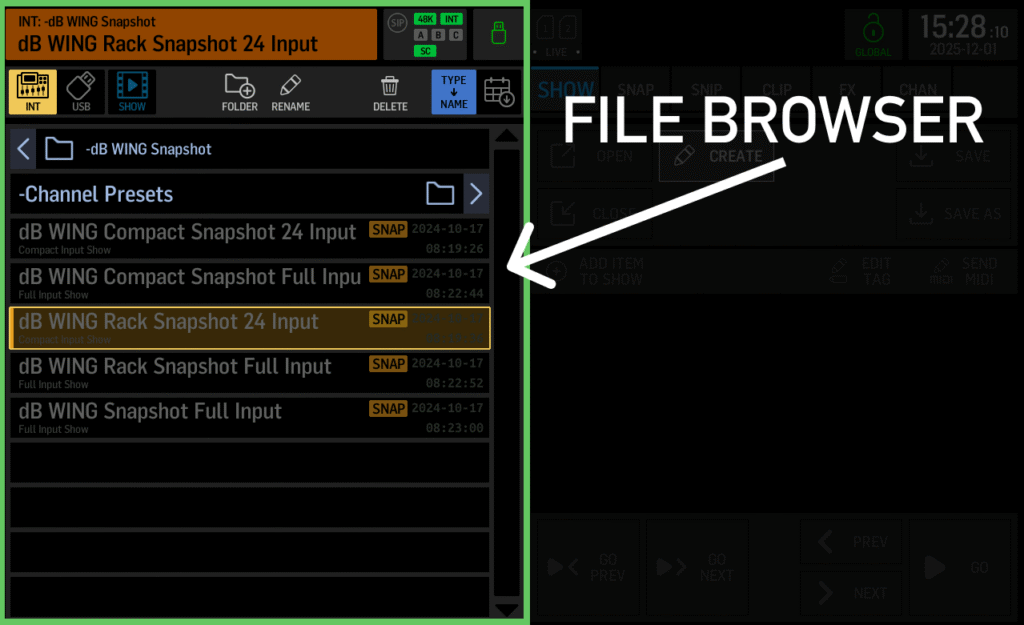
The left side of the Library screen is your file browser. This is where you navigate the internal storage of the WING, a USB thumb drive plugged into the USB port, and—once you’ve created or loaded a show—the Show tab for navigating your scenes.
You can see in my file browser my Behringer WING Snapshot, which is a pre-configured mix scene I created with optimized routing, EQ, compression, and effects for live sound and streaming. If you’re looking for a ready-to-go starting point instead of building everything from scratch, that snapshot will save you hours of setup time.
When to Use Behringer WING Snapshots
Snapshots are your go-to for full stage changes. If you have multiple bands performing on the same stage with completely different setups—different input assignments, different monitor mixes, different effects—a snapshot is the right tool.
Here’s an example: Band one has drums, bass, and one electric guitar. Band two has drums, bass, two electric guitars, and keys. These are fundamentally different console configurations. You’d save a snapshot for each band’s setup, and when it’s time to switch, you load the appropriate snapshot and the entire board reconfigures itself.
To save a snapshot, go to LIBRARY → SNAP and press Save. The WING will capture every parameter on the console. If you want to add it directly to your show at the same time, press Save + Add instead.
Snapshot Scope: Loading Only What You Need
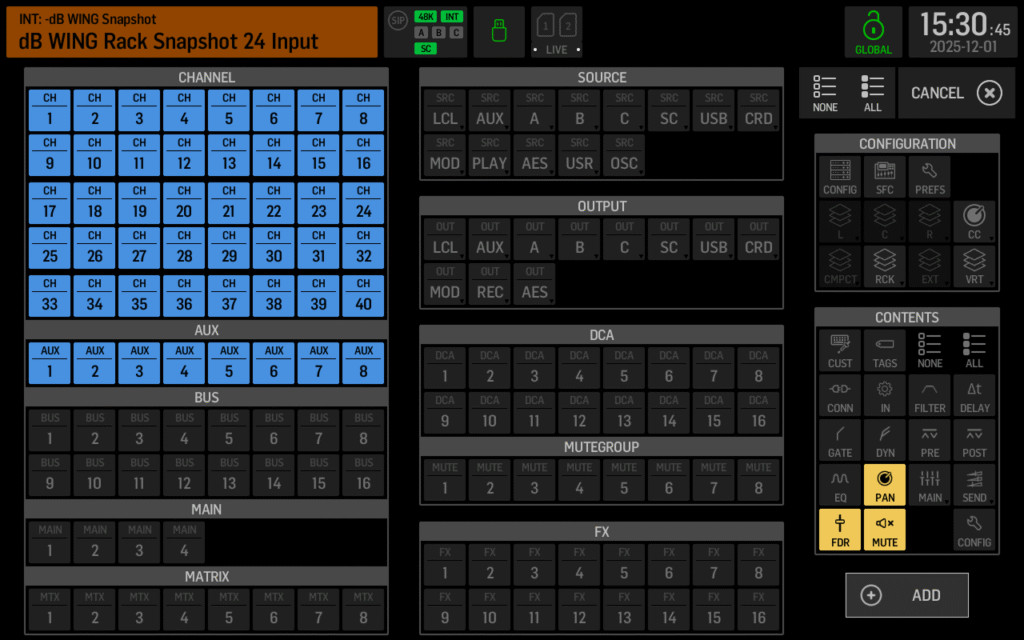
One thing to note: WING snapshots always save everything, but you can control what actually loads when you recall them. This is called the Scope.
When you press Edit Scope, you’ll see a grid showing every channel, bus, matrix, main, DCA, mute group, effects slot, and configuration setting on your console. You can selectively enable or disable any of these. If you uncheck the buses, for example, those settings won’t change when you load the snapshot—even though they were saved in the file.
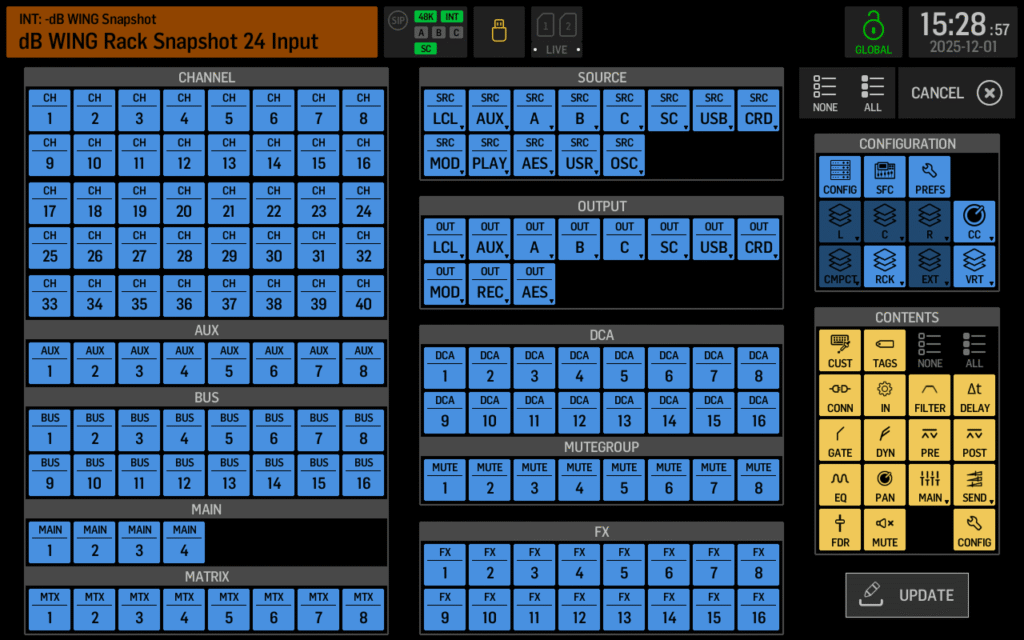
The Snapshot Scope screen showing selectable channels, buses, and configuration options.
This is incredibly useful when you want a snapshot to reset your input channels but leave your monitor mixes untouched.
Global Safes: Protecting Parameters Across All Scenes
There’s another layer of protection called Global Safes. While Scope controls what a specific snapshot loads, Global Safes protect parameters from any scene recall.
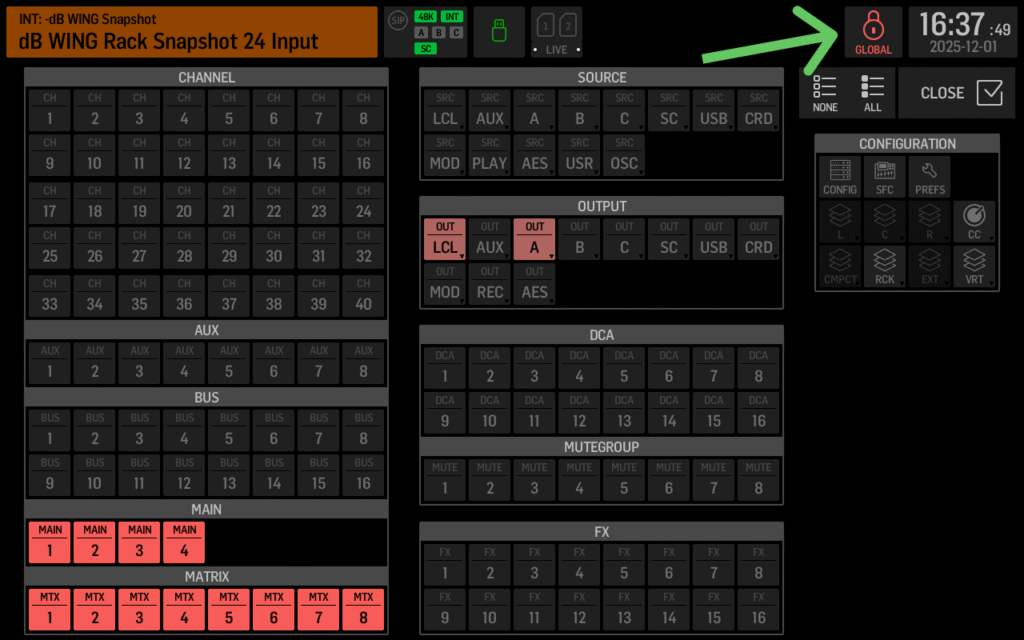
Press the Global Safes button in the Snap tab, and you’ll see the same grid layout as the Scope screen. Anything you select here will never be overwritten when loading snapshots or snippets—regardless of their individual scope settings. When Global Safes are active, the icon turns red as a visual reminder.
This is my go-to for protecting things like my main output levels or monitor engineer’s bus settings during a service. I will typically safe my output routing for my Main PA, Streaming Outputs, Lobby, etc.
When to Use Snippets
Snippets shine when you need surgical precision. Instead of affecting the entire board, snippets let you save and recall only the specific parameters you care about.
Let’s say you’re running a Christmas service where the band lineup stays the same, but you need to adjust fader and mute positions between songs. You don’t want to reload every EQ, compressor, and routing setting—you just want the faders and mutes to change. That’s exactly what snippets are for.
Recording a Snippet
To create a snippet, go to LIBRARY → SNIP and press Record. Now, anything you change on the console gets added to the snippet. Move a fader? That fader position is now part of the snippet. Unmute a channel? That mute state is saved.
You’ll see a parameter count on screen that updates in real time as you make changes. When I’m building a snippet for song transitions, I might see “4 parameters” after adjusting two faders and two mute buttons.
The Snippet recording interface showing the parameter count as changes are made.
When you’re done, press Stop and then Save + Add to save the snippet and add it to your show.
Adding Parameters Without Recording
Here’s a tip that will save you time: you don’t have to manually adjust every parameter to add it to a snippet. Press Add Items and you’ll get a scope-style grid where you can select exactly what you want to include.
For example, if you want to save the fader, pan, and mute positions for all 48 channels (inputs plus auxes), you can select all those channels on the left, then check only Fader, Pan, and Mute in the Contents section on the right. Press + Add and you’ll have 144 parameters ready to go—without having to touch every single fader. This is my go-to setup for song-to-song transitions where I need consistent control over levels and positioning without affecting EQ, compression, or routing.
This method guarantees you don’t accidentally miss a channel, and it’s much faster when you’re setting up snippet templates.
Snippet Use Case: Mid-Service Instrument Swap
Snippets aren’t just for fader moves. Let’s say a guitarist swaps instruments mid-service and needs completely different channel settings—different EQ, different compression, different gain.
You can create a snippet that captures every parameter for just that one channel:
- Press Clear All to start fresh
- Press Add Items
- Select the guitar channel (e.g., Channel 15)
- Press All to include every parameter for that channel
- Press + Add
Now you have a snippet with 269 parameters (or thereabouts) that will completely transform that single channel when loaded—without touching anything else on your board.
Building Your Show with WING Snapshots and Snippets
Once you have your snapshots and snippets saved, it’s time to bring them together in a Show.
Go to LIBRARY → SHOW and create a new show file. I like to create a dedicated folder first (like “Christmas Services”) and save my show there. Once a show is open, you’ll notice a third tab appears in the left panel alongside Internal and USB—this is your show’s contents.
As you save new snapshots and snippets using Save + Add, they automatically get added to your show in sequence. You can also manually add existing files by selecting them and pressing Add or Add Item to Show.
Navigating Your Show
With a show loaded, the Custom Controls section becomes your show controller. You’ll see:
- Go: Loads the currently selected scene
- Next: Selects the next scene in the list
- Prev: Selects the previous scene
- Go + Next: Loads the current scene AND selects the next one (this is my preferred way to run a show)
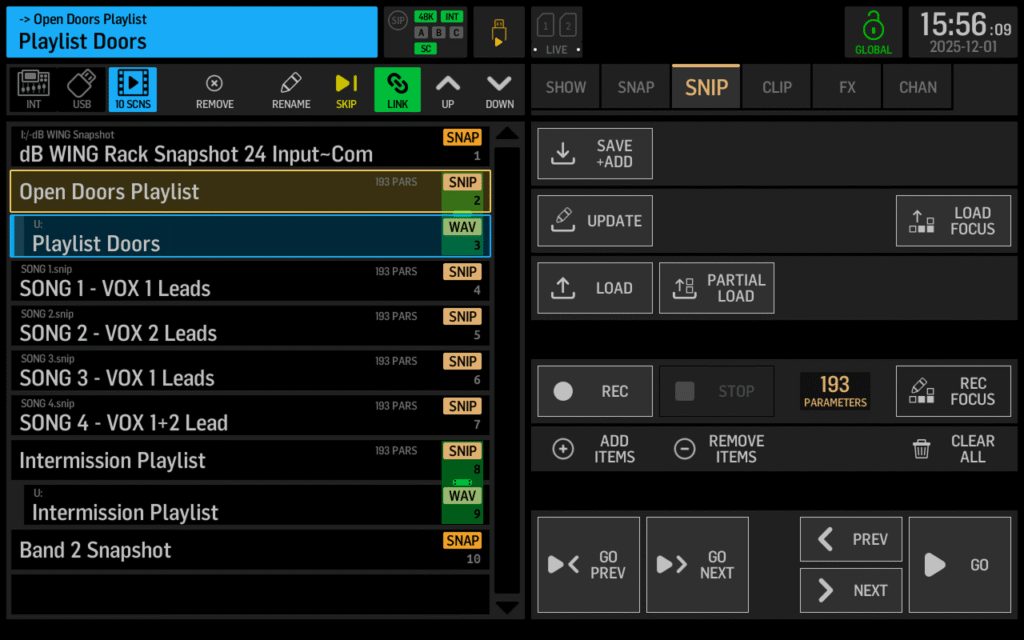
The Show tab displaying a scene list with snapshots, snippets, and navigation controls.
Linking Scenes Together
One really useful feature is the ability to link scenes. When you link two scenes, loading the first one automatically loads the second one as well.
This is particularly powerful when working with audio clips. You might have a snippet that unmutes and raises your playback channel, followed by a clip that plays your walk-in music, followed by another snippet that mutes and lowers the playback channel. Link all three together, and pressing Go once will execute the entire sequence—including waiting for the audio clip to finish before moving to the mute snippet.
To link scenes, select a scene in your show and press Link. That scene will now be chained to whatever comes immediately after it in the list.
Scene Tags for Custom Control Buttons
You can also assign tags to scenes for direct recall from Custom Control buttons. Select a scene, press Edit Tag, and assign a number (like #1). Then program a Custom Control button with Function: Scene Recall and Scene Tag: Scene #1.
Now you can trigger that scene from anywhere on the console—you could be on the meters page, deep in a channel’s EQ screen, anywhere—and that one button will fire your tagged scene.
Important: There’s No Crossfade
You have to be very careful about when you load scenes. Unlike some other consoles, Behringer WING snapshots and snippets do not offer crossfade times. The moment you press Go, every parameter loads instantly.
This means you’ll want to time your scene recalls during quiet moments—between songs, during applause, or when the band is vamping. If you load a scene while someone is singing, you’ll hear every fader jump to its new position in real time.
One thing I’ve seen people mention on forums: the fader speed setting in SETUP → SERVICE does not affect scene recall timing. That setting only controls how quickly the physical faders respond to layer changes and other surface updates. Your snapshots and snippets will still load instantly regardless of this setting.
Auto-Loading Scenes at Startup
If you want a specific show, snapshot, or snippet to load automatically when you power on your WING, rename the file to start with “STARTUP” (for example, “STARTUP_christmas.show” or “STARTUP_baseline.snap”) and place it in a folder named “STARTUP” in the root directory of your internal storage or USB drive.
This is great for ensuring your console always boots into a known state, especially if you’re setting up for recurring services.
Putting It All Together: A Christmas Service Example
Here’s how I might structure a Christmas service using Behringer WING snapshots and snippets together:
- Snapshot: “Service Start” — Board fully configured with all channels muted, ready for doors to open
- Snippet: “Song 1” — Unmutes and sets fader positions for keys and lead vocal only
- Snippet: “Song 2” — Brings in the full band (drums, bass, guitars, additional vocals)
- Snippet: “Song 3” — Adjusts for a different arrangement
- Snippet: “Message” — Mutes band channels, brings up pastor mic
- Snapshot: “Band 2 Setup” — Complete board reconfiguration for the second band
The snapshots handle the major reconfigurations, while the snippets handle the song-to-song transitions where you’re only adjusting faders and mutes.
Quick Reference: WING Snapshots vs. Snippets
| Feature | Snapshots | Snippets |
| What it saves | Everything on the board | Only parameters you specify |
| Best for | Full stage changes, complete board resets | Song transitions, single channel changes |
| Scope control | Yes (controls what loads) | Built-in (only saves what you record) |
| Parameter count | All console parameters | You decide (could be 4 or 400) |
Want to see Behringer WING Snapshots in use?
If you are interested in seeing Snapshots and Snippets in use, check out my YouTube video!