
Welcome to my Behringer X32 FX Series tutorials. Today we are going to be exploring the Vintage Room Reverb on the Behringer X32.
Behringer Vintage Room
The Vintage Room Reverb is a time-based effect on the Behringer X32 that is modeled after the Quantec QRS. The Quantec QRS is titled a ‘digital room simulator’ and was originally released back in 1982 at the Montreux AES Convention. This reverb was popular and in volume production up until around 1990!
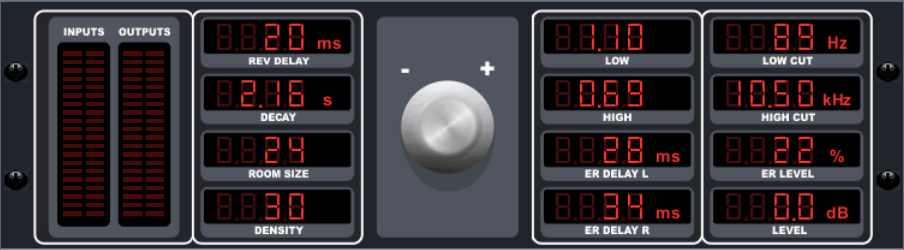
Vintage Room Layer 1

- Revrb Delay – The Reverb Delay is the same thing as pre-delay on other reverbs. It is the time between the original source and the reverberation effect starting. The Vintage Room offers us a pre-delay setting from 0ms up to 200ms in 2ms increments.
- Freeze – This button takes the incoming audio and will freeze it indefinitely in the reverb. This is an on or an off type control.
- Decay – Allows us to control the main reverb tail decay time. This is the decay time at 1kHz.The Vintage Room offers us a decay time setting from 0.1 seconds up to 20 seconds in a logarithmic type scale.
- Size – This controls the ‘Size’ of the room for the reverb generation. Control allows for adjustment from 2 to 100 in increments of 2.
- Density – The density adjustment gives us control of how much reflection content is generated in the ‘room’. Control allows for adjustment from 1 to 30 in increments of 1.
- ER Level – ER Level controls the level of early reflections of the reverb. Control allows for adjustment from 0% to 100% in 2% increments.
- Level – This allows us to control the overall gain of the effect. Control allows for adjustment from -12dB to +12dB in 0.5dB increments.
- FX Home – Pressing this button takes you back to the ‘home’ tab of the effects.
Vintage Room Layer 2

- Lo Multiply – This controls the Low-Frequency decay time at 300Hz. The red LED’s on the left side of the lever will show the multiplier. There are 4 available x0.5, x1.0, x1.5 and x2.0. The multiplier refers to a factor of the main decay time. The higher the factor, the more low-frequency content will be in the reverb tail.
- Hi Multiply – This controls the High-Frequency decay time at 6kHz. We have x0.25, x0.33, x0.5 and Max available for the multiplier. When the main decay time is set to 3 seconds, Max on the Hi Multiply is approximately x1.0. Just like the lo multiply, the higher the factor, the more high-frequency content will be in the reverb tail.
- Lo Cut – This offers us a high pass filter with a variable frequency from 10Hz to 500Hz
- Hi Cut – This offers us a low pass filter with the variable frequency from 10kHz to 20kHz.
- ER Left – ER Left controls the timing of the early reflections on the left side. The volume level of these reflections is controlled with the ER Level on Layer 1. Control allows for adjustment from 0ms up to 200ms in 2ms increments.
- ER Right – ER Right controls the timing of the early reflections on the right side. The volume level of these reflections is controlled with the ER Level on Layer 1. Control allows for adjustment from 0ms up to 200ms in 2ms increments.
- Level – This allows us to control the overall gain of the effect. Control allows for adjustment from -12dB to +12dB in 0.5dB increments.
- FX Home – Pressing this button takes you back to the ‘home’ tab of the effects.
What do I use the Vintage Room on?
The Vintage Room is a great reverb if you are looking for a darker voiced reverb that is great for vocals.
A room reverb is a very simple reverberation to explain, it is a room with walls! Think of the room you are in right now, it might be a Starbucks (or maybe that’s just me!). That Starbucks probably has a hard title wall on one side giving a nice reflection but all of the other walls are different shapes giving it a very interesting sound. Being that this is a smaller room, any reverberation wouldn’t last very long.
Next, think of a cathedral. You’re likely going to have hard walls in a very large room, possibly marble throughout the building and a tile floor. This is going to produce a very long reverberation time. If you clapped in the cathedral, you will be left with a reverberation of your clap that would take a few seconds to disappear.
Two Samples to Try!
Depending on how you set your Vintage Room Reverb, you can create some very different sounding rooms. Here are two to try out that are quite different.
Dark Room Reverb
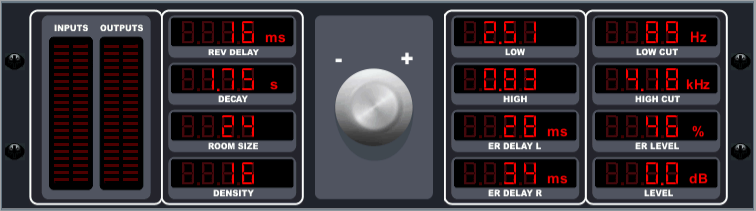
- Revrb Delay: 16ms
- Decay: 1.75s
- Size: 24
- Density 16
- ER Level: 46%
- Level: 0dB
- Lo Multiply: 2.51
- Hi Multiply: 0.83
- Lo Cut: 89 Hz
- Hi Cut: 4k1 Hz (4.1 kHz)
- ER Left: 28ms
- ER Right: 34ms
This will leave you with a longer reverb time with a very dark sound.
Small Bright Room
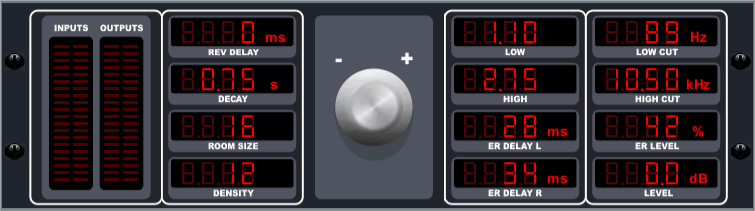
- Revrb Delay: 0ms
- Decay: 0.75s
- Size: 16
- Density 12
- ER Level: 42%
- Level: 0dB
- Lo Multiply: 1.10
- Hi Multiply: 2.75
- Lo Cut: 89 Hz
- Hi Cut: 10k4 Hz (10.4 kHz)
- ER Left: 28ms
- ER Right: 34ms
This will give the complete opposite of the dark verb that we had above!
Losing Clarity?
If you find you are losing clarity with your reverb, try any of the following:
- Raising the Reverb Delay (Pre-Delay)
- This provides more space for the original signal to reach the listeners ears before the reverb which will increase the clarity.
- Lowering the Decay
- This makes the reverb time less which may clean up how much reverb is happening in your mix.
- Raising the Lo Cut
- By raising the low cut, you can reduce clutter in the lower mid range. This area tends to be a space that gets muddy very easily.
- Lowering the Hi Cut
- Lowering the high cut will reduce the clarity of the reverberation which is probably fighting with the clarity of the main source.
If you are looking for more tutorials on the effects built into the Behringer X32 and Midas M32, make sure to check out the rest of my Behringer X32 FX Series tutorials!